
*checks watch*
8:15
Beachgoers aren’t staking claims with their blankets and umbrellas.
Tourists aren’t walking next to the waves, looking for shells, or looking inland for insight.
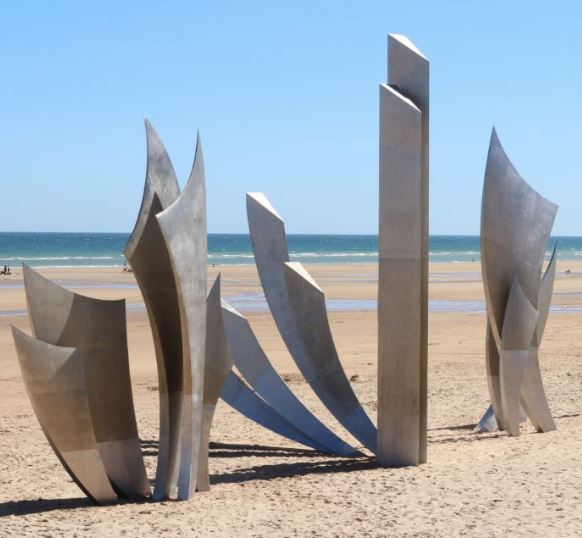
“Les Braves” memorial isn’t built yet.
But a few hundred men are still staring down the barrels of panicked German soldiers who never thought this day would happen.
But it has, and history is on the brink of disaster. If a beachhead isn’t made today, it may never be made and Fortress Europa will remain a Fortress. Fascism will reign supreme over millions of Europeans and the world will be a much darker place.
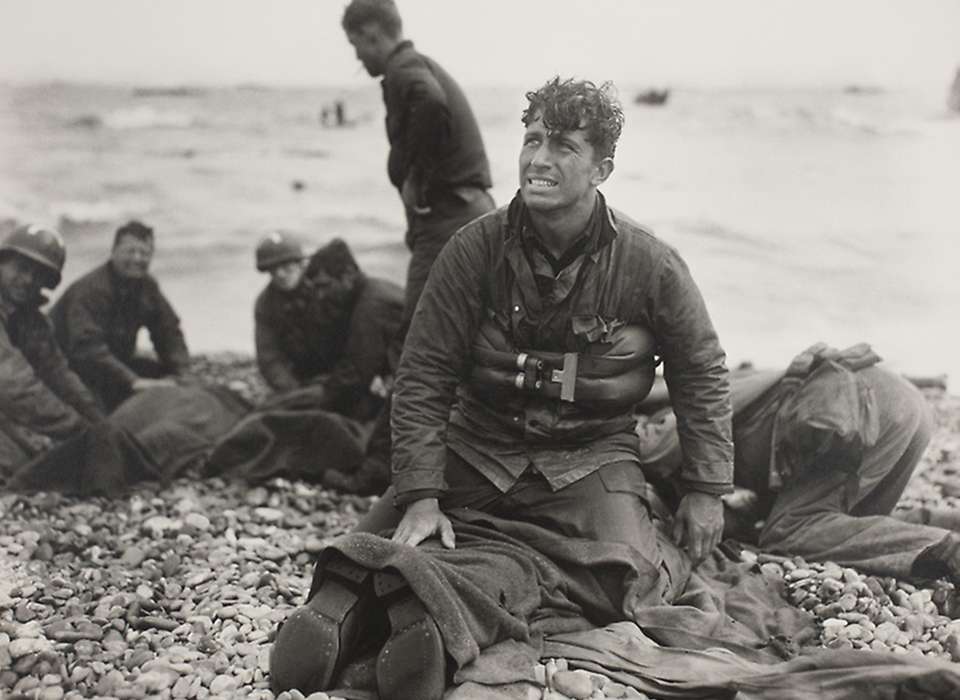
So we press on. Up the Shingle. Over the Bluffs. Into the Bunkers. Right up to those barrels, doing everything we can to quiet them. Maybe not for ourselves, we’ve lost too much blood for that, but for the men behind us. They can make things right.
I know I’m just playing a game here, but sometimes I like to recenter myself and remember: this ACTUALLY HAPPENED. Even though I’m just pushing chits around, when I’m told to “lose a step,” 4-6 people won’t be returning home today. To some, that’s a statistic. To those people’s family, it’s more than that. You should occasionally take a moment to reflect on that. The strangest thing the human mind can do is be surrounded by people getting older, by people getting sick, by people dying and thinking “this will never happen to me.”
But anyway, games.
(Did anyone even read this far?)
We’ve got more Artillery hitting the shore. We haven’t been able to get to use them much…or at all really. The main reason being they can only assist in an attack when they are under command of a General/HQ who is also commanding the unit that is doing the attack. That is very difficult to do in the chaos of a beach landing. However once HQ is able to set up and their command sphere is opened up to more than just their adjacent hexes, it becomes much more possible to rain hell down on the enemy.
But we need to have our ocean landings first to start the water cycle that ends in rain.
Wooo, that’s stretching the metaphor, ain’t it?
Oof, both Canadian units were destroyed completely in the waters. The others took hits as well. Not a good pull on my part.
And then the event:
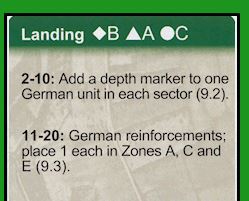
To EACH sector? Ooof. Sector = Beach Side, so East and West. So that’s two Depth Markers, one on each side. Phooey.
On the East beach, there’s only one unit who has US units right next that is missing a Depth marker to it….that wily Yellow bunker. Dag nabbit. West beach is in a similar situation. Everything already has a Depth marker that has units right next to it…except the Yellow Bunker, so there we go. Luckily they’re still both Disrupted…but still, that’ll prevent me from Eliminating them another turn.
Dag nabbit.
As I feared, Blue and Red were able to inflict casualties, and the new Brown reinforcement opened fire. Luckily it didn’t draw the right symbol to take out G/2/16, but that’s a bit close for comfort.
Sadly that shot to H/2/116 bring our casualty count to ‘5’ of ‘8’. I need to take these bunkers out and fast. I got lucky that the other two draws were misses.
I’m able to get two more hexes cleared on the East Beach, but it’s amazing that Brown and Red cover the entire beach, save what I’ve already cleared over on West Beach. The Engineers are getting restless.
And ho-lee-crap y’all. I did a dumb. Does anyone remember I/3/16? No, of course not, because those poor bastards have been stuck against a sheer cliff all game.
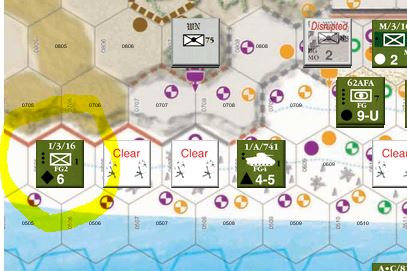
I was flipping through the rules for something else, and noticed that Sheer Cliffside is not a “protective hexside” for a “self preservation move,” so I could move it over as a free action. Once it hit the hexes with the scalable cliffs, then it would stop, because I could have it climb up as an Action, buuuuuuut, it’s better than just sitting there.
Good thing High Tide doesn’t start ’till Turn 16, huh?
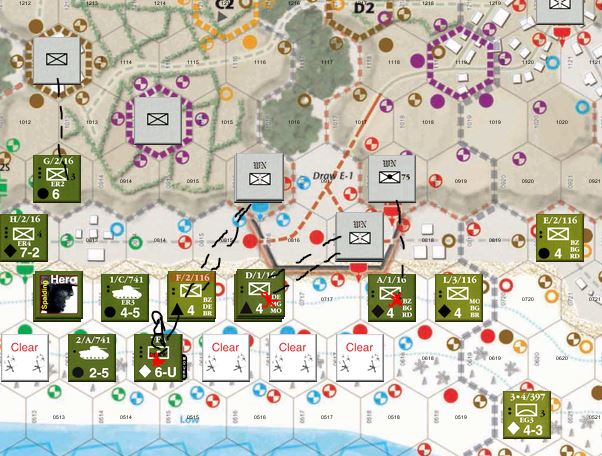
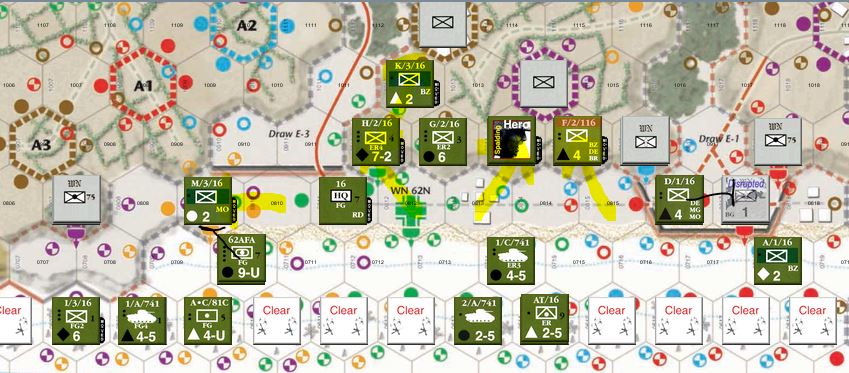
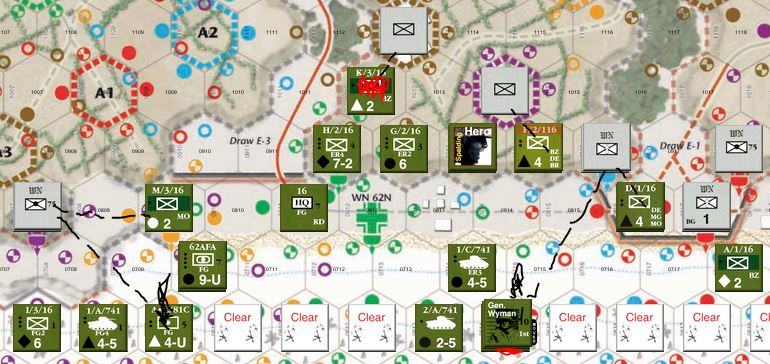
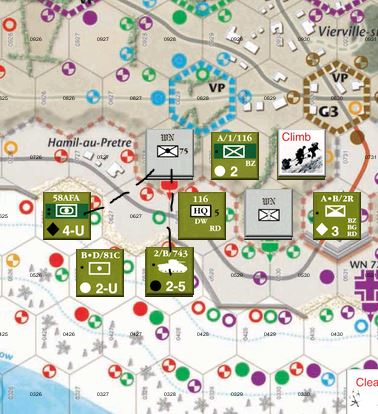
We continue to make our move up the middle, while the West Flank bravely tries to encircle the Red Bunker. I’m hoping the F/2/116 stack can flank the Blue bunker while our hero takes on the Purple reinforcements up there. I didn’t move the HQ yet so I can take out the Yellow bunker without an action, and then move HQ up so we can get those Rangers topside without Actions. I believe I’ll get a General in a turn or two which will make the West Flank a bit easier to handle. If I don’t draw a Red on the German firing card next turn, I’ll be a happy man.
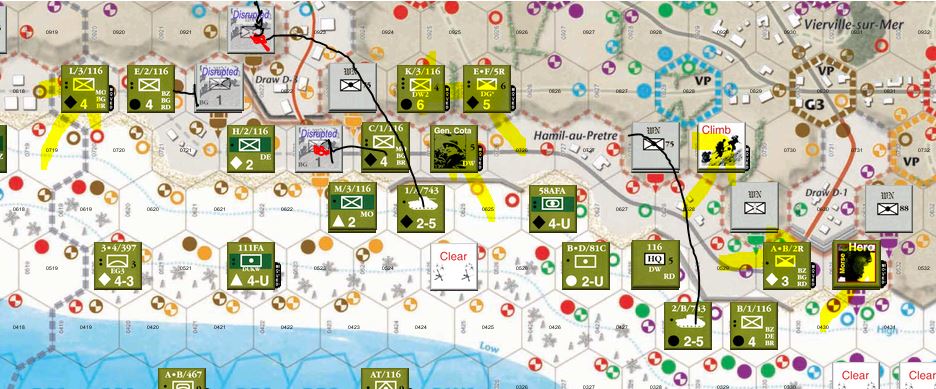
More big moves over on the West Side. Using some of the free actions given by HQ and General to take some Barrage Actions. The Eastern tank is able to knock out the Brown Bunker, the other was not as lucky. I’ve got two full strength units up top now, charging over to the Yellow Bunker, while the lower Yellow bunker is hit and has its Depth Marker removed. The lower Brown Bunker is hit, but doesn’t have its Depth marker removed as I didn’t have the right weaponry (needed AR), but luckily it was only a 1, so I was still able to Disrupt it. Seems I don’t have anyone nearby that will be able to do it, so I’ll have to use Attrition to actually get rid of it, won’t I? Drat. Think I’ll do a flank attack and lose H/2/116 since that already counts as a casualty in my numbers.
And you get to see my first “Climb” action as A/1/116 is scaling the Bluffs there. Next turn as a free action, all it will be able to do is remove the Climb marker. Better than nothing, and here’s hoping they’ll be able to attack a bunker and do something. They’re VERY weak, but I’m hoping to park them in that blue zone to prevent any Reinforcements showing up there.
Things are heating up!
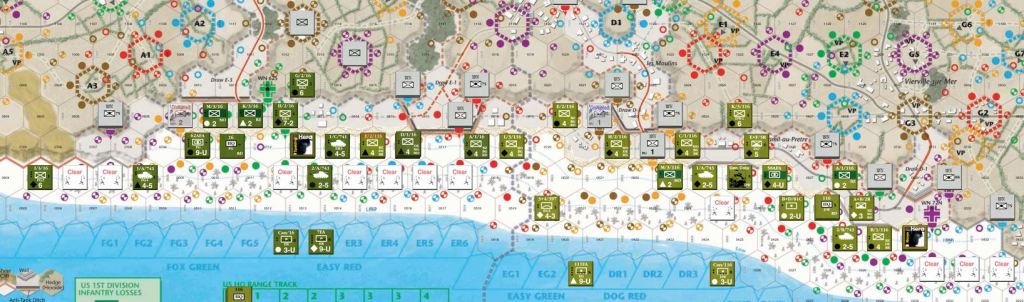
So as the clock ticks forward we land some more units, cluttering up the board more (funny to think all of these green pieces are on a row of beach that is no more than 3 hexes deep, huh?).
No damage this time from the surf, but quite a few units are delayed for 45 minutes so only 4 units total end up touching sand. I suppose that’s better than taking damage.
So the next wave to land is only one unit….and that unit is…
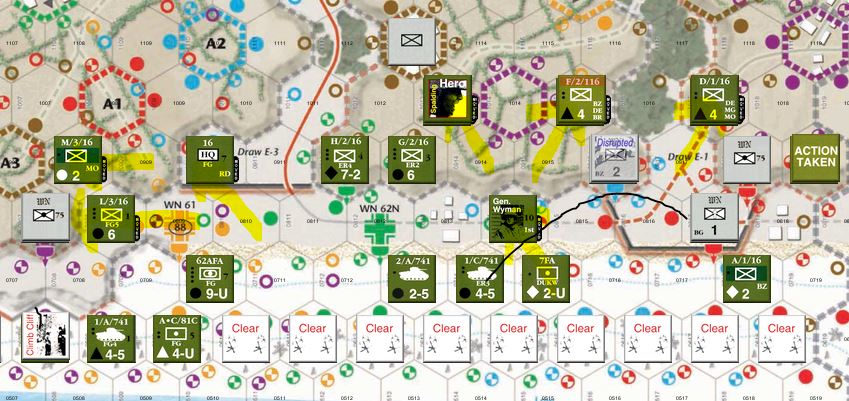
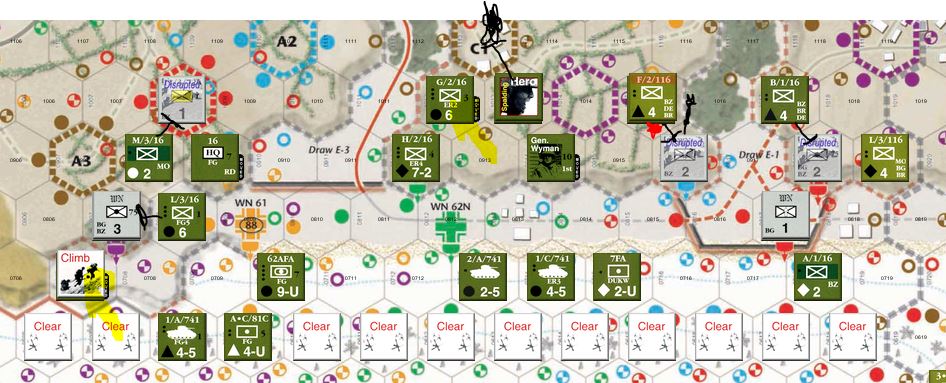
Okay, calling him a unit is just rude. It’s General Wyman, the General for East Beach. He, along with General Cota on the West Beach are the two Generals I have at my command to use throughout this game. I can place him in any of the landing boxes, so this is kind of important. He’ll give free actions to any units adjacent to him. I could put him right in the middle to give the units charging ahead the means to keep charging ahead. I could put him on the Eastern flank to let that side finish off the Yellow bunker and ultimately take the Purple bunker, making the capture of the draw that much easier, or going to the Western flank and helping the poor men trying to take the Red and Blue bunkers, which are really tough to get to, up high on those bluffs there.
I think the Eastern flank can do okay with the HQ there so I’ll put him on the Western flank, but injogged a little so his sphere of influence may touch anyone drifting over, giving maximum help to take the Blue Bunker, and that Purple reinforcement hex right behind it. Our Hero Spaulding is back there also, so I think between the two of them, that should clear that middle. I’ll have to use my Actions to work on the Red Bunker which, I’ll be honest, has been a pain in the arse every time I’ve played this game.
I just realized I used the term “injogged,” which I’ve only known from when I studied card magic back when I was a performer. I can’t find a picture, but it’s basically when you push a card in a fan or in a deck slightly toward you so it sticks out a little bit so it can easily be found with the thumb. In the reference above, I’m using it to say the General’s sphere of influence will be sticking out a little bit to be used by units near the center.
Again, I’m mixing my metaphors.
Aaaannnyyyway. I need to survive this turn first.
We have more smoke obscuring the beach! This time it’s WN 64 and 65.
*does happy dance*
Want to see which ones are 64 and 65?
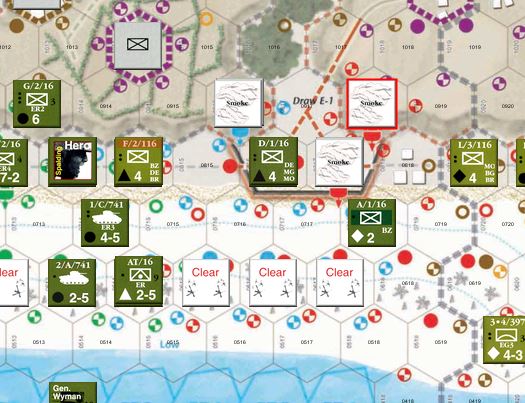
That was lucky….very very lucky.
But will the luck hold out as we enter another German Fire Phase?
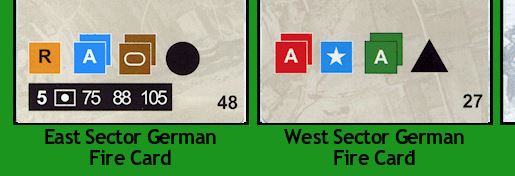
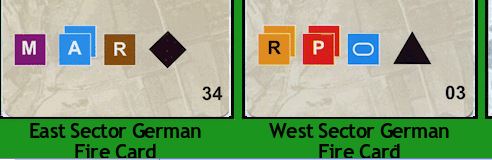
I haven’t shown what the cards look like in a while, so this is what I drew. And you see we have an Artillery draw, which now that I think about it, I haven’t drawn for a LONG time, if at all since Artillery has been active. Wow. Anyway, let’s do this.
The East Section isn’t worth a picture…..All that happens is Yellow “Ding’s”. Blue is Obscured by smoke, and Brown doesn’t have a Depth marker so doesn’t fire. And the Artillery will only fire if there are 5 total artillery chits in play….which is all of them. And guess what…the Green Bunker is one of them. Which I’ve eliminated. Therefore the Artillery doesn’t fire. Nice.
The West Sector is a different story, however.
On the plus side, only one step is removed from C*D/467, every other shot is a miss (and there aren’t any units in Blue’s field of fire).
And hey, this also means my Engineers are able to clear 2 hexes on each beach! High Tide looks less dangerous all of a sudden. Ain’t that nice!
So I continue to head up into the fields of Normandy, and the Yellow bunker is no more, however I hit a bit of a snag with the Red Bunker. While it only has a Strength of 1, it requires BG, which none of the units surrounding it has. That means I can only Disrupt it, never Eliminate it. The closest unit that does have a Bangalore Torpedo is two hexes to the West that I have planned to help on that Beach (and is under the command of the West) soooo….I’m not sure what to do now. Even the units on top of the Bluff who is trying to take down the Blue Bunker wont be able to hop down and save the day as those two units don’t have BG either! Hrmph. Okay, have to do some thinking here. But on to the West Beach.
So we have another successful tank Barrage (I didn’t draw the smoke!) and our hero is scaling the Bluffs to finish the Bunker off….maybe. I was able to take out the lower Yellow bunker, while up top the Depth marker was taken out by a joint attack by the Tank and Infantry. I used both Actions to do a joint attack on the lower Brown Bunker. Since the Depth marker was already revealed, I was able to do a “Disrupted with Optional Attrition” result, which meant I could remove a step from one attacker to remove the Depth Marker, even though I didn’t have the proper weapons on the chit. Since the unit was so devastated it was already considered a casualty, I removed H/2/116 like I said I’d do last turn. This will let me Eliminate it using only E/2/116 as long as a new Depth marker doesn’t appear in the interim.
As we hit 8:45, our Landing Checks aren’t eventful, because the ONLY unit hitting the beach is General Wyman, and he is not affected by the tides.
Which I’m sure he reminds people all the time. Egomaniac.
(And I just did that for laughs, you historians out there, please don’t start messaging me about how humble he was or anything like that.)
ANYWAY.
We won’t be seeing any new units until turn 13, either, so we’ve got to work with what we have right now. Which is a little frightening, to be honest. You kind of rely on the steady wave of units to keep backing up the other units, but when that wave is over? Can that pressure remain?
Oh.
Oh crap.
This is going to be a deadly turn. Yes, it’s turn 11. Were it turn 10, the Germans would merely gain a Depth marker. And while that’s annoying, it’s not nearly as bad as what might transpire here. Hoo boy.
I guess the Germans saw the break in the wave of Allies and see that this is their only hope to drive them back into the waters, and desperation strikes, so all the bunkers alight in a wave of death.
*sigh*
I apologize for the inconsistency where sometimes these pictures are taken before I change the status of the chits and sometimes it’s taken after.
So some of my artillery is damaged if they were in the kill zone, and luckily the Blue drawing didn’t have a star symbol on it, because if it did, our General would have been flipped to the Wounded side. Not a great way to enter combat. Biggest hit was K/3/16 there at the Southern most hex getting wiped out. Hrmph.
For the first time, I can say West Beach had better luck. Yellow only fired if it had two chits (double bunker or a depth marker) and it’s a single chit bunker at the moment, so no fire there, and the Blue Bunker fired, but there’s nothing in it’s field of fire, so nothing there. Only Red fired, blowing up some Artillery, which is sad, but hey, with everything else that could happen, I’ll take it.
For the Engineers, they could totally clean up East Beach if we can get Purple out of the picture. West Beach is still a mess. And no hexes can be cleared this turn.
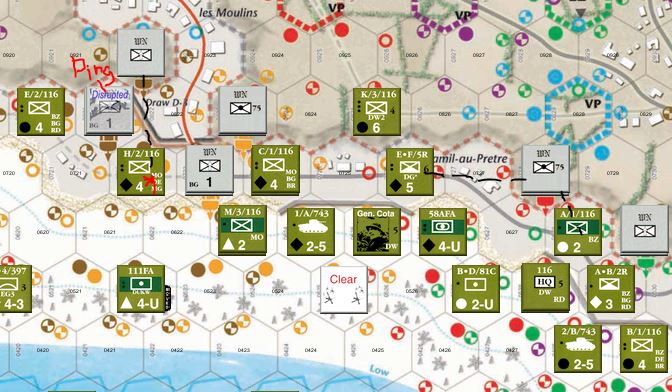
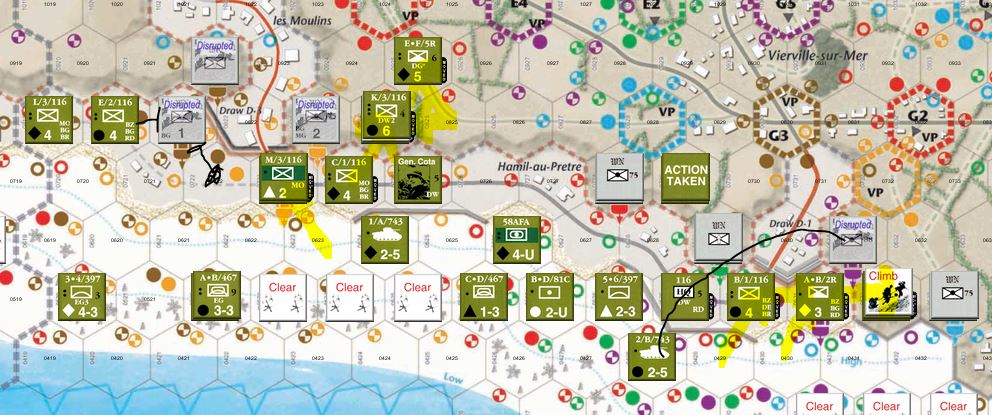
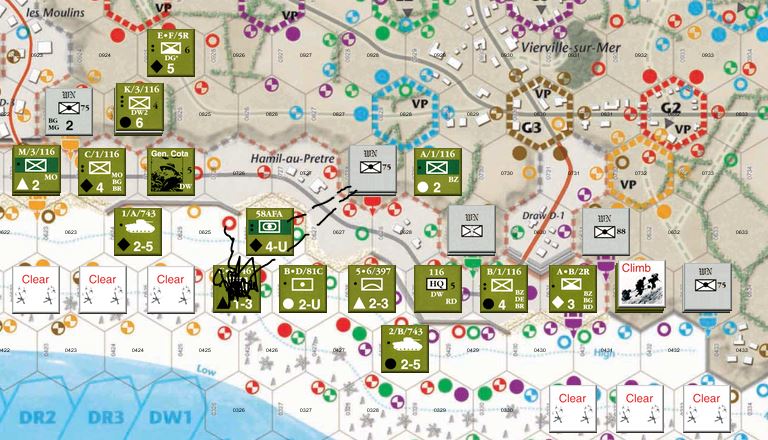
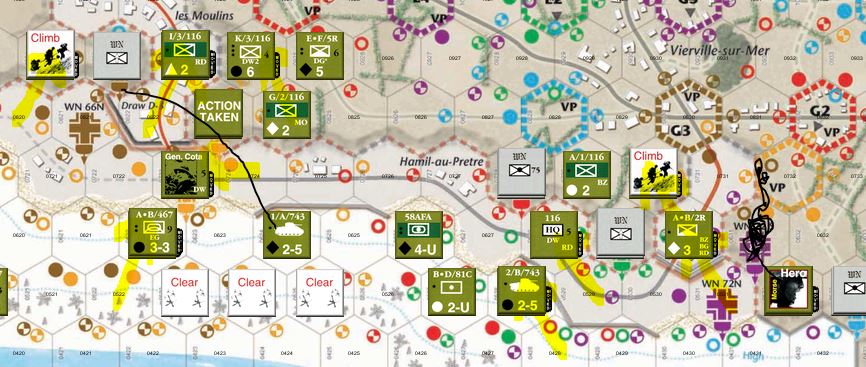
With the arrival of the General I split into two groups, sending L/3/16 and the HQ to take out the Purple Bunker, while the General leads the rest to clean out the Western half. Spalding’s men successfully take out the Purple reinforcements, I’m lucky because they needed “FL” which is flanking, meaning they needed to be attacked from to different units that weren’t adjacent to each other, but the Hero counts as one weapon, and he counted as FL for this case. F/2/116 and F/2/16 attacked the Blue Bunker, 2-BZ was no problem, but the Depth marker required “NA,” which is Naval Artillery. Riiiiight. You only get that with an event card. So I can defeat that with “Optional Attrition” or with a Hero. I didn’t want to use Optional Attrition, so I’m going to have the F/2 duo head South while Spalding heads West to deal with that Bunker.
Since the Red Bunker is proving a pain, I had D/1/6 also head south so it wasn’t staring at that full dot and have them go up the bluff to help attack the Bunker up top. You can attack DOWN a bluff without penalty, so that could be fun, though it still doesn’t help against the lack of BG.
The Eastern side of West Beach is a flurry of Activity under Gen Cota, but I’m having trouble on the other side as the HQ only has unarmored Artillery nearby, and they can’t do anything if they are in the field of fire of undisrupted Germans. Morse is topside now, though, so here’s hoping he’s able to get Purple out of the way and allow those two units to move more freely and get them up that draw. You can also see on the left side of the picture the unit climbing the bluff ready to help East Beach with the BG problem. Though now that I’m looking at it, why did I have them climb? The BG is the lower bunker!
Um…..radio static must have gotten to them. Yeah, that’s it.
Anyway, the beginning of the 9:00 turn (Turn 12) is uneventful as there are no units hitting the beach. There are no units lining up for next turn either. Little scary.
We get a slightly different Event this time, though “Place a German Reinforcement in Zone E.” In Zone E, there’s one hex within 2 spaces of a US unit, so here we go:
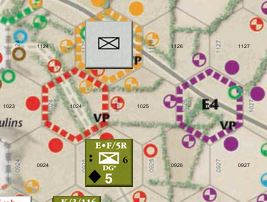
Those 2 “E” spaces are equidistant from E-F/5R, but the Yellow hex is E1, a lower number, so it takes precedence. Luckily that doesn’t put that Ranger unit immediately in its field of fire, but does keep me from snagging that VP right away. Hrmph.
And…..
Guess what….
NO UNITS WERE HARMED DURING THE GERMAN FIRE PHASE!
Yellow Red and Green were drawn for East. Yellow is gone. Green is gone. Red fired on two Triangle Units, but needed Diamond to wound. West drew Yellow, Red and Brown. Yellow is gone. Red fired on Diamond and Circle but needed Triangle. Brown needed a Depth marker to fire, but is missing it.
Huzzah!
*rejoicing gif*
Still can’t do anything on my Engineering Phase, however, as these bunkers still have a field of fire over the beach, so the Engineers know better than to stick their heads out there. But still, I call that a good turn.
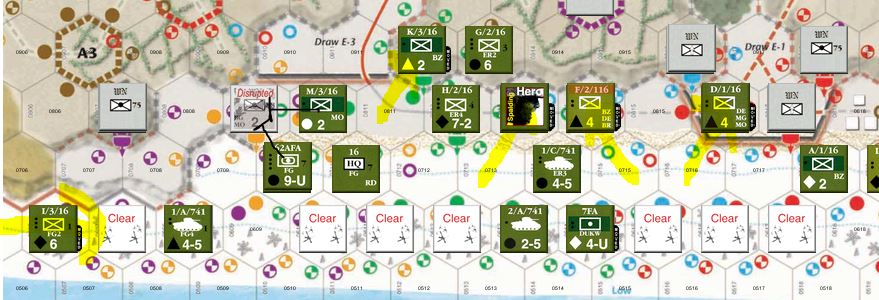
No attacks made on the East Beach except for a failed Barrage (though had I been going for the top Bunker without the Depth marker, I would have been able to disrupt it. Just a lot of movement to clean up the rest of the bunkers. You’ll notice I can’t move any of the Artillery/tanks over the Shingle. That’s because I don’t have any Engineer units on the beach yet to flatten the land enough to let them hop over, so they have to wait on the edge. You also see the Climb Cliff marker over there. It’s like the other Climb marker you saw, but since it’s a bigger border it’s crossing, next turn it’ll actually move into the hex it was moving into (as a free action) and flip the Climb Cliff marker to a basic Climb marker, and then the NEXT turn remove it for free. Then it’ll be able to do stuff. It’s slow going but it only costs one Action to get it started and I wanted it off the beach before High Tide came in.
Similar experience on West Beach as most units were setting themselves up for further attacks. Though Purple Bunker was taken out by Morse and his gang. I also chose to use an action to bring more Artillery off of the beach and get them closer to the action and away from possible High Tide problems in the future.
9:15 and all is?
Well?
Again nothing lands in this quarter hour, but at least I get to set up a few Artillery units to land next turn. These were the Units that were “Delayed 3 turns” back in turn 10.
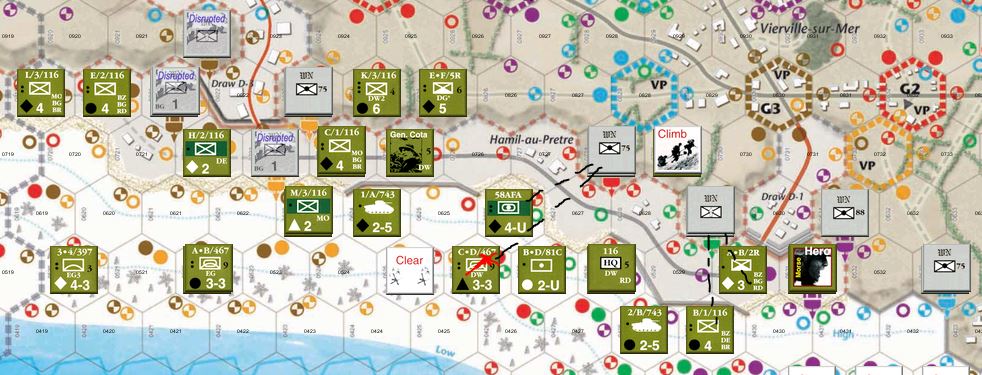
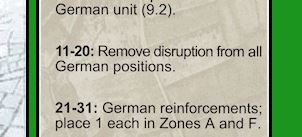
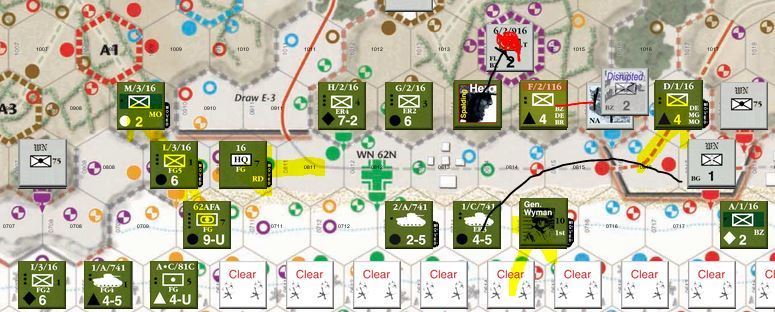
Oof. Our Event has us placing German Reinforcements in Zone A, D and F. Looks like the call for help is getting heard and they are mobilizing. Inland Normandy just got a bit more interesting.
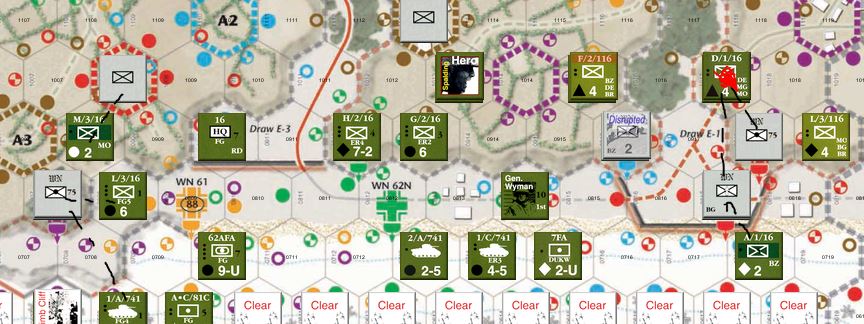
One of those new Reinforcements got to fire right away, but luckily had the wrong symbol. Unfortunately the Red Bunker fired and completely wiped out D/1/16 brining our casualty count to 5 on East Beach, tied with West Beach. Oh, and it looks like there’s a small error with the picture, the third firing line for Red Bunker should be pointed at L/3/116 because it has more steps than A/1/16. Doesn’t matter, though, since neither would be wounded by the shots as only Triangles would get damage.
Another good draw here as that’s the only bunker that fires, and it doesn’t wound anything.
Engineers are still unable to do anything as nothing much changed last turn, so we hop right to the US Action Phase.
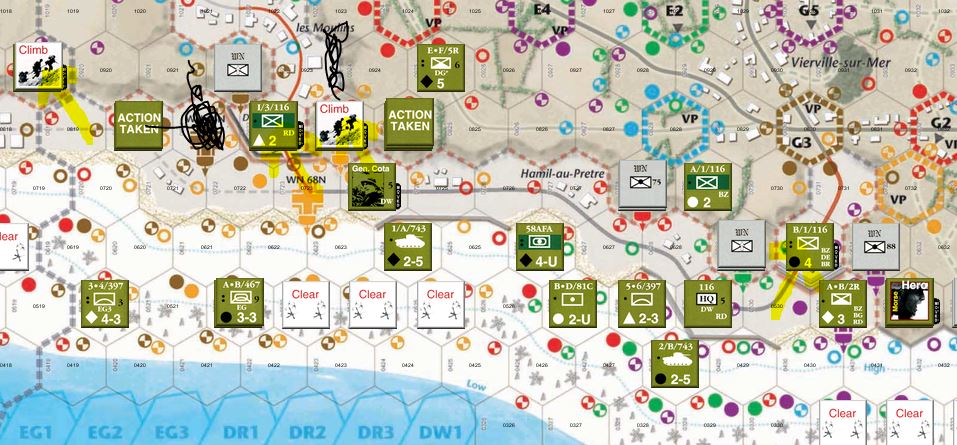
Hoo boy, hit some snags here. First, the Purple Bunker had a Strength of 3, so L/3/16 running up the Bluff there bounced off since it was effectively going against a Strength 6 Bunker. It’ll need to either spend a turn going up the bluff behind it and attack it on even ground, or get help from M/3/16. Speaking of them, they poked the Red Reinforcements who need Bazookas to be taken out, but luckily were only Strength 1 so were Disrupted. I decided to use the Optional Attrition to have F/2/16 lose a Step and have the Depth Marker removed from the Blue Bunker because I needed SOMETHING destroyed because the Red Bunker required BG and BZ, which B/1/16 did not have together. Neither did L/3/116, so it will only be destroyed by a joint attack. Dangit. That Red Bunker is a pain in the arse.
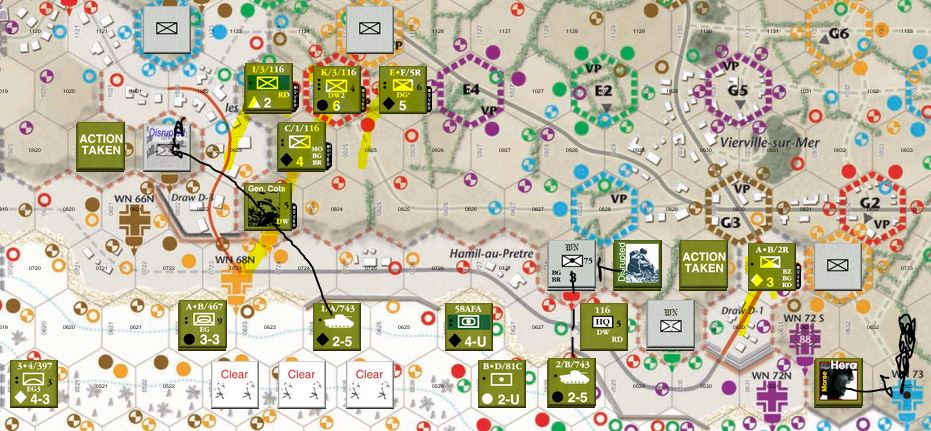
West Beach was a bit more successful. Gen Cota has his units racing up the center, hoping to do a sweep around Draw D-3 to take out the WN on the southern tip of that objective. Morse blows up the Blue Bunker after it pulls up a Reinforcement token as its Depth Marker (you can see it there in the Yellow hex right above him). The only difficult spot was the 3 strength chit on the Red Bunker causing even the joint attack between A/1/116 and the tank 2/B/743 to fail pretty spectacularly, causing the Infantry to become Disrupted. That means next turn they’ll do nothing but remove their Disrupted token, which means they won’t be able to help in the attack against the Green Bunker. I was hoping 4 Strength would have been enough to at least look and see what Red was showing…but NOPE. What is it with Red Bunkers? JEEZ.
Thus ends Turn 13, we now enter the Penultimate turn of the first part of the game or “The First Wave.” You could play this as its own game. In fact I have, several times. I’ll keep going for the full experience, of course, but victory is hanging by a wire.
What is Victory? Why, Victory Points! What game is complete without Victory Points!
Well, lot’s of them, of course.
But this one has VP.
You earn VP by controlling WN positions, controlling German Reinforcement positions and a ton of points for Controlling Draws. Of course, to control a draw you need to Control every single hex in that draw.
Control is defined as being in a hex with a US unit or adjacent to one AND you can trace a line all the way back to the beach that doesn’t cross a German field of fire and/or a bluff/cliff. There are a few stipulations (Units down to one step and Artillery without armor don’t have control of adjacent spaces) but that’s the basics. So getting a Draw is a big freaking deal for VP.
But let’s just survive the next two turns, yeah?

Pingback: Generally Specific | Very Wordy