Turn Six begins as they all do. Soggy boots hitting sand. The sand doesn’t look so good at this point. It’s less rock eroded down to tiny bits of silica, and more blood mixed with shrapnel, salt and sweat. An hour and a half of steady machine gun and mortar fire will do that to a beach. Just look at New Jersey.
HAY-YO!
Anyway.
East Beach’s artillery is Delayed for three turns, so no new units there. West Beach only loses a bit on their Artillery, but is otherwise unscathed, and we get this:
That is a General, a HQ and the aforementioned Artillery all stacked in one hex. Those units will both be able to move for free AND command units adjacent to them, meaning THOSE units will be able to move for free. That also means they’ll be able to coordinate ranged attacks, letting tanks attack with infantry units, adding Strength and weapons together for larger attacks, increasing likelihood of taking out those bunkers. All these things are good things. Duh.
So on to the event where….West Beach now gets a hero! And grumbleadepthmarkerisaddedgrumble. And yes, you guessed it. That depth marker we removed last turn? It’s back, baby!
And now, the meat grinder begins anew:
Again, West Beach takes a bigger pounding, officially bringing the lost Unit count to 4. Here’s hoping the addition of the HQ and General can turn the tide over there.
East Beach Engineers are able to clear one hex right in the center. West beach is finally able to clear two hexes waaayyy to the West.
So now for my Actions. On the East Beach, I move my tank out of the Low Tide area, hoping to sneak up on that Yellow bunker to finally put it out of its misery, so I can get those units up and take out the Purple bunker (that’s off camera on the first picture there). I also use my hero free action to attack the Green bunker there again. This makes me reveal the Depth marker, which shows a 1-AR-DE. Well now, the Strength is no problem, but Infantry doesn’t have AR(tillery). However, the hero can count as a “wild” trait, so thankfully we can still count as having all the weapons required for the attack. Had this been a standard attack, I would not have been so lucky and I’d have to burn an action next turn to have the Tank provide support.
I then use my second action to move G/2/16 up over the Shingle to flank the bunker and eventually get topside and take out the second bunker on the hill. That way I can have F/2/116 and F/2/16 (both sharing the same hex beside it) concentrate on dashing up and taking out the Blue bunker. Not sure what I’m going to do about the Red bunker, to be honest. And now that I’m looking at it, I think I’ve been forgetting to move L/3/116 during the West Beach’s movement. It should have been doing free Self Preservation movement actions.
Yes, now that I looked back, it should have moved twice. And since every hex counts, I’m going to do just that.
*waves hands in air*
I’m still going to allow it to be shot and everything, but it’s now up against the Shingle. And it won’t be moving this turn. There.
So on the West Bank, the troops are still scrambling to the Shingle, but I also have a General and HQ helping them along now. They let me move a Tank closer as a free action, so I’m able to use my two actions to get my flanking unit over to the Brown Bunker and then Attack the Yellow bunker with a weakened unit, but use a Tank to support the attack. I moved the General over so you can see him and the HQ side by side in this picture. They’re occupying the same Hex, though. I put them in a bad spot where they’ll have to go up together for a bit before they split up. That was silly on my part.
Unfortunately the BG on the WN chit does not match any of the letters on H/2/116, and the Tank only provides AR, so we don’t have the proper weapons. That means we can’t reveal the depth marker. However, we have a Strength of 6 versus their Strength of 2, so we still Disrupt their position, so that’s something. Unfortunately, that’s all that happens, however. But hey, that’s two less hits I might have to take next turn.
The clock ticks to 7:45.
We’re at Mid Tide now, that means our landings place our units on the second hex now. It also means that everything that didn’t make it up to the second hex by now is washed away, so a few of our tanks and units are washed away. Sorry!
It also means that when I pull a mine illustration when landing, things can blow up if that part of the beach isn’t clear. And considering how little of these beaches aren’t clear, that’s dangerous.
Awesome.
But hey, it also means that I get a little closer to the Shingle right off the bat, so let’s look at it as a blessing, shall we?
I also get to add a HQ and some huge Artillery to the East Beach, which should be able to win me some more points over there.
The event, however, isn’t great. It just has me add a Depth Marker. Nothing else. Looks like that Green bunker will get it’s Depth Marker back. Again.
And then the hail of bullets:
East Beach takes a pretty big hit here, which makes sense as there are a lot of targets and, let’s face it, they were due.
West Beach doesn’t fare much better. Our unit that was flanking the Brown bunker gets hit unfortunately, and the three units of Rangers that was coming up the West side are completely mowed down, only one Step of one unit surviving the onslaught.
Our Engineers are able to Clear some mines out of the far East of the Beach. Strangely the West Beach only had one hex right smack dab in the middle of the beach I could touch. Better than nothing!
My battle for Draw E-3 continues. I continue my assault on the Green bunker. Rather than flanking it, I move the full strength unit up onto the greenery of Normandy, making it the first non-German boots to hit Europe for the Allies!
I also send M/3/16 in to flank the Yellow bunker, to flank that and remove it’s double defense bonus. I only hope Green doesn’t shoot it in the back. My hero attacks the lower Green bunker again, revealing a 2 Strength Depth marker with AR and RD requirements. The unit covers RD, and the Hero provides AR, so I’m able to remove the marker and Disrupt the bunker yet again.
West beach is getting a bit more active this turn:
Our Hero on the West Shingle attacked the lower Purple bunker and destroyed the Depth Marker and Disrupted it. K/3/116 dashed forward, hoping to run up the slope there and take the high ground, finally our tank in the middle Barraged the higher Yellow bunker and drew a lucky Yellow + diamond to Disrupt it. That was a lucky shot in the dark because hey, it was a free action due to being beside the General, so why not? And wouldn’t you know it? Score!
Then as my two actions, I had E/2/116 charge at the Brown bunker and reveal a 1 BG, no problem, and then a 1 DE…small problem. That gives me the option of “Disrupt with possible Attrition,” meaning I could kill the Depth Marker….if I choose to remove a step from my unit. I’ve already lost 4 units on my side, halfway to game over, so instead I chose to use my second action and have H/2/116 run up the Shingle and help them along (notice the DE on their chit). Unfortunately if I draw Brown on the next card, they could get shot to all hell and ruin that plan….but I’m holding out for a miracle.
But hey, it’s 8am. My work shift just started, and a bunch of these guys have been fighting for hours.
We’ve got some more Artillery landing, as well as a HQ on the East beach. Only a little damage taken, so nothing bad there.
Well that’s fun! I think Yellow can count on it’s last breath this turn.
And then….the pain.
Of course, I didn’t pull either of the colors covered with smoke, so no help there. And the Yellow bunker immediately untaps (yeah, I’m saying untaps. Why not?) The West Beach decided to focus on one hex which…is interesting. Basically crippled that Artillery. Weird. Another thing it did was make my Engineer Phase completely pointless.
So now comes the attack! The HQ allows East Beach to surge forward, finally taking out the lower Green bunker, as well as removing the Depth marker on the Yellow bunker (though still not getting rid of it completely). The attack on the upper bunker reveals Tactical Reinforcements…..which I played incorrectly originally.
When you reveal that, the original unit is defeated!
THE GREEN BUNKER IS NO MORE!
*confetti gif*
Mind you, the Blue and Red can still do considerable damage, and that reinforcement put a target on G/2/16 which took the bunker down….but still, much rejoicing.
The West Bank is also pushing up the middle, but having combat successes on the flanks, with Morse Eliminating the lower Purple bunker, and the joint attack of E/2/116 and H/2/116 taking the Depth marker away from the lower Brown bunker. A lot of pain can still come down from Yellow, Red, and Green next turn, but Yellow should be feeling the pain soon, but Red and Green are up on some high bluffs (that Red Dotted Line) so getting there will take some time.
Didn’t look like I’d ever get any success, did it? But it can happen!
Will I ever get a foothold and make it into the hedgerows?
I’m trying to think of a witty way to start this, but I’ve got a lot of game to go over, so let’s just dive in, shall we?
We’re on turn 3 now. We’ve so far made a little headway on East beach, while not getting much of anywhere in the West.
Still a lot of map I haven’t even touched yet. But we’ve got to get more units down, so we get to the Amphibious Operations Phase (if nothing else, it’s gotten me to spell Amphibious correctly every time) and try to land the two tanks that had trouble on turn 1.
Two cards are drawn, and both symbols end up with “No Effect” which is very lucky, so they land right where they’re supposed to. I like where this is going. Then I draw the event card:
I no longer like where this is going.
Oh well. Nothing to it but to do it.
So now the Germans open fire. We start in the East where Purple starts shooting….but they don’t. They were Disrupted last turn, so nothing happens but they remove their Disrupted token. Then Blue will fire but needs a depth marker in order to fire, and lucky for me, it only has one token total, so they do NOT fire. Finally Brown fires. East doesn’t have any Brown bunkers (yet). So. Um. No damage this turn!
I’m tending not to show the West much, so here’s the West:
So Yellow will fire. With three hexes (the two bunkers and the one depth marker under the one in front), it can hit 3 targets. There are 4 units under the field of fire for Yellow so it will target: The one in the Priority 1 hex, then the one closer to it, then (since the other two are tied for distance) 1/C/743 because it has more Steps.
Since G/2/116 is in a Stead fire space, it just loses a step no matter what the symbol is. The tanks would lose a step for matching symbols, but they are armored. So I luck out there. So only one hit. Now we move on to Red.
Red also has 4 targets, but can only hit 2. It’ll hit A/1/116 for being in a Steady Fire space, and 1/c/743 and C/2R are both next, and equidistant AND the same number of steps…which means I get to choose! I choose the armored one! So again, only one hit to the poor infantry who is knocked down to one measly step.
Which is a shame because now Green will fire, who targets C/2R and…..A/1/116. But lucky for me, they don’t share a symbol with the card, so don’t lose their last step. C/2R however is down to one step themselves.
Now my Engineers can get to work. I’m going to have them widen the zone on the East Beach, to make the center of the Beach a bit safer. The firing on West Beach unfortunately means only a singe hex is able to be worked on…see that one waaaayyyy over there with a purple, blue and brown circle on it? Well that one’s clear now. Yay?
Now for some ACTION. The Infantry runs to the Shingle, ducking their heads and thanking their lucky stars. I move a tank up to a safer space, hoping the Disruption from earlier can buy me some time. I also have one of my infantry start climbing a cliff to sneak around to attack a bunker from the flank and take it out. It’ll take a few turns, but be totally worth it in the end.
Except oops, I forgot I can only take one action this turn. I guess I’ll have to wait on that cliff climb. Dangit!
Over on the unlucky West side.
(West siiiiide!)
I decide to use my one action to take a pot shot at the Red bunker because I NEED something Disrupted to make any kind of headway here. Luckily I drew a Red and Disrupted it.
And thus Turn 4.
Not much new this turn, but we’ll have some anti-aircraft battery touching down, while they are brittle, they can certainly come in handy as support for infantry. Yes, I guess we can point them down. Woof.
Speaking of brittle, my Amphibious (spelling!) Landing check caused two of them to be delayed for 3 turns, so they have to wait for a higher tide to come in. Everything else landed okay, though. Already the beach is starting to look quite busy:
Get ready for the Analysis Paralysis to kick in! But first, the event.
Well F#$% you too. So, I have to chose a bunker that doesn’t have a depth marker already, and chose the one that is closest to a US unit.
You know, because the universe hates me. Blue and Green are equidistant on the East side, and single hexed units take precedence, so it gains a marker, and on the West side, the second half of the Yellow bunker gets filled up. Greeeattt.
And now, the guns. Let’s see if you can do it before I say when:
Sure, the second picture is hard to see….but squint for me y’all.
Now you can play along with me at least. East side has Yellow firing. We removed the Disrupted marker last turn, so it can shoot and now hit two targets due to the added Depth marker. There are three targets in Priority 2 boxes. The infantry that is right the hell in front of it takes precedence followed by the 3 step infantry in the back. Priority 2 means it’ll lose a step if the symbols match. Sadly the poor men who just got off of their landing craft are going to take some losses, so they lose a step.
Red opens fire and can hit three of their 4 possible targets. It’s got three in Priority 2 and one in Priority 3, so it goes for the higher Priority. The units in Priority three are stacked and that could change the space to Priority 1, but since it is four steps of units, it doesn’t quite make the cut. If it’s 5 steps of units or higher, it becomes a Priority 1 space. Lucky them. So it fires at all three targets, and does damage to any Triangles. It doesn’t care if it’s armored or not due to the oval in the symbol there, so that’s dangerous for my tank, but luckily none of those units are Triangles, so Red misses everyone.
And finally no Brown on East beach.
West beach drew Red, which is disrupted, so we simply remove that Disrupted marker. It was nice while it lasted. Then Purple way over there on the right opens fire. It can hit three targets and there just so happens to be three targets in its cone of fire. One is a Triangle in Priority 2, so those Rangers are sadly taken out to a man. Nothing happens to the Priority 3 space (the worst would be a Disruption if it were the same symbol). Finally Brown fires and it, too, has three targets. No targets are over Priority 3 and none are Triangles, so everything is fine there.
But wait, what is that black bar on the bottom of the card? And what does “Begin German Artillery” mean for Turn 4? Are these interconnected? Would I ask these rhetorical questions if they weren’t?
Nope. What all those numbers mean, if there are 4 (the first number) or more Undisrupted Artillery bunkers (basically Germans with binoculars and radios), then there will be Artillery fire this turn. And since there are now no Disrupted (or destroyed) bunkers, you can bet there are that many free radios to call in Artillery fire. So down come the shells.
The weird thing about this is they target those in beach landing spaces. So I have to target an infantry unit with a Triangle who hasn’t even landed yet. How rude is that? I choose I/3/116 because they are in the middle and have the best chance of having someone cover them and/or having Yellow being Disrupted by the time they are on the beach.
That chance is very very slim, but it’s non-zero.
Now my Engineers can get to work. I’m able to clear two more hexes in East Beach (though not connected), and West Beach continues to be impassable (since the Disruption token on Red was removed, it’s now considered to be an active zone so I can’t work on it, therefore the whole beach is covered again).
For the first time I’m actually able to attack a bunker with Infantry….and it’s at this point that I realized I missed one of the charts when I grabbed the charts to bring with me so I could write these blog posts….so I don’t have the terrain modifiers or anything.
Oops. So I’ll have to save here and hope to remember them tomorrow.
Fine journalism right here folks.
*Insert TWO WEEKS LATER Spongebob screenshot here*
Well, it is literally NEXT YEAR. I finally remembered the dang chart. Why do I need the chart? Because it is possible for me to actually make an attack this turn, and I’d like to know HOW.
We have two units adjacent to bunkers, and it would be nice to know what they could do to said bunkers.
Obviously an attack is one of your two actions, so choosing to make an attack is a difficult decision to make. You want to only do it when you know it’s going to count. Luckily both those units are at full strength, which is great, but they are also looking over a “Shingle Hexside” which is a big ol’ wall of sand to get to the bunker. That means the strength of the WN marker will be doubled, but the depth marker will not. If I decide to have the unit move up to the even ground with the bunkers and attack from the flank, then that extra defense will be lost, though that’s another turn where that unit could be shot all to hell. WN counters have a range of 1 to…3? I think? I could be wrong there. So a 1 or 2 versus a full strength unit is okay. A 3 would put them at equal strength over the shingle. Equal strength is usually a “no effect” or worse result, so not what we’re going for here.
But Strength isn’t everything, it’s the weapons that are brought to bear. On the other side of the German chit is a list of weapons that must be used. Infantry have a Bazooka, Bangalore Torpedoes, Browning Automatic Rifles, Demolitions, Mortars and Radios when at full strength. If the German Chit says that’s what you need, then that’s a significant bonus to the US. However, it could say you need Machine Guns (which Armor or ranged Infanty have), Artillery, or worse, Naval Artillery in order to get through. Thing is, if you don’t have the right weapons, the best you can do is Disrupt the Germans. You’ll NEVER defeat them. Oh, and Flanking. That’s another thing you may need. Which means you’ll need two units to attack, and they can’t be adjacent to each other. Oi, that’s annoying.
See here is a unit that lost a step. It only has a Bazooka, Browning and Demolitions left. Also only Strength 4. It can still fight, but I probably wouldn’t have it fight over a Shingle hexside.
Anyway, let’s have L/3/16 actually attack so you can see it. I’ll have E/2/16 hold back for now, and actually have a tank pull up beside it as my other action. That way it can provide support next turn and we can blow that thing up but good.
So step 1, we flip over the WN marker (but not the depth marker yet) and see what we see.
So this is Strength 2, now 4 and requires Bangalore Torpedoes and Mortars’. Lucky for me I’m strength 6 and have all those things. So now I can look at my attack chart and look under “I have those things AND more Strength than the enemy.” This tells me to Reveal the Depth Marker and consult the Column to the Right (which is basically comparing the new strength). This shows a 2 with RD. Now it’s Strength 6. So Strength Equal but I still have the right weapons, so “Germans Disrupted.” Had that been a 1, or had I not been fighting uphill, I would have destroyed the Depth Marker too, but I’ll take what I can get.
The West Beach is not as interesting as I don’t have much in position, so I am merely moving pieces off the no-man’s land that is that beach.
So now you’ve seen an attack. We’re on to Turn 5, which will put a General on the board, which will hit the Beach next turn. That will make things a little easier. But let’s land everything we have THIS turn first.
Quite the board we have now, huh?
And our event:
Ahhhh, a little give and take here. So we get a Hero which does a few things: 1) It acts as a “wild card” for ANY weapon that may be required to defeat a German unit. INCLUDING Flanking or even Naval Artillery! 2) That unit can now do it’s actions for free! 3) Instead of losing a step, we can choose to have the Hero take the wound instead. We’ll lose the #1 bonus, BUT the unit will still fight on with the #2 bonus because now they’re doing it for the Gipper!
Buuuuuut we have to add a freaking depth marker to balance the scales.
The choice of who to give the Hero marker to is a tough one. Do I give it to someone right up front to get them into the thick of things, but risk them getting lit up right away? Do I give it to the poor, poor, West Beach who seems to be not doing too well? Do I give it to the East Beach to take advantage of their seeming momentum?
I think I’m going to give it to E/2/16, right in the middle of East Beach. Sorry Westies. Probably not the best idea, but you won’t get shot at right away (which 90% of West Beach is under some kind of fire right now) and they’ll be able to do quite an attack this turn, which might be able to completely destroy that bunker soon.
And I just noticed that the bunker right next to him (well, the one further up the hill), is the one that’ll get the new depth marker. Oh well. I was hoping that lack of depth would mean Green wouldn’t fire this turn. Let’s cross our fingers.
Engineers aren’t able to do anything this turn, so right on to US Operations. Boy, how am I going to save the West Beach? They’re getting chewed up over there! I’ve got to get that artillery firing, I think. Or something. I don’t know.
So on the East side, we had our yellow bunker un-Disrupt, and we could easily disrupt it again for an Action, but I also have a lot of units in the back that I’d like to move forward. Well, first, let’s handle our free actions and get everyone in the back to scramble forward. And now that we have a hero, we can have that unit do a free attack up the Shingle.
I’d love to have H/2/16 join in the fray (you’ll notice that they have a range of 2), but they already moved, so they can’t join in. Tanks can only join in if they’re adjacent to the attacking unit, or adjacent to a General or HQ. So they’ll go in alone. The WN marker is a 1 with a BN. That’s doubled to 2. So we have a “Yes, we have Brownings” and Double or Greater strength. So we Reveal the Depth marker. And it says “Tactical Reinforcements.” That means no Strength is gained to the WN marker, so we have over double Strength of the bunker, so the Depth Marker is eliminated and the bunker remains Disrupted. But now, unless another Depth Marker is added next turn, we can blow it up!
But a Reinforcement is going to get added to the map.
Way to go, new guy.
And for my actions, I move a tank up and decide to Disrupt the Yellow bunker again. Now onto the West side. *sigh*
Here I’m going to get the high ground on the Eastern flank, and hope to take out the Brown bunker….eventually. And maybe get a lucky shot off and Disrupt the Red Bunker, allowing my units to get in a better position. And maybe get that Artillery into position to support some troops.
I draw a card with a Red and Circle. Not my shape, but has the Bunker’s color, which with Strength of 4 will Disrupt the bunker! Phew!
And the clock strikes 7:30am. It’s been an hour and fifteen minutes of battle. One beach is far more successful than the other. Command is wondering whether to call it quits or not. I fail completely if I lose 8 units on either beach. I’ve already lost 2 on West Beach (2 steps of a 3 step unit is enough for command to consider them “lost”). Will I make it?
I mean, I think that’s pretty obvious. The fact that our species has been “civilized” for as long as we have, but still resolve conflicts every now and again by getting a few thousand people that agree with you to purposely seek and murder a few thousand people that work for the people that disagree with you. That stinks. Sure, the reasons may be sound, and we get into all sorts of strange moral areas of “just wars” and things like that.
But simply put, it stinks.
And then we play war, for goodness sakes.
I mean, I’m about to do a Very Wordy Playthrough for y’all, and I’m going to enjoy myself. I’ll have fun. And it’s a game based on a very real thing that happened to very real people who felt very real fear that I hope to never feel. And I hope nobody ever feels.
I don’t know what I’m getting at here. I think as I sit here at my computer while a needless war is happening in eastern Europe going on to talk about game about a war that my grandfather fought in, I just had to acknowledge that we should all be thankful for the fact that at the present moment you are sitting in a safe place, reading these words. There are many worse places you could be right now. Take a moment and drink it in. No matter what is happening right now, today is a good day.
Anyway, games.
John Butterfield is a sacred name among solitaire gamers. This gentleman has made some of the great games in the solo gaming catalogue, and this is certainly one of them. It is also very intimidating to look at.
It’s like Walt Disney threw up.
But despite the looks, it’s a hell of a thing. It’s a huge game that takes…what…4 hours to play in whole? But it’s split into two, so you can play the first half as its own game which takes about 2 hours. Simply taking the beach is its own harrowing journey. Or you can spend 2 hours coming off of the beach and entering Normandy, sinking up with the rest of the Allied forces on that June day. And you can do both things epically.
Or you can fail spectacularly.
And some of it is kind of simple at first. You flip cards. The cards tell you what the tides do to your forces as they come in. They tell you which German forces are firing this turn. They tell you what special events are happening, and whether any of your risky long range artillery fire works or not. Everything else is done by looking at numbers on chits that are face down until you decide to attack them. Then SURPRISE, you either defeat them, are defeated by them, or suppress/are suppressed by them until you can get the numbers to defeat them.
And here’s the thing, you can only activate TWO units per side of the beach per turn.
FREAKING TWO.
Of course, as units get added, that restriction gets widened as Generals, Heroes, command structures and other shenanigans are added, but in the initial chaos of the beach landing, you’re making 4 choices per turn and then hiding your eyes behind your hands as the machine guns fire. It’s a nightmare.
I mean, as far as a game goes. Not comparing it to anything else….of course.
Ahem.
Let’s just get to it. What do I have at my disposal right now?
Looks like I have a few of these tank chits sitting in the ocean. What do all these numbers and symbols mean, you may ask?
You may.
All the bits on the top are the designations for their Platoon, Company and whatnot. If you’re a military historian, it is awfully important to you. If you’re a gamer nerd, it’s less so. The dots to the left are the “Steps” the unit has. Each time the unit takes damage, it is degraded a step. So these tanks can take damage twice before they get removed from the board.
The big ol’ shapes in the lower left are used for all the randomization in the game. When things get shot, floated away or any number of things, these symbols will help us choose that. Finally the numbers at the bottom show us the Fighting Strength and (if needed) the range that Fighting Strength can reach. The little itty bitty letters and numbers under the picture show the starting space (FG2 is Fox Green 2, for example). And that’s it. I’ve just described the entire beach landing force.
I’m amazing.
I’ll explain the enemy once we see the whites of their eyes.
So the game starts with the US Amphibious Operations Phase. I think they could add more syllables to that, but who am I to argue? Here we flip cards to see what happens to the poor landing craft as the tides and whatnot cause our units to land not exactly according to plan. To do that, we flip a card for each side of the beach:
I know, the artwork is amazing, right?
But anyway, right now we’re just concerned with the little bars on the top that are marked “Landing.” ’cause we’re landing. Try to stay with me. So any of the units that are landing and have Diamonds on them will be having effect “C” happen to them on the East Beach, and Effect “A” on the West Beach. I look at the Landing Table and see “C” is “Lose one Step” and “A” is “Delayed-place in Turn 2 space of the Turn Track.”
So…yay.
But looking at the chart, there is NO WAY to land on turn 1 without taking damage. If you read your history, the seas did not cooperate that morning, and this is how the game reflects that. But those tanks that arrive 15 minutes later have a much better chance of landing without damage. But after all this, four of my original 8 tanks land at the low tide line.
Then I line up anyone who may be coming in next turn. Which makes our shore line look like this.
I’ve got quite a few reinforcements incoming, but that still leaves 4 tanks on the beaches to fend for themselves for 15 minutes on their own, and they’re both in weakened states. If you remember from the first photos, they originally had strength of 4, but now they’re showing strength 2, so they’ve got sand in their gears, or clogged machine guns, or scared gunners. Either way, they are not fighting at 100%.
I know I certainly wouldn’t be.
I would be flipping an Event at this point, but you don’t do that at turn 1, so we just go to the German Fire phase.
In the same way as before, we draw a card for each beach, this time looking at the bottom of the card.
So what does that mean? First, it means that the Yellow, Purple and Blue defenders are firing. Below is showing what the Blue firing “arc” looks like:
But if you look at the map, you can already see what the firing arc is, it’s all the hexes with blue circles in them. Same with Yellow and Purple. And really, at this point, we only have to worry about the arcs for the locations that have German forces in them, which, currently, are just the “WN” markers on the bunkers. So the two Easternmost bunkers and the blue one I highlighted above.
And yes, Easternmost is to the left, despite the fact that often East is to the right, but keep in mind we are landing on the North side of France, so South is to the top of the map, so everything is backwards to the cardinal directions as they are often used, so remember that left is East. That took me a while when learning this game, maybe it will for you too?
Other information from that card: The oval on the yellow means armored targets (like my tank) is considered non-armored for this attack. Great. The double square for the Purple means Purple only fires if there are two chits in the attackers space. There is in our case (most WN start with a “Depth marker” so have 2 chits there), so it will be firing. The ‘R’ and ‘M’ are used for when the Germans start taking the offensive, which doesn’t start until Turn 17. That won’t be for a LONG TIME.
So let’s go left to right, Yellow fires first. 1/B/741 is in the field of fire. The circle in its hex is only half filled (that kinda radiation symbol looking thing) which is considered “Steady Fire, Priority 2”. Normally that would mean “Non-armored US units with the target symbol indicated on the fire card lose a step. Of course, for this particular card, this tank is considered non-armored. And since the symbol is a diamond and our tank has a diamond on it, it loses a step. It only had 1 step to lose, so BOOM goes the tank.
Purple fires to no effect because no one is there anymore. *sniff*
Blue has a tank in the same Steady Fire space, but since the tank is considered Armored for this one, it does not explode.
One survived the first 15 minutes. Of four. One.
Now the West side of the beach.
Here I am luckier as the symbol doesn’t line up, so both tanks survive.
Now is the US Engineer phase….which doesn’t happen until Turn 2, because there’s no Engineers on the beach yet.
So let’s do the US Action Phase.
Action!
Here’s where I do my two actions per side of the beach. Freaking two.
Okay, so it’s technically two, but you often do more, because there’s free actions you can do. For instance, Ranger unit actions are always considered free, because they’re bad ass. And HQ and Generals are considered free actions, because they have their crap together. And anyone being bossed around by those HQ and Generals have their actions considered free because they’re better coordinated than the poor guys just running for their lives on the beach. And speaking of running for your lives, Infantry who do “Self Preservation Actions” are also considered doing free actions. That’s if you’re on a beach hex and trying to get into the safety of NOT the beaches where all that lead is flying. Makes sense, yeah?
So sure, you do more than two, but the two you make are still important.
Like now, I only have one tank on the East side of the beach, and I can either a) Attack with it or b) Move it further inland. Attacking means I could possibly Disrupt a machine gun nest and make it a little safer for the infantry hitting the beach next turn, but make it harder for the tank to make landfall later as the tides will eventually come up and make the big lumbering machine float away. And add to the fact that this line of hexes in front of our tank:
Are chock full of mines that could blow our tank sky high. So it’s dangerous to move forward, too, until our Engineers are able to sweep for mines.
Whose idea was it to land here?
As the tank only has a Strength of 2 right now, it has a pretty low chance of doing much damage, so as much as I hate to say it, I’m going to chalk it up as a loss. I’m going to let it fire at the Blue bunker, as that’s the weaker of the two bunkers it can reach. That means if I pull a card that shows a blue firing square on the bottom of it, then I will disrupt the bunker.
Nope. Ah well.
On the Western side, my two tanks have a bit of a better chance. Not that their Strengths are any better, but just because I have a few better numbers and they’re in the center of the beach which means they don’t have as much concentrated fire on them, so they have a better chance of being able to survive and help out the infantry as they make it down the beach. That being the case, I’m going to move them both up the beach.
And that’s it. Then it’s the end of turn phase, which doesn’t do anything besides check to see if you shuffle the deck (You do every 6 turns or so, it says it on the turn track), and then you start the whole thing over again.
It starts out a bit slow, but as the number of chits piles up and your numbers dwindle it gets more and more tense, but as you start knocking out German positions and see holes in their defenses? That’s when it gets good and you get excited.
But what’s the point?
There areas on the map are called “Draws,” the spots that bridge the area between the beach and the rest of Normandy. In the first 16 turns, you have to have Control of the four Draws on the map. Control is having a unit on a hex and all adjacent hexes around it, as long as none of those hexes are in a field of fire of an enemy unit. If you have that, you’ve won. Well, half the game, anyway. You score points from that, and if you have 19 points (5 points per Draw, 1 point per German reinforcement position) then you can continue to turn 17 and continue to the second part of the game where the goal is to get your units off of the map using any of the roads on the South, West or East. You get points for that, as well as just getting points for units on the high ground and controlling the beach and as much ground of France as possible.
Of course, most of the time I don’t make it to the second part of the game, and rarely win that part, so let’s just see what happens anyway.
It is now 6:30am. The second group is now landing. I draw the cards to see what happens with the tides to affect the first waves of infantry as they land.
Diamonds are getting the “A” effect. Two Infantry are affected, and it states they drift FOUR boxes east. All the other units do not have as drastic of movement, but at least no one is damaged.
West Beach is much more drastic, with a few units being dragged NINE boxes east. In fact, two units are now in the Eastern half of the beach.
But you can’t fight the tide, can you?
Shut up, Alexander, you can’t.
Anyway, we get our first event:
Welp, we’re in turn 2-20, so it’s easy, we add a depth marker (effectively making it stronger, or at least making it more unpredictable) to a Unit.
So I need to find out who is closest to a US Unit….ah, okay. The Green bunker on the West side is chosen because it is 3 hexes away from a tank and is only 1 hex in size. There are a few that are only 3 hexes away, but it is chosen for being a 1 hex position. So now it’s bigger. Great.
Now they get to shooting.
The new symbol you’ll see that could affect me this early in the game is the star. That means it will target Heroes or Generals. None on the field yet, but it’s a big stinkin’ deal if it would.
Lost two steps in a single hex in the East, and blew up a tank and a single step in the West. Could be worse, but when you’re far away from the grinder, you only take mild losses, but now they run TOWARD the murder.
Before the mad running starts, we have the Engineer & HQ phase. The HQ won’t be doing anything yet (they’re still on the boats looking at the beach going “Oh dear”), but Engineers can…um…engineer. You see, all those greyish wobbly bits in front of the hexes all of our units are landing on? Those are Obstacles. We call them Obstacles because calling them mines or deathtraps or Things What Get You Dead, is a bit messy to say. Once the tide comes in (Turn 7), anything that floats over those hexes can possibly get wounded unless we do something about it, so this is the time we do something about it. Right now, each beach can clear two hexes, when the tide is a bit higher we’ll only be able to do one hex, so our timing is good.
Of course, the engineer’s can’t clear mines off of hexes that are under active enemy fire, so you can only clear hexes that aren’t under a color that was drawn during the enemy fire phase. Since the east card had Yellow, Purple, and Green, that covers almost the entire beach, so the Engineers can only work on the three extreme western hexes of their section of the beach. Gotta do what you gotta do, right? This is why it’s important to Disrupt firing positions, because if it were, say, Red, Purple and Green, I would have had NO hexes able to be worked on.
Speaking of which, West beach can’t be worked on, because they’re all under fire. Awesome.
So just two hexes cleared on this second turn, but don’t worry, we’re just getting our feet under us.
’cause now it’s the ACTION PHASE!
*cue action music*
Remember, I only get two actions per beach, BUT I get free actions for a number of reasons, the biggest ones being “Self Preservation actions.” Meaning the poor infantry realizing they’re waaaayyyy far away from the shingle (or seawall or whatever) that they can take cover behind so they’re going to haul ass toward it and not wait for a commander to tell them to do so. Sooo..
That didn’t cost me anything. You’ll notice I didn’t move the two units that are under the umbrella of West Beach. They are technically still under their command. I can, after this turn, switch their command to East if I like. But I gotta give them one turn to see if they can make it to their proper positions.
Okay, now what to do with my ACTUAL actions. Same troubles as before. But now I have two tanks at full strength that I kind of want to get up, but I could also use them to suppress and/or Disrupt the bunkers currently raining lead down on my infantry. Both 1 and 2/A/741 are within range of Yellow and Green bunkers, respectively and could possibly take them both down. 1 has a better chance as Yellow’s a smaller bunker. Green has more targets it could possibly hit, however.
Eh, heck with it, I’ll have them both fire, and if I’m lucky I can use next turn to move them both up.
So 1 will fire at Yellow. This is a Barrage action, which involves drawing a card (as most everything does) and checking the colors drawn against a table.
So I’m a strength 4 unit with a Triangle and I draw Yellow, Green, Brown and Triangle. So that means I drew the German Position’s color AND the barraging unit’s target symbol, so I look at that entry under the 3-5 strength entry and that reads: “German unit disrupted.”
The pieces in the real game aren’t transparent, FYI. So that’s the best of all possible outcomes. If I had 6+ strength, I could have removed the depth market too, but tanks just aren’t going to do that. I’d have to wait for the heavy artillery for that to happen. Let’s check the other tank.
I’m just showing this to show I’m not cheating. So again, I’m shooting at a Green unit with a circle tank, and I drew color and symbol, so the bunker is Disrupted.
And what does Disrupted mean? Well, that simply means the next time that color comes up for German firing? It doesn’t. Instead the Disrupted counter is removed and that’s it.
Things don’t go nearly as well for the West bank
I decided to move one of my lower strength tanks closer to the shore so it can provide support for when infantry starts attacking, and I also tried to have a tank fire, but this one drew neither color nor symbol, so it missed. You’ll notice the red stripe on F/2/116. That means it is now under the control of East’s commander. It gave up and said it’s not going to bother trying to get to that side of the beach anymore. Seems understandable to me. Their luck doesn’t seem nearly as good.
And that’s it. Two turns of play. The basics are in play now. On turn 4, German Artillery will become active. Turn 7 mid tide will kick in. Turn 16 is high tide and Turn 17 we should be Beyond the Beach and heading into the Bocage of France.
But let’s not get ahead of ourselves. We’re still trying to get a foothold onto the beach.
So despite me trying my best to generate more and better content I haven’t posted anything since October of last year!
Well.
That’s not to say I haven’t been working on anything. I’ve actually been typing a LOT (I am Very Wordy, after all) and making a play through of D-Day on Omaha Beach. And believe me when I say it’s going to be HUGE. I’m finishing up the third post and I’m on turn 7.
Seven.
Of Thirty-Two.
So it’ll probably be another 9 posts before I can finish that game. Sure, I’ll probably lose before that happens, but I’ll fudge the numbers to get at LEAST to turn 20 or so to show off the second half of the game, so you’ll get at least 6 posts out of me.
At this rate…..this might be my one game for 2023.
I hope that’s not the case and I find a way to get it out faster to you, as a lot of slow down involves end of year madness, but I’m just being real.
But anyway, I thought of some content to throw your way.
For those who only come to this blog to read boardgame playthroughs, you may exit now. For those who don’t mind reading a little more to something a bit nerdy, but having very little to do with boardgames, you may continue:
So from 2001ish to 2015ish I was a bit of a comedian. I was part of a troupe called the Mad Mechanicals, and we performed Shakespeare….
Sort of.
It was like Shakespeare…..only entertaining.
For any of you Shakespearean die-hards, that statements was definitely said with tongue firmly in cheek.
Anyway, we performed Shakespeare parodies done in 20 minute stage shows, or Random Acts of Shakespeare where we performed any Shakespeare play in 3 Acts in less than one minute (Act 3 was always “Everybody Dies!”).
It was a hoot and a whole lotta fun.
During the last two years, we branched out into podcasting our show in a Jack Benny style Audio show where we continued to do our parodies, more or less. We pushed the boundaries a bit, doing less period humor and more modern jokes (well, modern for 2010) since we didn’t have to worry about pissing off a renaissance fair director that might have cared about “authenticity.”
Anyway, y’all might care because boardgame jokes occasionally made it into our shows. Arkham Horror, I know, was mentioned on more than one occasion, and there’s even a “box fart” in our very first episode.
No, I have no reason to be proud of that.
But I am proud of all the work we did for that decade and I thought I would share what little remains. It seems we were a bit before our times as we constantly had to explain what Patreon was to our audience, yet now it’s ubiquitous. Go figure. Even photos weren’t as plentiful a dozen years ago as they are now. Weird, right?
So if you are interested, here are the episodes that remain:
Only 5 minutes left of life left for our little medical robot, and it hasn’t been the most Helpful bot ever. It only has 3VPs at this moment, and the Cyborg is sitting pretty with 8. In 3 minutes antimatter will explode and damage the exterior of the Station, but the remaining 2 minutes will mean all the humans will be free to escape, which is what the Stowaway, our remaining opponent will happily do, though she may only gain 4 points at this point.
But what does my plucky little Medical robot do this turn?
BONK of course!
I seem to have a Kompromat of my own still remaining near me, so I can Step into the Rec Room, Step into the Aft Hub and then Attack the Stowaway. BONK!
Remember, she’s not wearing a helmet anymore because the Inspector asked last turn for her to remove it. Because it wasn’t up to code and wouldn’t fit in the escape pods.
Or something.
Now let’s talk about Guilt.
Since I Attacked (ahem, Bonked) someone in a Lit area and Cameras have not been turned off, I move my little player marker up to the Suspect part of this chart here. If the game ends and anyone sends Evidence Data to Authorities (and during Stationfall, anyone who Escapes gets a free chance to send their Data to anyone they want) can make anyone Guilty. What that means is people will know that I did the bonking, so I’m not actually Helpful! I’m Hurtful! Oh NO!
Of course, if I can prevent the Stowaway from Escaping, then she can’t deliver the Evidence and….I guess everything is okay, isn’t it?
This turn, since no one is able to attack an Officer this minute, the Cyborg focuses on picking up (or Manufacturing) more weapons, and strangely uses his last Influence cube to Influence the Inspector to pick up the Bludgeon in the Storage area where I started the game.
The Stowaway Activates the Astrochimp (our hero!) to pick up the Nanogel in the Reactor section, presumably to Revive her next minute. Of course, I could Revive her, but she doesn’t know that.
Of course, I COULD Revive her. I won’t, but I COULD.
“4 Minutes Until Total Annih….Wait, that’s me, isn’t it?”
My turn is pretty lame. I’m Activating Medical again, even though I’m Exhausted, because of my “Emergency Response” ability, which allows me to Step into a space with a Downed human without spending an Action. So I can Step into the Therapy Garden, and then use my 1 and only action to Revie the Counselor, scoring myself a VP and denying (maybe) the Cyborg 3.
Aaaaannnnd the Cyborg rolls a 2, so he immediately has the Troubleshooter whack the Counselor again.
Comedy, folks.
And the Stowaway sticks with the Revive Script, and since the Astrochimp can’t get to her this turn, must Renegotiate, which gets her Activation Disc back, as well as her cube from the Betrayal box, and cube from the last character…which happens to be the Investigator.
“3 Minutes….I don’t even know why I’m saying this…I’m going to die!”
Ugh, I’ve got a lot going on right now. I’ve got a successful Cyborg with fires everywhere and a downed Counselor giving him a lot of points. I could easily Revive the Counselor, but there’s a Troubleshooter standing right over him, waiting to continue bonking until the Station hits Atmosphere. I do have some Influence over her, so I could have her Step away, but since she’s Exhausted, it’d be her only Action, and with 3 Minutes left, I need to Maximize my Action potential.
I would also love to somehow get both the Counselor and Stowaway back up before Stationfall to get 2VP back on the board…but, I’m not sure how to do that with what little time I have remaining. The Stowaway is probably going to do that herself, now that there’s a monkey holding Nanogel..
I’m sorry, I just going to take a moment and drink in the fact that I just typed that sentence.
Ahhhhhh.
So I could concentrate on moving the Troubleshooter away and focus on Reviving the Counselor and hope the Cyborg starts working on Firebombing the rest of the game.
But I (Medical), too am Exhausted at the moment, limiting my abilities.
Hmmmm.
Well, here’s something:
Who is that next door? Why, the unexhausted Investigator? I could have him enter the Garden and bonk the Troubleshooter, keeping her from bonking the Counselor again. Will the Cyborg just Influence the Inspector and make him Bonk the Counselor on his turn? Possible, though if I place 1 more cube on the Inspector, that will be impossible (Cyborg only has 1 free Influence Cube right now), but that costs me 1VP at the end of the game, unless I can Renegotiate.
Choices, choices.
Okay, since I’ll gain 2VP if I can keep everyone alive at the end of the game AND it’ll cost the Cyborg 2 VP if the Counselor stays up, I’m going to add 1 cube to the Inspector and then Activate him (you don’t have to Activate whomever you Influence, it’s just convenient here) and have him Bonk the Troubleshooter, which means the final 2 minutes will be me Reviving the Counselor and Troubleshooter.
Awesome.
The Cyborg rolls 4+, and even though it can’t throw a Firebomb usefully, it still creates one. A one track mind on that one.
The Stowaway activates our monkey hero…
Okay, yes, I’m aware Chimpanzees are not monkeys. But monkey, due to the hard consonants, is a funny word. And I like funny. So I shall continue to try to be funny.
Stop judging me!
Anyway, Astrochimp Steps to the Stowaway and Revives her. How nice.
And then all hell breaks loose.
All spaces with “OuterSpace Arrows” are now damaged, which means the Airlock action is now gone. The Launch Pods action is also gone, which means the only way to leave the ship is with the Timed Launch action, which means you need to enter a Pod with 1 minute to go.
Speaking of which…
Ahem…
Your line is…
“I know my line, I was getting into character, jerk. 2 Minutes Until Atmospheric Annihilation.”
As I said before, I spend my turn Reviving the Troubleshooter (I’m leaving the Officer down until the last moment, so they can not be re-Attacked).
The Cyborg rolls low, but there are no characters able to down a Officer this minute (phew). And actually, can not to anything on that Script, so goes to the Focus (blow stuff up) Script anyway.
Oh no.
Oh NO.
/
Translation: Cyborg just wants someone to hit something> Cyborg is going to select an Unexhausted Conspirator with the most cubes on it. That’s the Troubleshooter (whom I just woke up).
Welp. There went that plan.
The bot prioritizes hitting people with more Influence cubes on them, so down goes the Inspector. Wait! The Inspector is wearing the Helmet he stole from the Stowaway.
Which means.
*sniff*
Down I go.
Wait!
I picked up a Helmet early in the game!
I can’t get hit either! MWAHAHAHAHAH! He’s got to pick someone else!
That was a roller coaster of emotion, wasn’t it?
Okay, no one else can just hit someone, so he’ll just try to get someone close enough to Manufacture a weapon next turn, which moves the Engineer to the Physics Lab. No big deal.
Phew. I need to take a breath there.
Finally the Stowaway’s turn, the Stowaway herself goes and….strangely, makes it into a Pod.
Is someone actually going to Escape?
That just doesn’t seem right. She doesn’t have an Action to trigger the Timed Launch yet, so, it’s right down to the wire.
“1 Minute. Who’s really listening at this point?”
I finish off Helpfully by Reviving the Counselor.
Bite me, Cyborg.
But I know there’s nothing I can do about the Cyborg merely Activating the Troubleshooter next turn and re-hitting the Counselor so you know what I’m going to do?
I’m going to spend the Kompromat that I picked up wicked early in the game (Turn 1?) and take the one action and Bonk the Troubleshooter. Yes, it denies me 2 points for that, but it denies the Cyborg 3.
And the Cyborg, being out of Influence Cubes and being stuck in the flamming wreckage of the Station can do nothing on its Script that is useful at this point, so does not much of anything but get another character closer to making a weapon.
And the Stowaway hits Timed Launch on her pod. Will she make it out? (checks watch) Maaaaayyyybbbeee.
Because now we look at this Reentry Token. If it shows a burning Station, it’s Reentry and time for Scoring. If it’s only a mildly burning Station, we have 1 more turn (which is only a 1 in 3 chance).
Well I’ll be damned.
I’m not entirely sure what I could do on this last minute that would have much of an effect. If I revive the Troubleshooter, even if I use my Bribe token to move the Counselor (which is probably something I should have done earlier), she could still Step and Attack and gain 3VP for the Cyborg. So I guess the best thing for me to do is Renegotiate and get an Influence Cube back to be back under my limit and save that VP.
And the Stowaway is launched into Space.
The End.
Upon escape, the Stowaway Delivers her Evidence Data to the News and Authorities, meaning I am Guilty and unable to win the game.
But let’s see my points anyway.
And I’m under my cube limit. And my Grudge did not end the Game down, so it looks like I only receive points for the number of Stars on my track, so I end the game with 5 VPs.
Let’s look at the Cyborg:
Ouch, I didn’t realize the Inspector would have to Escape for those points to not score. So 3 for no Infection Escaping. 3 For a Fire at the end, +2 for 2 zones on fire at the end. 8 VP for the Cyborg
And finally,
4 for getting Evidence to the News. 4 for Escaping, and another 4 for the Inspector not Escaping with his Evidence.
Wow, I REALLY should have focused more on getting the Inspector out.
So final scores:
Stowaway bot: 12
Cyborg bot: 8
Me: 4
I got owned, I got owned good.
Didn’t I say something about playing on super-mega-easy level? Woof.
I suppose it’s a lot easier to play with a physical copy as you’re able to get a bird’s eye view of the map, rather than constantly having to pan and zoom all over the place. Also learning the interactions between characters is certainly a plus, not to mention playing in 1 sitting would certainly help, since this playthrough took over a month, remember what Influence Cubes were on what would certainly hinder your play.
But it was still fun, and told a heck of a story. I mean, the Stowaway only got away because the Astrochimp revived her!
I’m sure with more plays, I’d get the bot Scripts down faster and that would help things a lot, not to mention internalizing which room is where and what they all do.
To me this requires the brainpower of playing a COIN game with the whimsy of playing a Flying Frog game. It’s a tactical puzzle of wonderful depth, but your a mad robot hitting people so you can revive them while a mad Cyborg is trying to kill its creators while someone is trying to grab all the data and escape! Oh, and there’s an evil science project on board that could have escaped! There’s 8 different projects, and in our case, this could have gotten out:
That would roam the Station eating everything in its path. Because why not?
Now I did find out that I was playing with an outdated version of the module, so there may be some bits of the Script that are changed in the physical copy of the game. Also, I’m sure I forgot a Cube here or there, or ran a Script wrong or did something funky, so if you’re playing along at home, I’m sorry. I’m learning too. This isn’t meant to be a teaching game. I’ll let you know when I do one of those. This is just a playthrough of a new game that’s wacky fun, so don’t take it too seriously and have a good time.
Anyway, if you had a good time, this is where I point to my tip jar and wiggle my eyebrows suggestively. But if you don’t want to, that’s okay too. I lost the game by 8 points for crying out loud. What do I deserve?
It’s the end of September as I type this, so it’ll be October as you begin this trip, so enjoy your fall days, and I hope to start a new game soon!
“I’ve noticed we will be hitting the Earth’s Atmosphere in 12 Minutes and you do not appear to be in any distress yet. That seems abnormal. Here, let me help you with that.”
My Medical Robot just wants to be useful, and gets VPs for doing so. In fact, I get bonus points if no one is unconscious at the end of the game. Of course, I get VPs every time I revive someone. So of COURSE it makes sense for me to knock someone out to revive someone before time runs out right? Right.
My Activation Disc moves back to Me (which is short for Medical. And Long for Me.). And I get two actions, one to move to the Airlock which has no cameras and BONK.
Fun!
And now the Cyborg…makes the Troubleshooter build another Firebomb? Oookay.
And the Stowaway finall makes her first appearance by popping into existence in….the Aft Airlock. After witnessing the Medical Robot go crazy, she realizes time is of the essence and quickly dashes into the Security Station so that she can copy data.
Hmmm, now that I’m looking at this, since Console Actions are a free action for her, she would have done this on the first turn, I think to turn off the Jammers. Drat. *sigh* Ah well, was still a dramatic reveal.
“11 Minutes Until Atmospheric Disintigration”
I’m in a bit of a pickle now. I could use my Kompromat that I have on myself to overcome my exhaustion to move to the Stowaway and bonk her on the head, but she’s not my biggest threat right now. I’m currently worried the most about the Cyborg. Currently he’s got 4 points for the fire existing on the station + 1 for it being one section. If the Troubleshooter throws this bomb, that’ll be another point.
I currently can’t get anyone to the Troubleshooter to do anything about it, and while I can Activate the Troubleshooter myself, all I could do is make her drop it and move away, which hardly seems like a good use of my turn as the Cyborg will most likely simply move her back, thereby sucking up our time while the Stowaway continues gaining on us.
So what to do?
Answer? I don’t know! I can a) Revive the Station Chief to gain myself a point and deny the Cyborg a point b)Bonk the Stowaway and deny her next steps toward points c)Delay the Cyborgs goal to fiery frenzy.
I shall go with option a. Reasons include: Why not? Also, gaining points is good for Medical because they can’t be taken away unlike the Cyborg whose fires could be put out or Officers who could be revived. Also, there’s a lot of game left to be played, and I think I need to see more of what’s developing, so let me just get some points here.
So I activate my Exhausted Medical again and do a Revive action on the Station Chief. Easy.
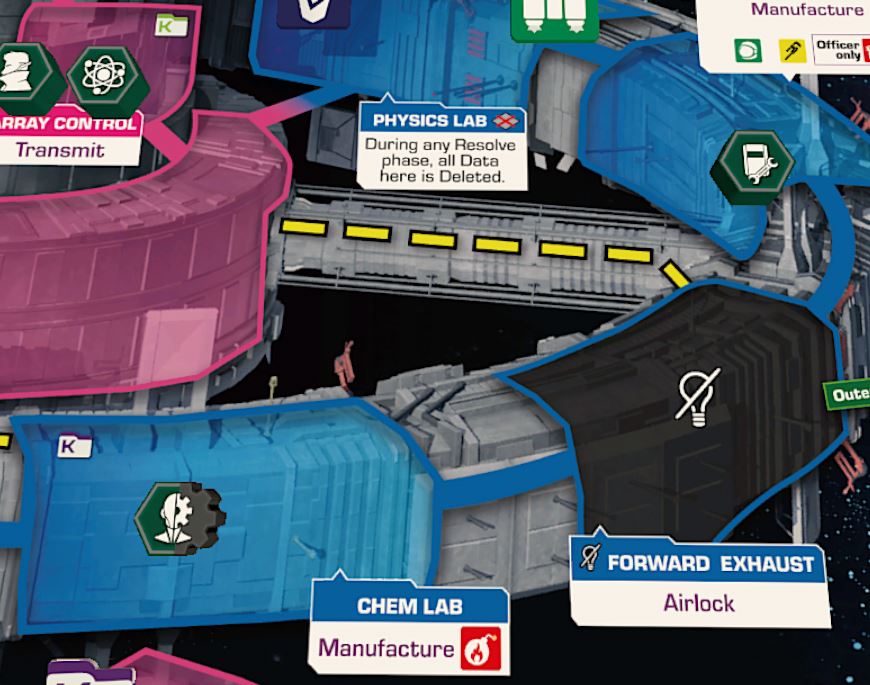
And so I roll 4+ again for the Cyborg, so the Troubleshooter (who is obviously a VERY disgruntled employee of this space station), throws another firebomb into the Forward Exhaust, the only other adjacent room of the Chem Lab. Of course, that means they can’t get out of the Chem Lab. Not sure the logic there, but *shrug*.
The Stowaway merely creates some Data. She now has dirt on the station. Big woop. Except that’s 4VP. And another 4VP if she escapes with that Data and no one else has data. Huh. I’ll have to do something about that.
Something like BONKING.
“10 Minutes Until I am Out of a Job”
Okay, we’re 1/3rd of the way there. I still have some work to do. I’m only at 3VPs, while the bots are seemingly getting there much faster. However, I still have some options. I also can get the Engineer in front of the Cyborg, because I get 2 points for my Grudge bonus, if you remember, and that will offset that 2VPs I score if there are no humans down at Stationfall, and I have a feeling that may be a tall order.
So what I’ll do, is bring my Inspector up to the top of the Station with me. So far he has no bot cubes on him, and he’s got the ability to Manufacture data and pick up Kompromat from adjacent sites, as well as the ability to Rob as if he had a Gun. Therefor, having him near the Stowaway is a good thing, as he could steal the Data off of the Stowaway’s phone when I bonk her.
He can only be adjacent to her, but I think it’s a good threat to have him there.
Huh, I didn’t roll a 4+, and for the first time, the Daredevil activates. She moves down to Hydroponics and picks up a Bludgeon. Because the Cyborg wants everyone to have weapons, but the bot doesn’t realize just how far she is from everyone. Then again, she’s pretty close to an airlock, so could jump out to space and back in the other side, so I guess that’s something. Huh. Wonder if that’ll come into play.
So the Stowaway at this point is trying to get off of the ship. But Abandon Ship hasn’t been announced yet, so that’s step 1. It’s taken me about 5 minutes to figure out what the bot would choose, because I’ve got to figure out how close the people she controls are to Ejecting Antimatter, then how close the Officers are to getting to the Bridge, how able they are to damaging control stations and all that. It’s a bit much. I THINK the bot will have the Station Chief hop out of the Airlock and hop back in near the front of the station so that she is one room away from the Bridge and able to call for Abandon Ship in 2 actions. Everything else seemed slightly less priority for various reasons.
So I revived the Station Chief and she jumped out the Airlock. Anything to avoid insurance bills. Typical.
Anyway, it’s a bit like figuring out what the bot would do in a COIN flowchart for those who have played those GMT Series games. For the most part, it’s pretty easy, but sometimes it can take a while. Usually I don’t find it too difficult and I go with my gut and not worry about it, but this one seemed to take a bit longer than I liked. Ah well. It did make for a good story, though. Who would want to stay in the same room with a robot that just knocked you out, anyway?
“9 Minutes Until Friction Becomes a Thing”
So I suppose knocking out the Stowaway becomes a good idea? I’ll also be in the Security Station, so I can put out the fires the Cyborg started, which will be a good thing. I think that’s for the best.
Oh no!
She’s wearing a helmet! That makes her immune to bludgeoning attacks! I can not Bonk the Stowaway!
Ok, plan B. I shall go to the Security station anyway, and put out the fire in the Bio Lab. Perhaps I can fix it later, which will make the Stowaway try to get someone to create data there, which will make her want to stay on the ship longer. Not sure I can actually pull that off, but it’s a long range goal. Not sure long range is something to think about with 9 turns left, but there you go.
So I Step into the Security Station, then change the Fire Hazard token into a Gas Hazard token.
The Cyborg Activates himself, and Self-Repairs. I don’t get credit for that one, dang. But he uses his section action to build a Fire Bomb. Because of course he does.
Again, have a bit of trouble figuring out the Stowaway bot’s move, but it looks like since the Station Chief is Activated and can’t start Abandon Ship this turn, she chooses an Unactivated person first, so it looks like she’s choosing the AstroChimp to go into the chamber with the Antimatter. Though now that I’m looking at it, AstroChimp can get there in 2 turns because they have the Tunnel Rat ability, so really it should have done that last turn, rather than the Chief going. Dang. Oh well. The Chimp is in the Antimatter Containment chamber. What could possibly go wrong?
Of course, there’s something else called Project X in this game….coincidence?
“8 Minutes until This Guy Will Stop Rambling.”
So let’s take a quick look at the big picture:
Me:
3VP from my Revive track and 2 for not having anyone down at the moment.
Cyborg:
3 For a section on Fire. 1 For one section on fire.
Stowaway:
Nothing unless she transmits or escapes with data.
So far, I’m in the lead by a single point. It looks like Abandon Ship will be triggered in the next turn or two and the Stowaway will probably be able to get out, unfortunately if she’s able to do that, that will get her 8 points (!). So I either need to give someone else data and have them escape (can’t make her story an exclusive), and lower her score to 4, OR I need to boost my score past 8.
I don’t see me getting my score up to 8, so I need to get a way to mess with the Stowaway, and I already set up a good way of messing with her earlier, so I’m going down that route. So the Inspector I had emailed before all this started continues his mission, and enters the already crowded Security Station.
I use his heightened sense of authority to steal the phone off of the Stowaway, citing NDAs and other legal mumbo-jumbo. Now she doesn’t have Data to Transmit or Escape with. Mind you, she can always just create more, but now more than one character has it, so if that story gets out, that’s 4 less VP for her.
But now the Cyborg…
For Pete’s sake!
(Pete was the dude who built the station)
I rolled 4+ AGAIN, so the Cyborg simply throws his fire bomb back into the Bio Lab. Because some people just want to watch the world burn.
Strangely by the letter of the Stowaway bot’s algorithm here, even though she could just manufacture data from her spot, the line before that would have her place a cube on the Inspector and have him copy the data he has to her (since the Jammers were disabled, he can do that). So that’s what happens.
I’m guessing she was prepared for this eventuality and have a Pineapple(tm) on her person and it grabs all of his data off of his person since he’s close by. She’s a crafty sort. A near-future Shannon Morse.
“7 Minutes Do you Know Where your Children Are?
That’s a dated reference now, I know.
There’s a lot of push and pull going on now, with me doing something and the bots quickly undoing it. From what I’ve played multi-player (the whole 2 times I’ve played 2 player games), this is not usual. Of course, were I paying a bit more attention and not committing to a move and then seeing what the bots will do, rather than seeing what the bots will do before making a choice, things would be going differently.
However, I think it’s going okay, as Medical doesn’t care if it makes it off the Station, so if I delay the other two just enough to best them in points, this should work. This strategy would NOT work against many of the other characters, which is what makes this game INFINITELY replayable. There is absolutely no two games that would play the same. With minimum 12 characters on the Station, and each of them having 2 “powers” and differing goals, imagine if I were playing against, say, 4 bots? While figuring out what they were doing may be difficult, I bet it would get easier the more I played (and some are probably easier than others), but winning? That’d be a tactical nightmare. In a good way. In a good way? It’d be chaos, in a good way.
Anyway, back to the chaos.
So the Inspector has 2 Activation tokens on him, so he’ll be Exhausted and only get 1 action, so I don’t want to choose him, ’cause I want to get him to an escape pod and deny the Stowaway her scoop (though I briefly thought about Bonking and Reviving him). But I noticed the Troubleshooter wasn’t activated, and she has the Tunnel Rat ability, and look where she is…
That’s right, she can tunnel to the Central Hub and be 1 Step away from Array Control, where the Engineer is. If you recall, I have a Grudge against the Engineer (you see, he didn’t program me to be Helpful enough…I wanted to be Big Hero 6), so if he is Down at Stationfall, that’s 2 points for me.
Of course, if no one is down at Stationfall, it’s 2 points for me. So win/win for me, really.
But wait, the Engineer is an Officer, which would mean the Cyborg would get 3 points for that, too!?! Oh dear! That is not worth it at all!
So I have two options I’m looking at: Either use the Counselor that I’ve influenced really early in the game as a stand by for such an occasion to Step into the Data Center and get me a Kompromat that might be useful, or have the Troubleshooter head up the map toward the escape pods, so that she can help the Inspector out when the time comes.
I’m going to go with plan B as those 4 points will probably be the thing I most need to prevent (It’s here, folks, that we can predict the Cyborg will win).
So I Activate the Troubleshooter and do 2 Step Actions to move her to the Aft Hub.
The Cyborg rolls under 4 for the 2nd time all game. And he has the Exile walk up to the Machine Shop (which is menacingly right next to the Aft Hub) and pick up the Bludgeon there. I believe there will be some misbehaving going on.
And what does the Stowaway do? Well, the camera isn’t on her right now, it’s on a curious little monkey
Our hero. Who just ejected a big chunk of antimatter into space.
In 4 minutes, that will explode, damaging everything in Outer Space, and all sections with “Outer Space Arrows.” Essentially that’ll make all airlocks worthless, as well as ruin the Section Launch ability to get pods launched into space. What’s weird, but maybe exists for game purposes, is that it doesn’t damage any of the pods themselves. So if you do a timed launch AFTER the antimatter goes off, you’ll be fine.
“Fine.”
“6 Minutes Until Everything is Fine.”
The Blue timer shows that at the end of Blue’s turn (The Stowaway), the Antimatter will explode. Leaves a ton of time for escape, right?
So with my little time left, I’m going to Activate the Inspector again, and utilize his Rob ability one more time. This time he is going to grab the Stowaway’s helmet and then Step to the Rec Room, getting him closer to the Aft Airlocks and out of the Station.
Maybe I’ll be able to bonk her later?
The Cyborg rolls under 4, so he Activates the Troubleshooter, and has her enter the Therapy Garden with the Counselor and…*gasp*…Bonk without my permission!
That’s a downed Officer for the Cyborg, which will net him 3VP, and take away 2 of mine! Uh oh.
The Stowaway then makes her way to the Aft Hub, close to the Array Control to Transmit her Data and/or get to the Pods and escape.
Each turn in Stationfall is 1 minute of time in the game world. You can’t accomplish much in 1 minute, so you have to plan out each action you want to take very closely to try and attain your goals. As a refresher, I am playing Medical who is trying to be as Useful as possible. My opponents are the Cyborg who is going for Revenge and the Stowaway going for the Scoop of a Lifetime.
It’s blurry due to it being security cam footage, I swear.
A random roll had this as our turn order as well (Medical>Cyborg>Stowaway), so I will be starting things off.
Turn order is always the same: Reveal(Optional)>Influence(Optional)>Activate/Renegotiate>Resolve
So first thing I decide whether I want to Reveal myself.
Yes, I will chuckle a little every time I say that. I will never grow up.
When playing against automated opponents, there isn’t much of a reason to remain hidden, however, I gain points for having Influence cubes on me when I reveal, and my opponents won’t Influence me if I’m a PC (Player Character- ie. Revealed…otherwise you’re an NPC). So it behooves me to remain hidden for as long as I can. Mind you, my Reveal power (the benefit gained for Revealing) would give me a Bludgeon so I can knock people out…to Revive them (and be useful!), but I can get a Bludgeon other ways.
So I won’t Reveal (myself, heh). So now I can Influence. Influence means choosing one of the 12 folks onboard and putting cubes on them. I have 8 cubes at my disposal. After I’m done placing cubes, if I have the most cubes (or tied for the most), that person is under my sway and I am allowed to Activate them.
HOWEVER, every character has an Influence limit. Whomever you chose at the beginning of the game will limit how many cubes you’ll want to have on the table.
You can use all 8 (and the automated opponents have a limit of 8, of course), but every cube that is over your limit is -1VP at the end of the game. There are ways to get your cubes back, but it’s a bit of a dance to stretch out your resources and pull them back before Stationfall.
Obviously I want to Influence….myself, and do things with…me. Or I could wait and not bother until I Reveal. You can always Activate yourself after Revealing.
So instead I’m going to do something that will a) Use the fewest amount of cubes and b) Piss off the Cyborg.
So before the Station was going down, the Inspector had received a cryptic email that suggested he walk through the Bio Lab to see a thing or two…
So I place a single Influence Cube on the Inspector.
I now move on to the Activate/Renegotiate phase. Renegotiate is what you do (mostly) when you can’t Activate, so I’ll choose to Activate…
Boy, that sentence didn’t make much sense, but let’s just say I’ll explain Renegotiating later. Anyway, Activating is what you’ll be doing for the most part. So you can Activate anyone that you have the most cubes on. Considering I only have cubes on 1 person, it looks like I’ll be Activating the Inspector. So I put an Activation Disc on the Inspector.
If there was already an Activation Disc on the Inspector (including my own), he would be considered “Exhausted” and would get 1 Action. Since there wasn’t a Disc, he gets 2 Actions. Everyone also gets 1 free Pick Up/Drop Action every turn.
Here is our Inspector sitting in the Chem Lab. That folder with a “K” on it, is a Kompromat, which is an item that is kinda…meta. It doesn’t belong to any of the characters, but to the players themselves. If I have the Inspector pick it up, it goes into my hand and whatever character is shown on the other side, it allows me to force that character to do one action later on (unless it’s a PC, then they have the right of refusal, though it’ll make them Suspect, more on that later).
Since I want to keep ordering people around, I’ll use the Inspector’s free Pick Up Action to pick up the Kompromat:
Huh, it’s for my own character. Well, that works out, it will give me a free action later on in the game. Can’t beat that. Anyway, I’ll make the Inspector now take a Step action to move into the Bio Lab. If you look at the board, entering there means the Inspector is now Contaminated, which currently prevents the Cyborg from getting some VPs. I still have one more Action, so I’ll have the Inspector move up to the Forward Hub, so that he’s closer to Medical…so I can thwap him. And Revive him.
Useful!
And that’s it. There are no end of turn actions to happen, so it’s now the Cyborg’s turn.
The Cyborg focuses on weaponry this turn (it either focues on attacking or getting weapons), and this turn it’s weapons, so it looks like it moves himself into the newly vacated Cham Lab where it’ll be able to build a Fire Bomb next turn. Awesome.
And the Stowaway…..
Influences ME! To bring me to the Security Station. Ultimately she wants me to turn the Jammers off so she can broadcast Data throughout the station and get all the Data for herself.
Of course, if I Reveal next turn, that’ll shatter her plans.
Do I need to reuse that Skeletor picture I used in my Oath playthrough?
Probably not…we saw how that Oath playthrough went.
“14 Minutes until Atmosphere Disintegration”
Welp, I guess I should Reveal myself now.
*ahem*
I get to put my big ol’ Eye icon on the character card. I then put all the Influence cubes into the Betrayal Box and move my tracker up 2 spaces.
So I’m already at 2VPs, and we’re 2 turns in. Oh, I also get a Bludgeon. Nice.
For Influence I’ll place a cube on the Counselor. Because why not? It’s good to have multiple avenues for chaos, and he’s standing beside the Shred Room, which gives you access to Kompromat.
But, for my Activation, I’ll just Activate myself and move from the Security Station, much to the Stowaway’s chagrin, I’m sure, into Storage to get close to the Officers nearby. On my way I used my free Pick UP Action to grab the Kompromat in the Airlock. Turns out it’s for the Troubleshooter. Who has a Bludgeon herself. Could be fun. Hmmm…she’s near the Cyborg. That might come in handy later.
The Cyborg again focuses and builds a Firebomb for himself. I suspect things are going to get interesting soon.
The Stowaway is still trying to turn the Jammers off and activates the Station Chief who walks from the Therapy Garden, through Storage and is now in the Aft Exhaust Airlock there.
“13 Minutes until Atmosphere Disintegration”
I must say at this point, that I’ve been very lucky. My character + position is such that I’m perfectly positioned to prevent Stowaway Bot from doing what it’s trying to do as its step 1 – Turn the Jammers off. I’m a bit worried about helping the Cyborg along too much, but he’ll be doing so much damage, that it might be in my favor since I’ll be able to revive everyone that he manages to beat up, so I think this game will be simple.
Now I should note, I’m playing on super-simple-mega-easy-mode. It is stated in the rules that the more bots you add, the more difficult the game will be for you, and two is the absolute minimum for the solo player. So if it looks like a walk in the park, it’s only because I made it that way.
Of course, we’re only 2 turns in and nothing is on fire yet.
Speaking of fire, the Cyborg is certainly close to setting off a fire bomb, which will net him 3 VPs if something is on fire at Planetfall, and we can’t have that, can we (tsk, tsk)? So obviously we have to use that Kompromat we gathered earlier to muddy the waters for our bot enemies.
Now you’ll notice my focus keeps flipping back and forth between one half of the ship and the other. That’s mainly due to the Exhaustion mechanic. If you Activate a Character that had an Activation Disc already on them at the beginning of your turn, you can only do 1 action that turn (I briefly mentioned that before). That’s REALLY limiting, so that’s a “when you’re desperate” kinda thing, or you really, really, really need to get something done kinda thing. Or if it’s REALLY funny.
But anyway
Our Troubleshooter is up in the Print Shop, two rooms away from the Chem Lab (seemed like a good place at the time). I can Influence the Troubleshooter with 2 Cubes (she’s already under the Stowaway’s sway) and then use 2 Actions to move her to the same room as the Cyborg. I can then spend the Kompromat I have on her to make her do ANOTHER action and do an Attack with her Bludgeon and make the Cyborg go Down.
Not only that, she hasn’t done her free pickup action, so I can freely Pick Up the Cyborg’s firebomb now.
YOINK!
Trouble successfully shooted.
Not a magic bullet by any stretch, but I’m just trying to stymie some things. The main drawback is I’ve used all my influence cubes already. If I use more I’m either biting into my VPs, or I have to get them back before the end of the game.
Anyway, on to the Cyborg’s turn.
He’s considering Focusing on bombs again. Has done so all 3 turns so far. Fun! Hmmm, so I didn’t really think about this, but the Cyborg has influence cubes, and all he would have to do is place 2 cubes on the Troubleshooter herself and one action to throw the thing and that’s all he really cares about.
Um.
Ooops. So I really didn’t accomplish much by knocking out the Cyborg besides delay some things….but I did knock someone out, so that’s something, right?
And it was such a dumb move, that Tabletop Simulator crashed and then took Chrome with it. Huh. I had to retype some of this. Awesome.
ANYWAY, the Troubleshooter was told by the Cyborg to throw the Firebomb into the Biolab. Which actually makes a lot of sense because that prevents others from getting infected in there. Clever, clever, clever. The Troubleshooter was exhausted so only got 1 Action, so that was it (not that setting a section on Fire and Damaging it was nothing), so it’s back to the Stowaway.
I had focused on the Security Station for the Stowaway, because the board there looks like this:
It had all the things she wanted, a way to turn off Jammers AND a way to make data. But I didn’t look down at the Mainframe:
Which can also turn off the Jammers and has the Stranger right next to it, whom is already under the sway of our Stowaway. Clearly I need to pay a bit more attention. So the blue Attention Disc moves to the Stranger and a free Pickup Action takes that Kompromat, they move to the Mainframe and then use the Room Action to turn the Jammers off.
And here I was patting myself on the back, yet the bots are accomplishing their goals. But there’s still plenty of time to bonk some folks on the head and heal them, so there’s still plenty of healing to be done. And as you see in that picture, I can always put out the fire, denying the Cyborg 3VPs. It’s just finding the time to do that and we know that…
“12 Minutes Until Atmosphere Degeneration” – Found HERE
Chimps, telepathic mice, super spies, unstable isotopes and lawyer robots.
Would you believe it’s also a super thinky euro game?
It kinda is.
It’s also a chaotic heist movie maker in a space station that is rapidly plummeting to Earth while everything is going wrong, and no matter how good your plans are, they will be ruined by the other players.
I’ve heard it described as the “Beer & Pretzels game for the Complex crowd,” and I think that’s a fair assessment. You’ve got to think ahead a LOT, you’d got to plan and do a bit of deception and deal with the vast complexities the plethora of different player powers on the table do when they interact. BUT you also have to realize that all of that planning can get shot in the arse when the gravity gets shut off and your hidden character gets mind controlled and walks into a carnivorous plant. Or missiles get launched into the section of the ship you’re currently floating in. Or antimatter is released. Or a rampaging monster just happens to wake up next to you. Or that person you were bribing to help you just happens to be the other player who doesn’t want to play along. Or…
You get the idea.
It’s weird.
But it’s also weirdly fun and creates some weirdly fun stories.
(It’s also not out yet. As of this writing, it’s being pumped out by factories and will be getting on a boat in a few weeks. I’m all cutting edge and stuff)
It’s also incredibly difficult to describe, so the best way is to be Very Wordy about it ™, so I guess I should just start rambling, shall I?
Here is home. It’s big. There’s 41 rooms all floating in space. For now. If the rooms are pink, there’s no gravity there (because it’s not spinning enough), if they’re blue, there is gravity. That only matters for throwing things, but it’s important, because hucking things around can be a big freaking deal. There are also escape pods at the top of the board….but saying top is weird because there’s no “up” in space, but I’ll say top for now. Let’s let SOMETHING make sense, dangit.
You’ll also see some rooms are already “dark,” which just means there aren’t security cameras in there (no one wants to see you nekkid, even in the future) as well as a few lines that show vents…which is perfect for xenomorphs to crawl through. That movie made air vents to be MANDATORY xenomorph crawling size.
And these are the people on the station at the moment the alarm goes off stating “15 minutes to Stationfall.” That’s a lot of people. Every game will be played with AT LEAST 12 people. Each person has their own special abilities (the one or two colored blocks of text in the middle of the card) as well as victory conditions if that character is “you.” Of course, you don’t have to ever reveal to the rest of the table that you are, say, the Station Chief. You can control ANYBODY at ANY TIME. The currency of the game is Influence Cubes that you place on the character cards that lets you activate the characters and has them do whatever you want. But, if you reveal yourself (heh), you get an extra special ability (the ability under the eyeball in the lower right of the card). Of course, now the rest of the table knows EXACTLY what you need to do to score VPs, so they know how to stop you, but maybe it’s too late….
Thought experiment time: This game can play with 9 players. With 9 players, there are 20 characters in the space station. That’s 20 characters that can be activated, and 9 will be every turn (mostly). 20 special abilities to keep track of, 20 victory point pathways you want to be aware of and try to stop while trying to get your own without making it OBVIOUS so other players don’t immediately stomp on you.
Chaos, absolute chaos.
But maybe fun?
I’ve only played with 2 players. Today (and over the next month or so, probably), I’ll be playing with 3. Myself and 2 “bots.” The game comes with “Station Automation,” a way to play with any of the characters as automated opponents as a means to increase player count so games don’t get stale by playing against the same people. From what I’ve seen in the Ion Games Discord server, it’s been play tested quite a bit, but I can’t imagine all possible combinations have had extensive testing, so I imagine a lot of wacky things occurring, and I’m all for it.
Then again, playing against a human opponent, I had my Botinist eat half the station using his giant plant, and then had a game where my Cyborg failed miserably as the Telepathic Rat took him over and made him open Project X which killed him instantly. I did get to shoot the Billionaire in the head, which by happenstance was the other player, so we both had a crappy score, but still. Comedy.
ANYWAY
So what’s the point? What are all these people doing on the station, and what do I, as the player, hope to accomplish? Well, let’s look at the two identity cards I was dealt and discuss that shall I?
I have a choice between a Medical Bot and Engineer…um…man. Firstly this “bot” is different than the “bot” as of an Automated Opponent. That’s going to make this kind of confusing, I think. This character in the game has a gear shaped piece (look in the upper left of the Medical card), so this Character is considered a Bot for all game purposes. The two characters that are going to be dealt out as my opponents are going to be Automated Opponents…which in my head are going to be Bots, even though their characters probably won’t be. I told you it was a thinky game, this is one of the things we’ll have to keep straight in our mind.
So, ignoring the small italicized text under their names (which just gives some setup information), the cards tell us the goals of these two characters: “Be Really Useful” and “Preserve Ecosphere”. Without anything else, we could make our choice based just on this. Do we want to be a Medical robot and try to be really useful, or an Engineer and try to preserve the ecosphere? If we want more information, we can see all the ways that Victory Points are earned underneath those headings.
At this point you’ll see there’s a TON of icons used in this game. That’s because there are SO MANY interactions in play in this game, there is no way they could define everything on little cards. So to help, they used icons, then defined icons on a side page, and then defined everything FURTHER in a character dossier that comes with the game. Rule Pundits rejoice! Playtesters had a grand time arguing “what if” statements and straining the system to its extremes, and they tried to define everything to its ridiculous level in the Dossiers. Which means those of us who are not rules people have to deal with this:
Which actually doesn’t seem so bad, now that I look through it. Anyway, back to our Characters: Our Medical bot scores 2 Victory Points if no down Humans at Stationfall (meaning the end of the game). Then Medical moves a tracker cube up one for every Human it revives and for every Influence Cube on the card when Medical is Revealed. More on that later. The tracker cube will be placed on the Character Card on the table which shows that it could gain from 0 to 7 VPs this way.
The Engineer scores 3 points if it blows up the Antimatter on board the station before Planetfall. 3 points if no Contaminated Characters Escape. 2 points if The Artifact doesn’t Escape (meaning it’s not in an Escaping Character’s possession). Finally 1 VP if Innocent….but doesn’t really care if Guilty. More on that later.
Finally on both cards you see the Reveal power, which is under the little Eye icon. Like I said earlier, it’s smart for other players not to know who you actually are, so you get a bonus if you Reveal who you are. The Medical Bot gains a Bludgeon….which if you think about it, means it can knock down Humans….so it can then Revive them. It’s now more Useful! Go Medical Bot! And the Engineer says “There’s a bomb on the station that will go off in 1 minute.” And it’s ANYWHERE ON THE STATION. When it goes off, that room on the station can’t be used anymore. Including escape pods. Or Antimatter containment. Or the bridge. Or….you get the idea.
Finally there’s a nice little Tip for new players (like me). Then you see the character name upside down with a few Stars next to them. That’s if you DON’T select that character as “you.” The other character either becomes your “Friend” or your “Grudge.” If there’s a Escape icon on the star, they’re your Friend. If there’s a Down icon on the star, they’re your Grudge. You gain those VPs if that other character Escapes or is Down at Planetfall respectively. A further wrinkle in the game.
They both look like a heap of fun to play, but I’m going to go with the Medical bot, because the idea of playing a robot hell bent on being “Useful,” so much so that it’ll injure someone just so they can “fix” them is kinda awesome. So I keep Medical right side up, and then turn the Engineer upside-down to show that I have a Grudge against him. I will score 2VPs if he is Down at Stationfall. That’s what he gets for programming me to wait for an injury to fix people. I can fix them BEFORE they get injured, dangit. How about some proactive medicine, huh?
I then shuffle up the remaining Identities and deal out one to each of the Automated Opponents (you notice I didn’t say bots yet? I’m goooooood.) and we have:
Oh no! The Cyborg is a Bot! *ahem*
So the Cyborg is going to do their best to murder everyone who is an Officer (The Station Chief, Counselor and Engineer at our table), keep infected people from Escaping and setting a whole lotta fires. Lucky for me killing the Engineer actually coincides with my Grudge, but everything else is directly opposite of my goals.
The Stowaway is a weird one. First, it starts off board so we don’t even know where she begins, and her goals involve stealing data off the station and broadcasting it to the News back on Earth. She wants Evidence and information on Project X. She also has a weird ability called Secret Stash meaning whomever gets that data immediately gains a helmet (think armor) and influence, meaning they’re in on the Stowaway’s conspiracy. She’s a sneaky one. She also has a crazy ability to score 16 points if she meets all of her goals, which is kinda ridiculous. I may need to knock her out…and Revive her, but totally knock her out and anyone who is working with her.
But who else is on our cast?
Why, we have a monkey able to travel through Vents, but who is difficult to get on your side. A Counselor who is able to get through locked doors on the station and remove Influence on others.
A Daredevil who can not be robbed and who will go anywhere on the ship, but we see by those two cubes already on her card, is already under the sway of the Cyborg, and is in on his Conspiracy.
An Exile able to stop others from knocking him out, and able to get data easily (also under the sway of the Cyborg). Also have an Inspector who came in his own shuttle and can easily get Data from the ship AND from others.
Our Station Chief who doesn’t have any abilities that we haven’t seen before, but we see she is under the sway of the Stowaway, probably trying to get Evidence that THIS ISN’T HER FAULT to the people.
And finally a Troubleshooter able to Repair sections and Robots and….whatever the hell that is. They’re both working for the Stowaway, or at least influenced by her.
Hmmm…you may be asking yourself. The Stowaway has 3 Characters with Influence on them, but I only saw 2 for the Cyborg, why is that?
See? I’m useful! It would seem the Cyborg has already gotten into my programming. But you see, were this a game with humans, no one would know that I was playing Medical, so they of course would put cubes on me (and no one would start the game with cubes on them). So there’s already a bit of a monkey wrench thrown into my plans as the Cyborg is going to try and control me some turns, but I could always Reveal and send his cubes to Betrayal. BUT if I wait and try to become useful for the Stowaway, I could gain extra VP. Already I have a choice to make.
The stage is set, the station has 15 minutes before it begins to break up in atmosphere. We have our goals. What will happen?
Hell if I know.
But you should know as soon as you tune into the next installment of this Very Wordy playthrough!
Now that I updated the font to make the blog look less….
Icky…
I noticed my header was looking HUGE.
I also notice that a lot of the games in the header are painfully out of date. A lot of the playthroughs up there are of games that were in playtesting and have now been released, or are of old versions that have been updated to newer editions, or are just plain WRONG given the current ruleset. That being the case, I want to move all those links to one place, so they don’t clog up the top of my page and leave them more for historical purposes rather than actual learning purposes.
Because reading the Bios: Megafauna playthrough actually hurts a little bit. It’s really, really, wrong.
But anyway, here are all the out of date or old version playthroughs you can find on my blog, including the grand-daddy of them all: High Frontier, which is 3rd edition, now out of date.
5150 Playthrough (Two Hour Wargames gets updated almost every other year, now updated with 5150: New Beginnings released in 2021)
Bios: Megafauna 2 Playthrough (This was in a playtest faze and I made many errors as the rules were being updated weekly at the time.)
Bios: Origins Playthrough (Also during a playtest faze. I did a bit better on this one, but I’m sure I still made errors)
High Frontier Playthrough (3rd edition, replaced with High Frontier 4 All which changes some rules and map locations)
High Frontier: Interstellar (Was included in High Frontier 3rd edition, not translated into HF:4 All. Will be released as a stand alone game at the end of 2022, though will be drastically different than the game shown here)
So Tybalt lead his people out of the lands of the Clockwork Prince and…
well, finished our game of Oath: Chronicles of Empires and Exile. So what happens now? What in our game changes, how does the story change and what will next game be like?
Well, first, Tybalt gets to choose what the Oath for next game will be. If he had won using a Vision, it would have to be the Oath connected to that Vision (ie. if I had won with the Vision I had, I would have had to be the Oathkeeper to the People)
But since Tybalt won as the Usurper, he can choose whatever Oath he wants (though it has to be different than the current Oath, just to keep things fresh), and decides to choose
Mainly for story purposes. Tybalt has it in his head that as the leader in a new land, he will need to put all the bandits in the land under his control, so he must show the people that he can tame the lands under his leadership. This, however, will be hard, as he is going to start with nothing, as we shall soon see.
The next step is the offering of Citizenship. The new ruler may add anyone to their court as they wish. Again, this is pretty much for story purposes, or for players who know they will be at next game who want to be Citizens. Tybalt is pretty salty about me trying to punch him in the face, so I was cast out along with the Prince, so no Citizenship was offered. All boards will remain Exile side up.
Then we have some building. If the winner was a Chancellor (Prince) or Citizen, they can build a Edifice, which is a special Site card. There is one of each suit, and the player picks one of the suits they have as an advisor, and builds the Edifice in a site they own if there’s space available (if there’s no space at all, they’re allowed to discard a card there because these cards are too cool not to build).
Of course, neither a Citizen or Chancellor won this game. That being the case, one Ediface would fall into Ruin and those cards would get flipped over:
I mean, c’mon. How awesome is that?
But sadly, an Exile won this first game, so neither of those things can happen.
Then we start clearing the map of anything the winner of the game doesn’t control. You see, the kingdom is only what the winner controls. The rest is rebel territory, and that’s not the story that we’ll be following in history books, and the game we’re playing is the history book (it IS a Chronicle after all), so all of that will be wiped away. We discard all Relics, Denizens and Sites that the winner doesn’t control.
Which, in this case, is EVERYTHING except the Advisors and Relics Tybalt had.
Then the map gets “redrawn,” with all locations getting pushed towards the Cradle, though those with Ruins (flipped over Edifices) getting pushed towards the end of the Hinterlands. You see, with the focus of the game on the new Capital, the old Capital is now on the edge of the kingdom. The roads there are no longer being kept up, trade is dwindling, no one cares about that anymore. We care about this NEW Cradle of civilization.
So normally your map will stay a little consistent, but the focus may change, as places in your Hinterland will become the Cradle, and Provinces will move in an out of focus, depending on their importance to your story. Some lands will fall away altogether, only to be replaced generations later. Great towers will be erected, only to crumble and fall to ruin, perhaps to be rebuilt by a later ruler.
Or, like this game, the lands will be abandoned, and all will be forgotten, and a new clean map will be built.
Where Tybalt finds himself looking down on his lands from a Mountaintop. Is that Hidden Place in the Hinterland the same Hidden Place that was in the Cradle from the Old Kingdom? Sure, I’d like to think so.
And notice that Tybalt now finds himself wearing the robes of the Chancellor?
Another change is to the people themselves. Six cards will be added to the Denizen deck. 3 from the Suit that was most common to the winner’s advisors (winner’s choice if tied). Tybalt was tied between Beast and Nomad, but chooses Nomad due to the Lost Tongue card being what cinched the win for him. Then 2 from the next “In line” so Discord and then 1 from Arcane.
These replace 6 random cards from the Discard pile. So the cards in Tybalt’s hand are safe, but everything else is possible to leave, and we don’t get to see what actually goes. So the deck will be subtly different next game, with a few more Nomad cards and a few less…..somethings. This game is now 100% different than any other game in existence (most likely).
Then all of the loser’s Relics get shuffled together and the map gets refilled if any Relics need to be put there (you see them in the picture above). Then the 4 Relics the Chancellor starts with gets shuffled with the Relics the winner got and they get put on the top of the deck meaning 1) It’s likely the Relics the Chancellor can offer players for Citizenship will be the same Tybalt had in the game or 2) You’ll be able to find Sticky Fire in the new lands as forgotten Relics of the last war.
The instructions finally have you rebuild the Denizen deck to set up for next game and place everything back in the box so that setup for next game is a breeze and BAM, we have the opening sentences for the next chapter in our story.
So there you have it.
Let’s be honest here, I was very distracted during that playthrough. I may have gotten rules wrong, or forgot a strategy mid way and it may have seemed disjointed as weeks passed in between postings (or even in the middle of a post). And for that, I apologize.
I hope it was at least worth reading through and you got the idea of what a game of Oath is like. Not like there aren’t a million other reviews and playthroughs out there on the ‘net about this game, but you come here for blathering, not for in depth analysis or thoughtful reviews. Just some light reading and a chuckle as yet another white guy plays games.
But I am certainly happy to finish another post and get it published and out there to the world.
Was it my best? No.
But perfect is the enemy of done.
Sadly it’s hard to compete with my original very wordy playthrough of High Frontier 3rd edition that got this all started. Shame that game is now out of date. Not that I couldn’t play a 4th edition game, though….
Anyway, if you enjoyed this game, you could always head on over to my ko-fi page and send me a cuppa. I do have kind of a pie in the sky idea for a huge bit of entertainment that would involve big, heavy boardgames like High Frontier, Stellar Horizon, Magic Realm, Churchill and all that kind of stuff and also involve other people and…..booze and comedy. But it involves a lot of work, time and energy and I just don’t know if it’s worth it. A few bills in the coffee can might push me over the edge, but now I sound like I’m begging, so I’ll shut up. Don’t worry about it. That’s a long way away.
Thanks for reading this far. Take some time to look around today and be amazed that the seemingly random bits of matter that happens to be occupying your space is “you.”