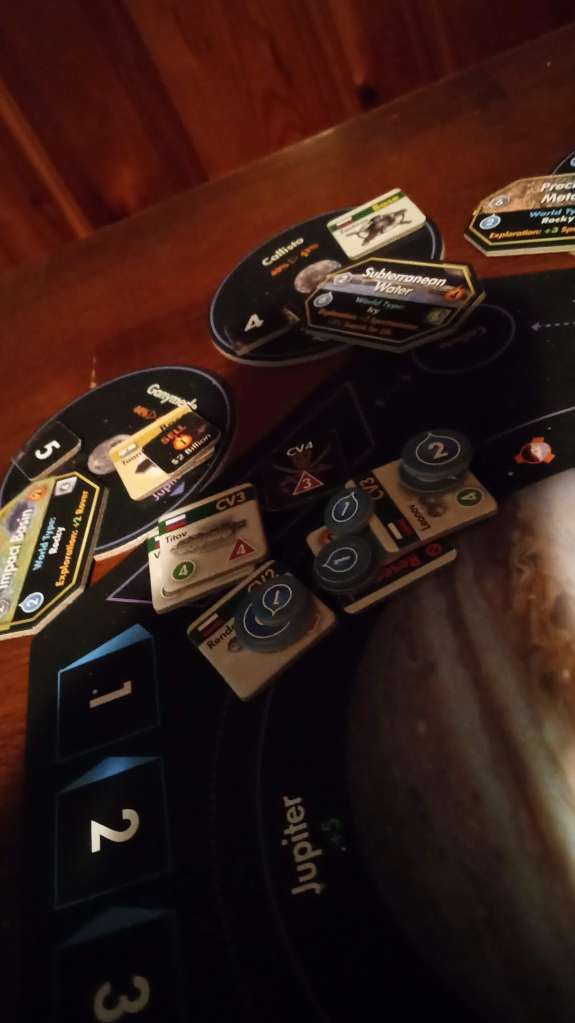
So we start the 2140s of our Stellar Horizon by spending 8 Billion on Renda.
I know, I bet you’re shocked. I should just copy/paste that every now and again. I also spend 6 Billion on Supplies to get all of that out to Callisto. Luckily with my .04 modifier, it only takes 1 year to get to Jupiter, so they’ll arrive in 2142. But I decide to have it wait a year due to the Pirate. I send Titov to Jupiter to hunt down that Pirate. But oh no, Leonov bumps into the Pirate! If it can’t run, it’ll get instantly destroyed (or I can pay ransom), luckily I get enough Tactics Points to flee. The Saturn Orbiter dies but is able to get a Dione Depletion on its way out. I finish off the year spending 9 Supplies on Callisto to start getting Terraforming points on Callisto. It begins! I need 20 total to have it fully Terraformed, but you have to start somewhere!
It costs 4 Supplies each, but if you want to do multiple per turn, it costs one more each, so 5 for the second one, 6 for the third, etc. It’s a careful balance between speed and efficiency, almost like a rocket equation. I figure 2 is enough for now.
Once I get that number up to 20, BAM!
2141: I launch Renda to Jupiter, hoping Titov will take care of things. We have combat in the Asteroid Belt. I’m able to get some points and +1 damage. +5 for me, +3 for them. I roll 9 to their 5. We both blow up. Seems a theme. Sadly that’s the only combat as the ships in Jupiter don’t find each other. Dangit. Tereshkova fails its Recall roll. Leonov gets 4 Supplies from the Saturn Asteroid. Nice!
2142: 3 Billion for a new Orbiter that I launch toward Neptune. Still no combat and a giant fleet is showing up next year!
2143: The giant fleet approaches!
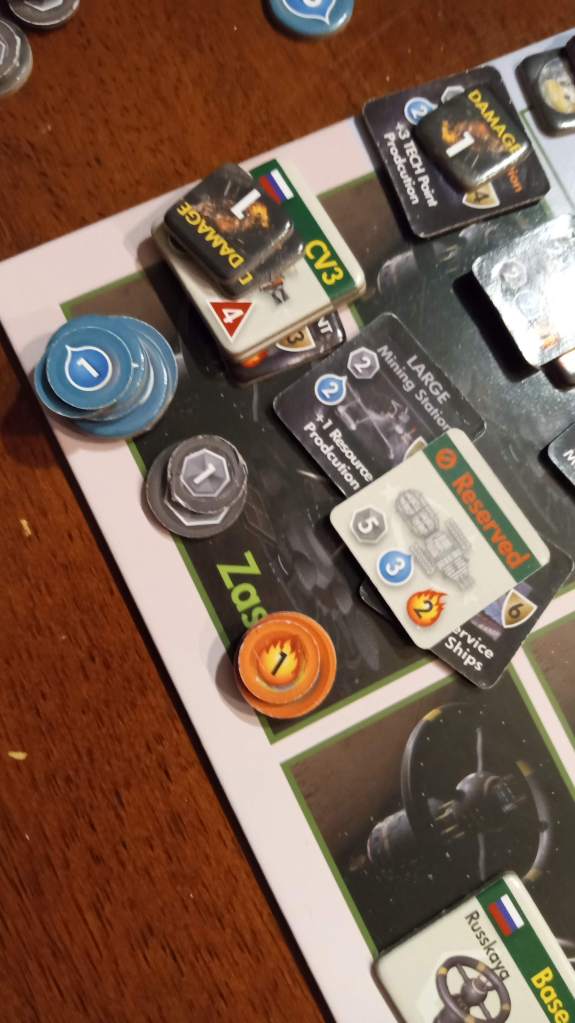
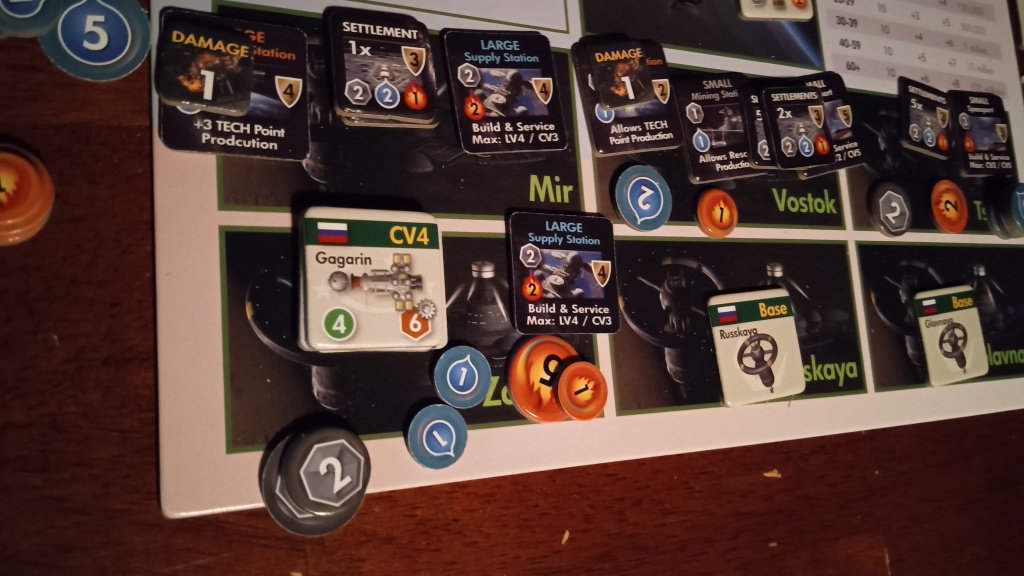
Of course, they see each other, because that’s a lot of ships. Luckily I get the most Tactics Points, so I give myself -1 Damage so I don’t get my cargo ships blown up. I have +9 to their +3. Oh no! I roll 2 to his 10! 3 damage to me and 4 to him. Luckily that takes him out, but barely. I spread my damage out among my combat ships. All the cargo lands at Zastava. 15 Supplies spent for 3 more Terraforming points.
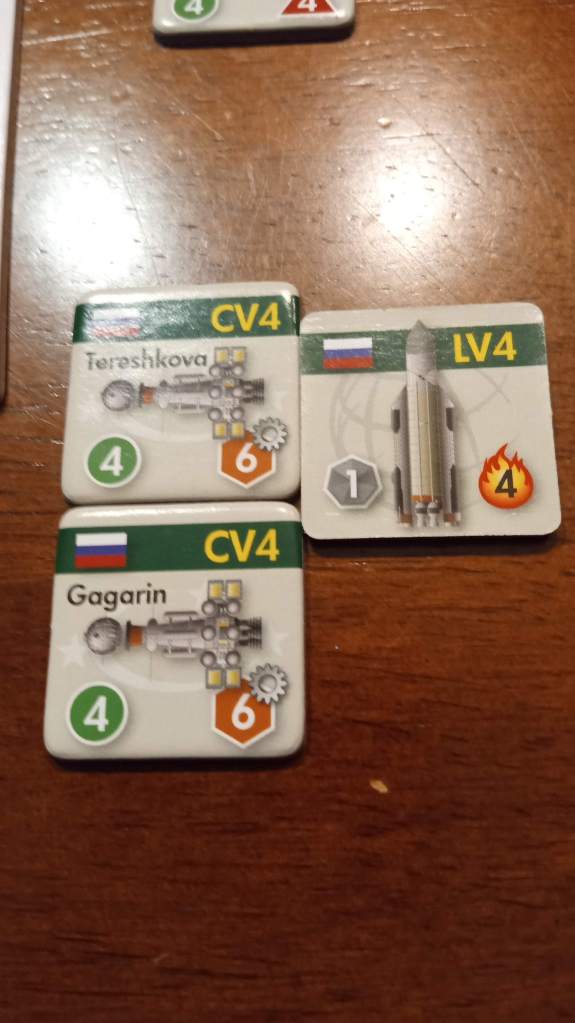
2144: Titov is repaired and Tereshkova is Unreserved at Zastava. What a wonderful place Callisto is turning out to be. I spend 2 Billion to launch a Space Telescope. I move the CV-4s to Dione to mine the Subterranean Water there (Supplies). Renda returns to Earth so I can spend money on Supplies. Leonov goes to Venus to Mine that Asteroid.
2145: I spend 3 Billion for a Sun Probe+Orbiter. A Pirate finds me and escapes….somewhere, I didn’t write down where. There’s only one left at this point, right? Maybe? I think it’s around Uranus at this point. That’s right, I can get that far at this point. Okay, Uranus. Anyway. Even though they’re combat ships, they land on Chariklo and say “eff the pirates, we’ve had this mission for freaking ever” and give that a shot. And succeed! Mimas is the new mission. Both Gagarin and Tershkova fail their Recall rolls, but both got 2 Supplies each, which is good, I guess.
Now I roll for End of Game for the first time. If I roll an 01, the game is over right the heck now. I roll 12. I’m okay.
2146: Now I spot the Pirate and give myself -1 damage and have +9 vs +3 again. I roll a 1 to their 8. Woof. I do 2 damage and so do they.
That Sun Probe that’s +11 to Science? Yeah, I rolled high so I only pulled 1 chit and only pulled a 1. *grumble* At least that Titan rover is continuing to give Depletions. The Neptune Orbiter breaks the year after it finally arrives. Leonov fails its Recall roll….
End of Game roll (02): 08. Yikes!
2147: 6 Billion for 6 Supplies for the Renda to send to Zastava. Titan delivers more great Science, but little else happens.
End of Game roll (03): 94.
2148: 8 Billion to build Komarov, I launch it to Mimas. Tereshkova and Gagarin Unreserve and head to Dione again. Renda land and delivers the 6 Supplies. The Sun Orbiter gets a Depletion. I spend another 9 Supplies for 2 Terraforming Points.
End of Game roll (04): 78.
2149: Leonov delivers Ore which will fix Titov. Deep Space Astronomy Depletion. Haven’t done that in a while! Gagarin fails Recall Roll AND only gets one supply. Hrmph.
End of Game roll (05): 46.
2150: Event: Survey Error.
Dear reader. I apologize that my dice don’t want you to have any fun. They are bad dice.
Bad, bad dice.
Shame on them.
*sigh*
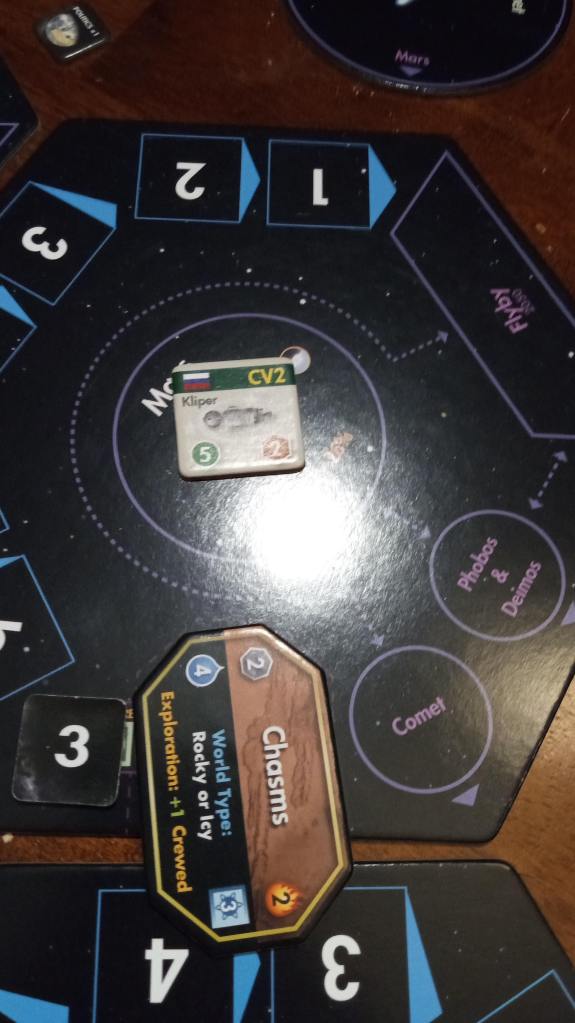
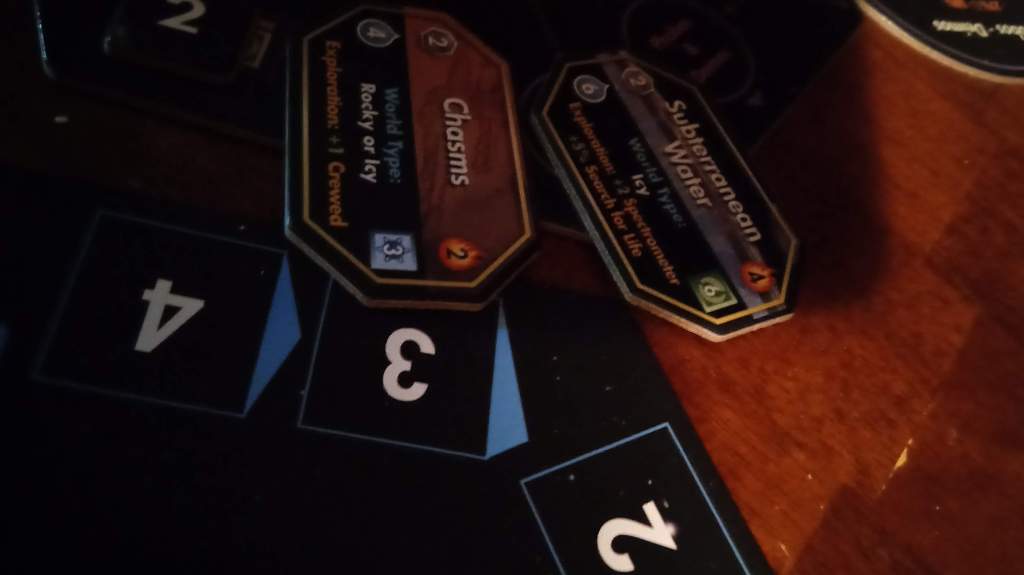
Pluto has Chasms now. Who cares?
Pirates around Neptune and the Kupier Belt. Who cares?
Asteroid around the Kupier Belt and Earth. Who cares?
Well, actually the one around Earth is nice.
Oh hey, we have another base around Jupiter. An Indian base on Io.
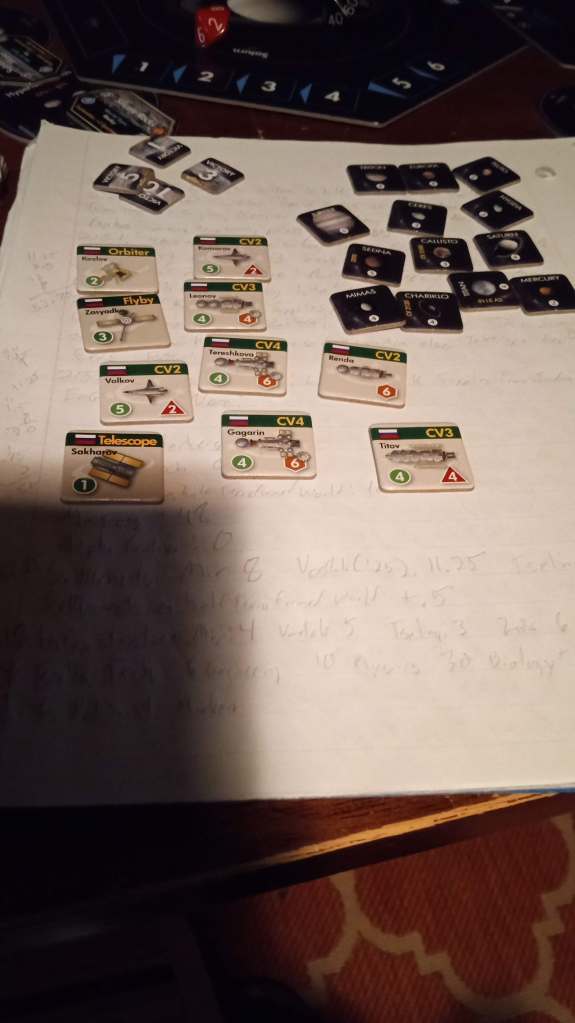
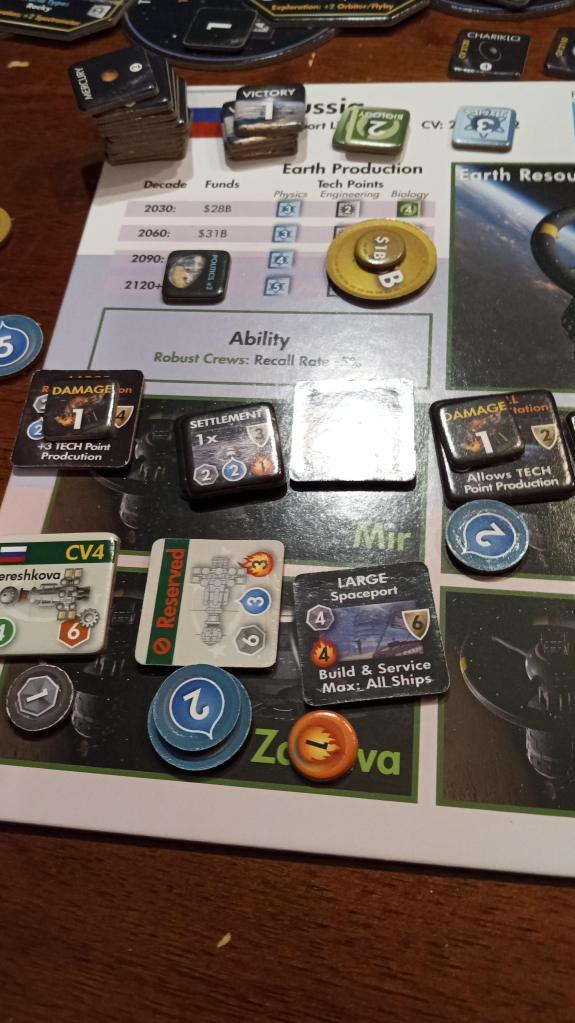
Mir, Vostok & Zastava have Settlement growth. I have 10 Engineering, 33 Physics and 38 Biology. Not a big Science decade, but I have plenty of Diplomacy and cash to buy what I need. I get Improved Space Medicine (Recall roll down to 20%), Pressure Shell (no more pesky Atmosphere problems), Artificial Intelligence (15% Malfunction chance & +3 for REs) and Energy Focusing which does….something. I think it’s +5 for combat.
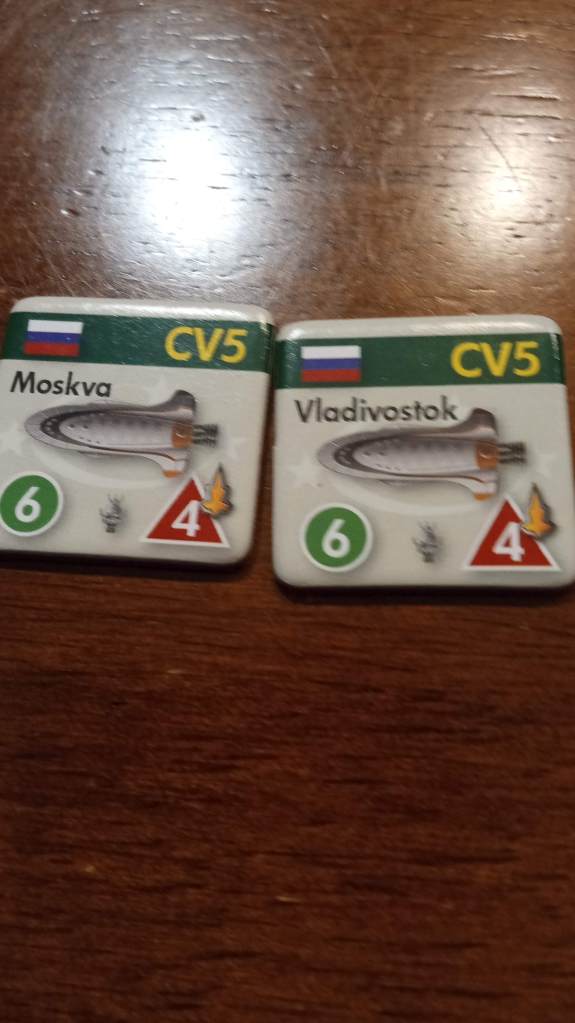
Now to just get everything to Zastava, have it build CV-5s & Terraform Callisto.
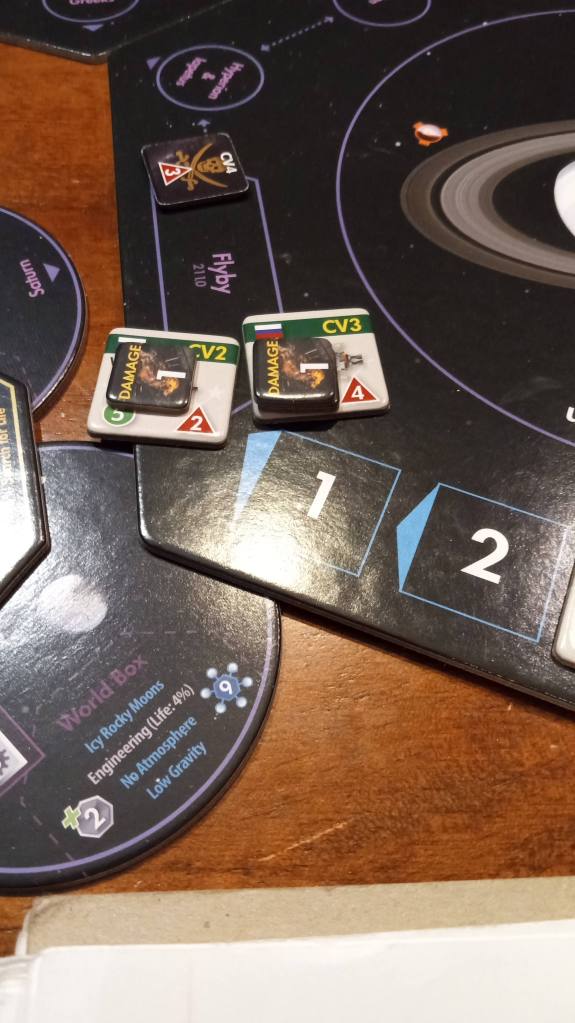
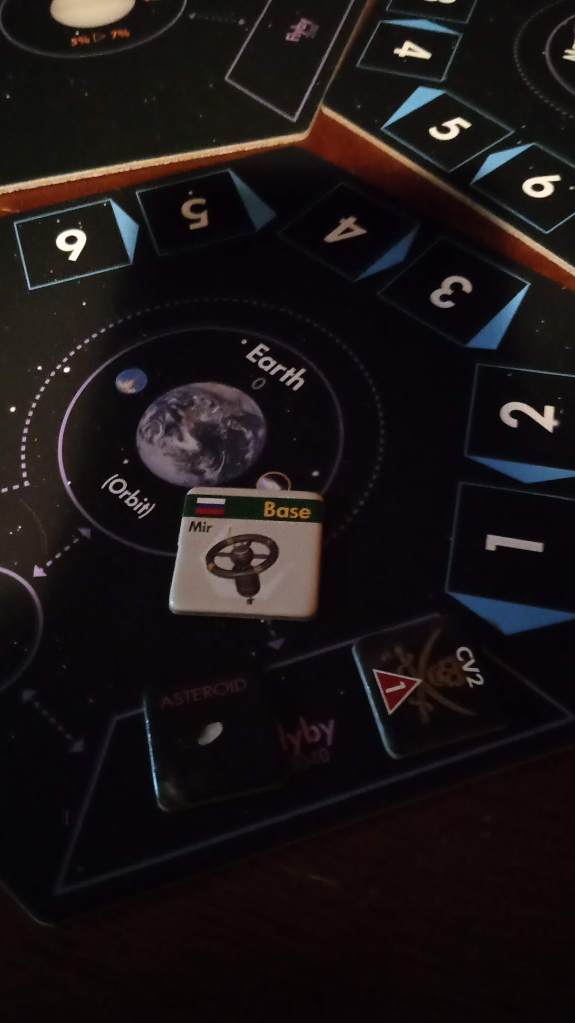
The timing of that picture may be off, because I don’t believe Titov is at the base, I believe it’s still around Uranus with that Pirate.
Okay, I Unreserve Leonov, fix Titov (Oh, I guess Leonov IS there. My bad). I spend 3 Billion on a new Neptune Orbiter. Titan continues to give me Depletions. Komarov completes the Mimas Mission so more VP for me. The new Mission is Phobos, a nice easy one. I buy 2 more Terraforming Points.
End of Game roll (06): 85
2151: 4 Billion for a Satellite for fun. Pirates find Titov and friend, but they only have 1 Tactics point, so they can’t flee. I have +11 to their +3. I roll 10 to their 5. I take 2 damage and they explode without a sound. I get another Sun depletion and another Mimas Depletion..with only 1% off from finding Life! Dang! And I get another Terraforming point, I’ve made it to 10. Half way there. The good thing about this is when you’re halfway Terraformed, you get a bunch of VP for reaching that threshold, so bully to that!
End of Game roll (07): unrecorded
2152: Load Renda up with Supplies, Unreserve Gagarin. Leonov delivers 4 Ore to Zastava. The Sun Orbiter dies. Titan finally Sciences itself out, so I shut down the Rover. The Space Telescope gets a Depletion on Eris.
End of Game roll (08): 75
2153: Deliveries are made. Leonov buys 4 Supplies from India for 2 Billion. Not much else happens because most of my Science ran out, but I’ve got a bunch of deliveries on deck for a ton of Terraforming next turn.
End of Game roll (09):
But there is no Next Turn.
*sad trombone*
So that’s it. That’s game. No more Terraforming, no more trips to the tech tree. That’s all she wrote. Now to calculate score.
Victory Markers: 19
Interstellar Technology (the end of the 3 tech trees): 0
Settlements on Terraformed Worlds: 10
Mission Points: 48
Discoveries on Alpha Centauri: 0
Settlements: 33.75 (multipliers for distance from Earth, +.5 for being on a half terraformed world)
Mir: 8
Vostok (x1.25 ): 11.25
Tseling (x1.75): 12
Zastava (x1.75 +.5): 2.5
Infrastructure: 18 (Things like Research Stations and Mining Facilities)
Mir: 4
Vostok: 5
Tselina: 3
Zastava: 6
Extra Unspent Tech Points: 3 (1 point per 20 unspent tech point)
6 Engineering
10 Physics
30 Biology
25 Bilion dollars that I spend on whatever I want
Unspent Political Markers: 1 (1 per 5 unspent, I have 6)
Fleet in Space: 11.5
3 Robot Explorers (.5 each)
3 CV-2’s (1 each)
2 CV-3’s (1.5 each)
2 CV-4’s (2 each)
Total Score: 144.25
BUT
Penalty: -3 for each turn after 2145 taken: -24
Penalty: -3 for each technology not researched: -30
True Total Score: 90.25
According to the rulebook, anything less than 100 is a “DISASTER.”
Well.
That’s disheartening.
Had I gotten Callisto fully terraformed, I’d have netted at least 15 more points., easily putting me into the “Defeat” category.
I mean, I said at the beginning I wasn’t planning on winning. Mind you, losing by THIS MUCH wasn’t in the plans either. Woof. But I suppose I learned something by playing, and maybe you learned somehing too. And that’s a win in and of itself. And hey, look at everything we have to show for it:
Almost every site has a World Card attached to it. We half-terraformed a moon of Jupiter. We have tens of thousands of humans living off planet. That’s pretty awesome.
Would I have been happier with a better score? Yeah, I would have. When I pull this out again next year I’ll do a little better, and probably re-read this post to see how I can improve. But hey, it’s the story of man’s first steps into the Solar System that I was able to watch from the driver’s seat. That’s what it’s all about.
Anyway, I hope you enjoyed watching, too. I do have a ko-fi account if you want to put a little something in my tip jar for the work it took to put all this together. If not, that’s okay, too. Thanks for reading!
It’s been a slow but steady road out to deep space. I’m spreading my wings and getting a few hundred people living on the surface of Mars and now have the technology to get people able to explore the Asteroid belt. And I’ve only been playing 60 years of humanity’s future!
But for now it is 2090 and I’ve got work to do. Lots of work. 2145 doesn’t seem so far away, and there’s a small possibility that the game could be over then, and I’m no where close to the point threshold of a victory (or even that Draw that I’m desperately fighting for), so I need to hop to and get those Missions done and get more Settlements out there…and also get those Settlements farther from Earth.
One step during the beginning of the decade that I haven’t mentioned yet, mainly because I’ve failed the roll every time so far, is that for each Settlement, for every multiple of 10 on the Size, it’ll grow another 1, and for each fraction of 10, if you roll less than that on a d10, it’ll grow another 1. Of course, Mir and Vostok have not grown due to this yet, even with Mir at Size 6. Because the dice don’t like me? I guess?
That’s okay, Settlements around Earth aren’t worth nearly as many points as the ones on Mars, or, better yet, even farther away. So I want to get those up and running as quickly as possible.
So I spend 5 Billion on a Rover and a Probe for that Ceres mission, 3 Billion for another Jupiter Orbiter and a size 2 Launch Vehicle to Launch it. With my new technology, it’s only going to take me 1 year to get my craft out to the Asteroid belt with an oversized launcher, and 3 years to Jupiter. Nice. Leonov fails its Recall roll mining Phobos for Ore this time. Hrmph.
2091: Spend 6 Billion to load Renda up to supply Mir with…um…Supplies. Volkov leaves Luna to head for Mars. Leonov delivers its 1 Ore to Vostok. Kliper is unable to complete its mission and must return home…or to a nearby supply station, at least. The Probe on Ceres gives middling results.
2092: No money gets spent as I need to see what happens first. Volkov now flies out to the Main Asteroid belt. Time starts to become an issue as most of the turn is watching things in Transfer Orbits.
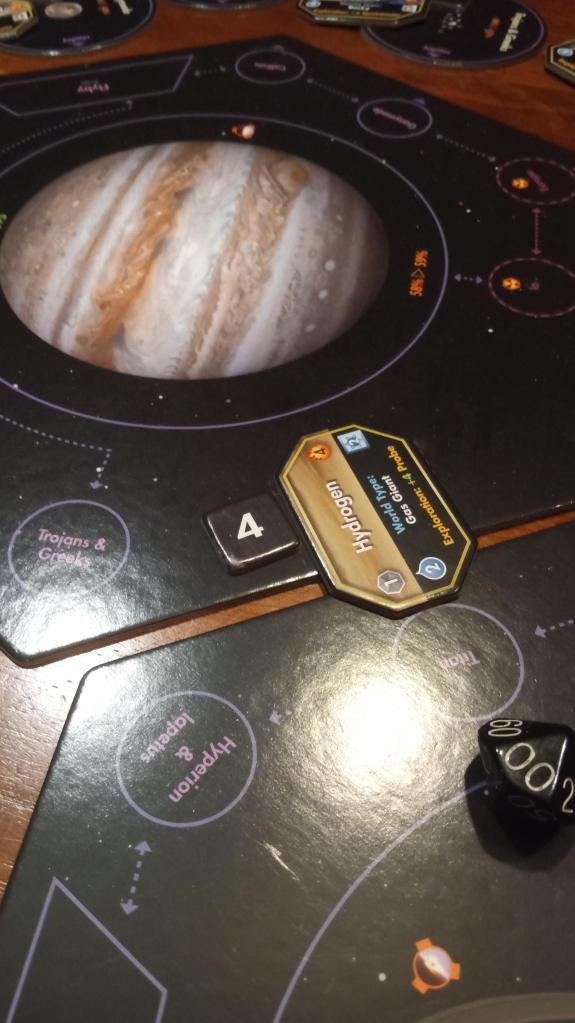
2093: Spend 6 Billion for Ore & Supplies for Renda to give to Mir. The LV-2 fails the Recovery roll when it launches Renda. That’s a pricey failure. Two ships dock at Mir to be resupplied. Jupiter Orbiter draws a 5! and breaks immediately. But hey, Mission successful. I draw Mercury as my new mission. And a World Card on a Gas Giant!
2094: Kliper and Leonov get Resupplied without landing on Earth, saving me a bundle on Launch costs! I spend 3 billion on a Mercury Orbiter. I watch as things float through space.
2095: Spend another 6 Billion worth of Resources on Renda for Mir. And an immediate Depletion on Mercury! Woot! New mission Vesta. Sticking to the Asteroid Belt. No problems there. Except my Ceres Rover dies. But not before completing that Mission! Double Woot! I may not be able to keep these Mission chits, but I get Victory chits instead, and the Diplomacy chits are nice as well. New Mission: Sedna. Oof. That’s a long road out to the Kuiper Belt.
It’s starting to look busy in this neck of the woods!
2096: I spend 3 Billion on a Sedna Orbiter and Probe. With an extra big boost from a larger Launch Vehicle, it’ll get there in 10 years. I actually had to do some math and multiply 15 times .07 on some paper to find the answer of 10.5, round up to 11 and subtract 1 to get that answer. I should use a slide rule for accuracy.
Or get a Kerbal to do it for MY kind of accuracy.
Oh no! Kliper’s Engine’s fail on its way to the Asteroid Belt! A 2% chance!
UN freaking BELIEVEABLE! Leonov’s Engine’s fail on its way to Mars! A ONE PERCENT CHANCE!
Volkov fails its Resupply roll too. A bad day for humanity in space. On the plus side, I get to draw a bunch of concillatory Biology markers. On the downside, I just lost 2 CVs due to shit die rolls. Oof. 2096. Not a good year.
2097: 10 Billion gets me a new Leonov. Mir Builds a Komarov. That’s right a fresh space ship without spending a dime using resources in space. Yes, I believe 100% of those resources were brought there from Earth…but some of them could have come from Mining…maybe. Not much happens that year, oh wait, I got another depletion on Mercury. So that’s something!
2098: Some things move. Leonov mines some Supplies from Phobos.
2099: The Mercury Orbiter finally breaks, but gets another depletion first! What a trooper!
2100: Another Survey Error Event. Huh. So this happens randomly:
During Diplomacy Japan drops to Neutral. Hrmph. You see, at the beginning of the Diplomacy phase, all NPFs have a chance to “regress toward the mean (neutral)”. You roll a die and on a 1-7 that country associated with that number will move toward Neutral. So far I’ve rolled 8+, which is why I haven’t said anything yet. This time I rolled a 1, so Japan decides to get a little grumpy.
So I spend 2 Diplomacy markers (I have quite a few this time) and try to get Japan and the EU as friends…and both say No.
I roll my eyes and continue.
I get my money and get no NPF bases or pirates or asteroids.
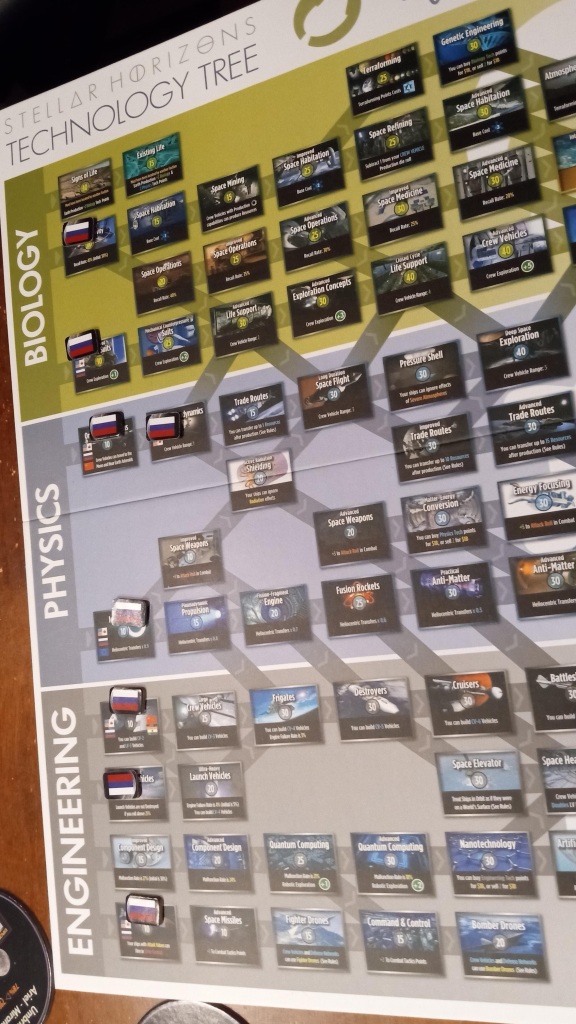
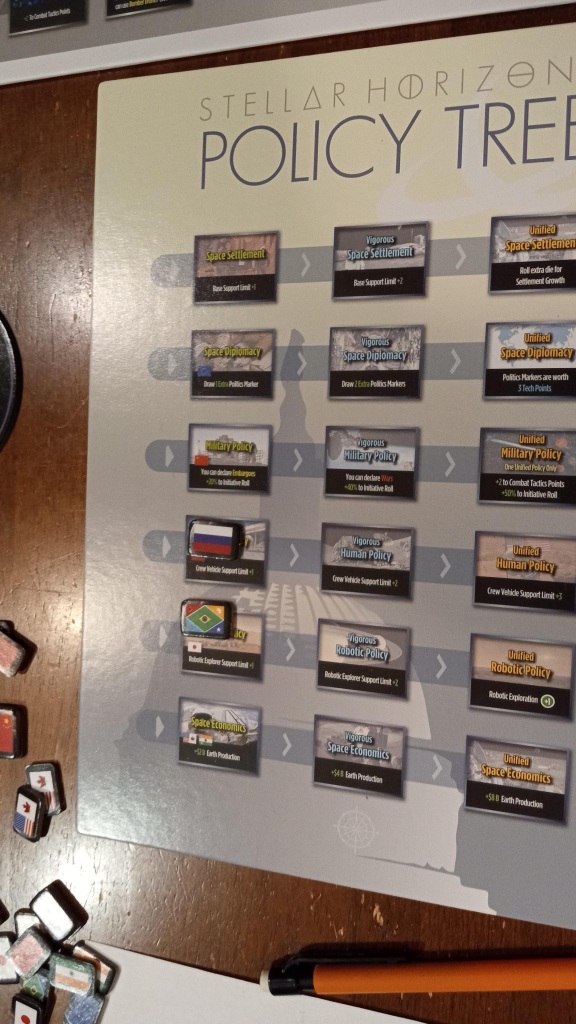
For tech I get 25 Physics, 30 Engineering and 31 Biology. I buy Exploration Concepts (+3 to Science rolls for humans!), Fusion Rockets (x.06 transfer times!) and Frigates (bigger ships!). I also get an Unified Human Policy so I can have the maximum amount of humans in space at once. I’m currently at that limit and I don’t have to pay any fees or anything.
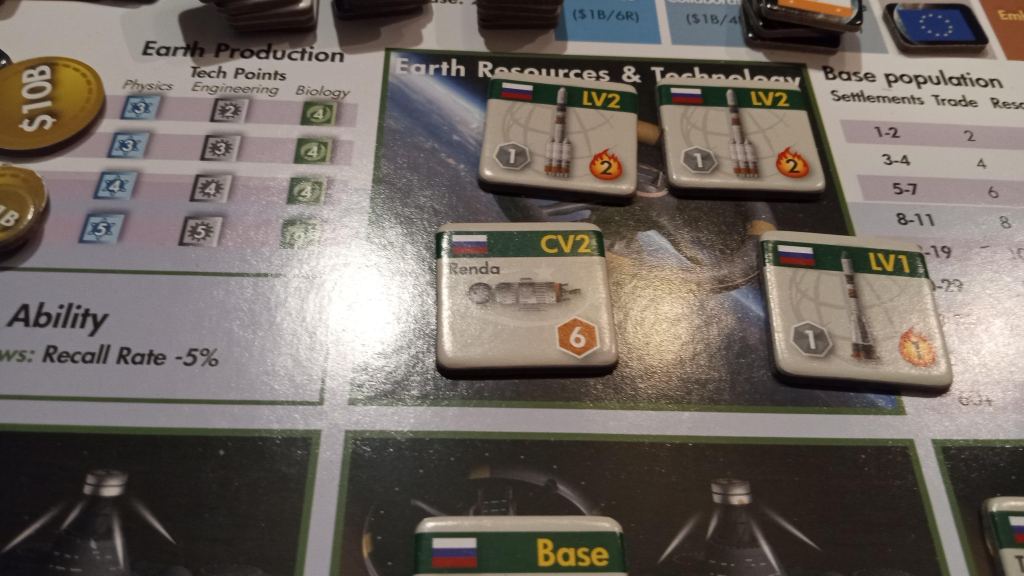
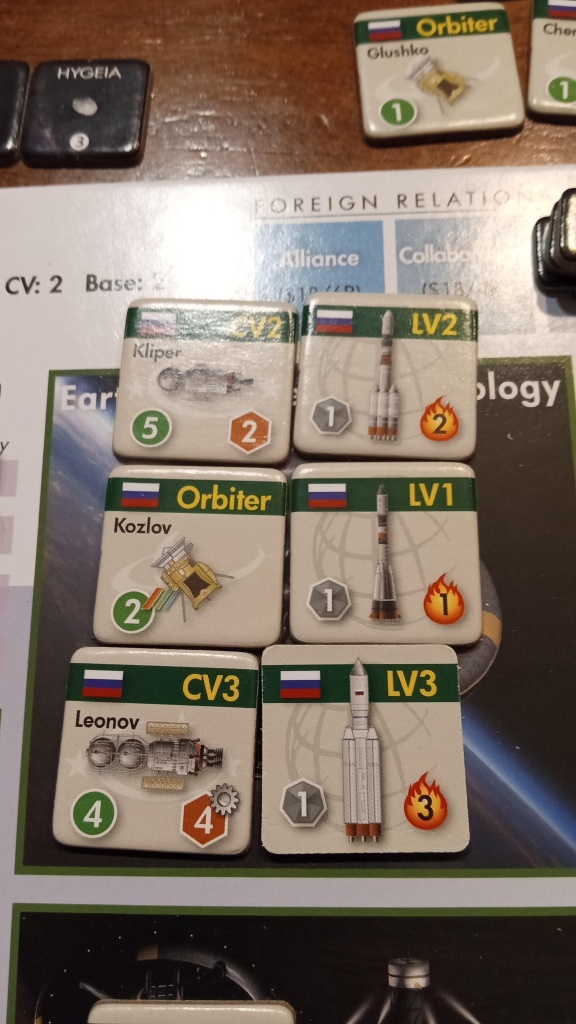
These are the things I can build now:
I expect to not be shipping as many resources from Earth now as I can mine a whole lot more. Bully!
Okay, so I Resupply Volkov on Mir (yay for not having to land and relaunch!), then spend 17 Billion on Gagarin and a Launch Vehicle to get that thing into the air…and then out of the air into space. Then 6 Billion to load up Renda with resources…then another 6 Billion to load up Gagarin with Resources. I launch them both toward Mars. Leonov Mines Phobos.
2101: 4 Billion for Zasdayka and I immediately launch it into the Sun like I’m Superman. The Launch vehicle fails, but okay. Renda & Gregarin land on Vostok. It builds a Small Spaceport. Zasdayka goes off course and crashes into the Sun. Leonov mines 2 Ore.
2102: So I buy a new damn Zasdayka and launch it TOWARD the Sun instead of into it. Leonov delivers mined Ore to Vostok. And then the freaking thing crashes into the Sun again! *sigh* But at least I now have the first Settlement on Vostok. Humans living on Mars!
2103: I buy a third Sun Satellite. I’m not even naming them anymore. I buy a Rover, too, because I need Science. Komarov fails its Recall roll on Vesta, but it succeeds its Mission! Aaaannnnd I didn’t write down what the new mission was. Uh oh. I guess we’ll infer that when I complete another Mission? Leonov mines 2 Fuel and Gagarin mines 2 Supplies.
2104: I’m down to 2 Billion already, so I chill out on Earth. The unnamed Satellite not only succeeds, but gets a Sun Depletion! The Telescope also gets a Depletion on Titan!
2105: A Venus Depletion as the Satellite had moved on past the Sun! Go unnamed Satellite! Well, the Telescope breaks down, bringing balance to the universe.
2106: Komarov resupplies at Vostok. Oh my, that Orbiter I launched YEARS ago finally is Orbiting Sedna! Leonov lands and delivers 2 Fuel and Ore to Vostok so it can increase its Settlement size. The Probe on Sedna would let me draw 2 Science chits on an 8 or less….I roll a 10. No Depletion. Gagarin has a full bay of Supplies, uses it to build a base called Tselina on Ceres. Livin’ it up Expanse style!
2107: Spend 2 Billion on Ore & Fuel for new base which I’ll be able to transport at some point. Vesta must have been my new mission, because I succeed this year! New mission is Callisto…which I need to do with Humans. Arg. Guess Tselina will need to be a Supply station as I can’t get humans out to Jupiter yet.
2108: Volkov fails Recall roll, but gets 2 draws resulting in another Depletion. Satellite gets another depletion…bully! Komarov also poops out. Sedna Orbiter also fails without getting Mission success. *sad trombone*
2109: Jupiter Orbiter fails; Ganymede depletion from passing Satellite…that thing is killing it! Leonov fails recall roll when mining. I scrap Redna at Tselina to build a small Supply Station there.
2110: Yet another Survey Error! Turns out the Water found on Triton was wrong, and is now replaced with Cratered Surface. Hrmph. No Diplomacy changes this turn. Vostok produces 4 fuel, all resources from Mir transported to Tselina. First NPF base on Mercury!
Solar radiation making it blurry. It’s a Chinese base (chosen randomly) and I can buy 2 Fuel for 1 Billion. Because I’m at Free Trade with China, I can do that up to 4 times. Considering my biggest cargo tank is 6 right now, that seems reasonable.
Oh hey, a Pirate shows up around Mercury, too. Guess they smelled profits! An Asteroid shows up around Earth, and another around Mars.
I end with 23 Biology, 36 Physics and 40 Engineering. I get Advanced Space Operations to get my Recall Roll percentage down to 25%. I get Advanced Space Weapons and Advanced Quantum Computing, lowering my Malfunction Rate to 18% and getting +2 to all RE Science traits. Finally Combat & Control because….well, because. Finally choose a Vigarous Space Settlement Policy because clearly I need a lot of bases to keep creeping out toward Jupiter.
So I spend 12 Billion to build Tereshkova on Earth, and 4 Billion for a Satellite & Probe to send out to Sedna…again. Oh, 5 Billion in Settlement supplies as well. Gotta keep shipping those people off of the planet. We’re full.
Well the LV-1 broke launching the Satellite, so we’re starting off great, but it’s off on the decade long ride out to the Kuiper belt. Tselina builds its Large Supply Station and Vostok gets another Settlement. Points, baby!
2111: 2 Billion for a Space Telescope. Cheap way to get a little science trickling in, right? Also have to spend 2 Bill on a launcher since the other broke last year. 4 Billion for a Mimas Rover to get some more Science. Got another launcher to get everything in space at once. Good thing, too, because one didn’t survive lift off. 25% rate of failure on recovery rolls is higher than it seems.
Volkov, Komarov & Leonov get Unreserved at Vostok. Nice that they don’t have to come back to Earth any more. Not even to Mir. Leonov goes to mine that new Earth Asteroid, the other two ships head to Jupiter as now they can since Vostok has a good enough Supply station to, um, Supply them. Gregarin goes to mine the Martian Asteroid.
Oh, the telescope breaks after one picture. Awesome.
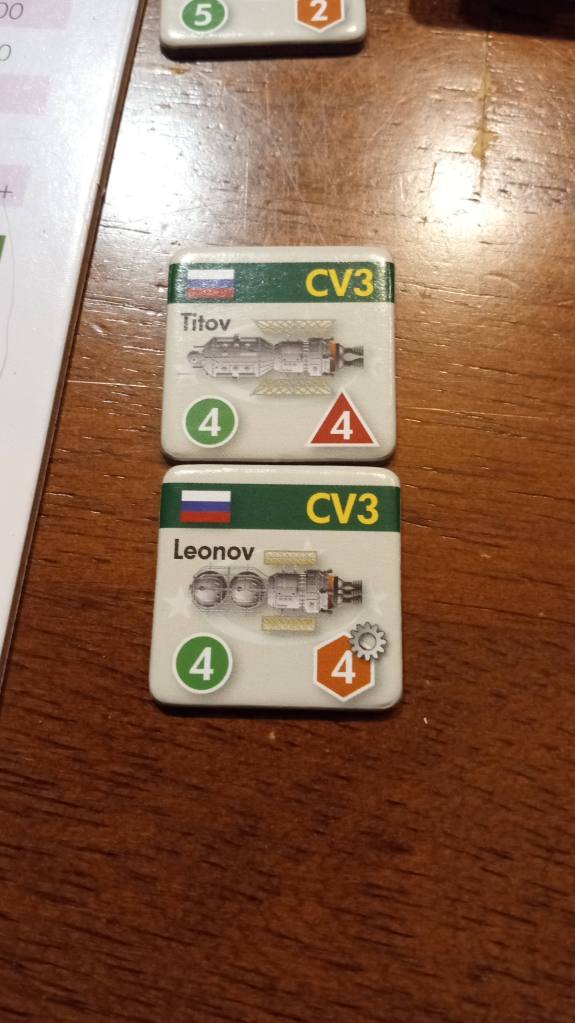
2112: 8 Billion for Titov. If you remember, that’s the CV-3 that’s made for combat. I make it for Pirate hunting!. Leonov manages to get 4 Fuel from its Asteroid. Gregarin gets 3 Fuel, but fails its Recall roll. Still, you get a Victory token each time you mine an Asteroid, so that’s okay. I also find this strange device under a water fall. When I touch it, it gives forth a sound. It’s got wires that vibrate and give music. What can this be that I found?
Did you really think I wouldn’t put a Rush joke in the 2112 entry?
ANYWAY
2113: Titov is unable to find the dreaded Pirates, space is big. Tereshkova fails Recall roll getting supplies from the Asteroid Belt. There’s something else noted here, but I can’t read my handwriting. I was probably shaking from my laughter at the stupid 2112 joke. Sorry about that. I guess you can blame all the blurriness of my photos on Moving Pictures as well.
HA!
Come for the gaming stories, stay for the Prog Rock puns!
2114: Leonov sells that 4 Fuel mined from the Asteroid for 8 Billion dollars. The Earth economy tanks. Game over.
Oh wait. Never mind. Though that is an interesting thought experiment. We do manage to get an asteroid into Earth orbit and we suddenly have access to Trillions of dollars of metals that were rare. What happens?
Anyway.
I buy some Ore to build up the Vostok Settlement. Still no combot as the dice are not being kind. A settlement is created on Ceres. More people in that tin can.
2115: Gregarin and Tereshkova are Unreserved. Spend 8 Billion on Renda & load it with 2 of each Resource to send to Tselina. The Pirate finds Titov, but with my technological upper hand, it only has 2 Tactic points, so it can’t run! Sadly the combat roll has him rolling a 10 and me rolling a 5, so we each do 3 damage to each other. Two simultaneous explosions in space.
In Science news, I had two double chit draws with human crews, on Calliso and Io, which means if those chits added up to 3, they would count as depletions. They were both double 1’s. Hrmph. To add insult to injury, Gregarin fails its Recall roll again mining supplies. But at least Vostok is now up to 5 Settlements!
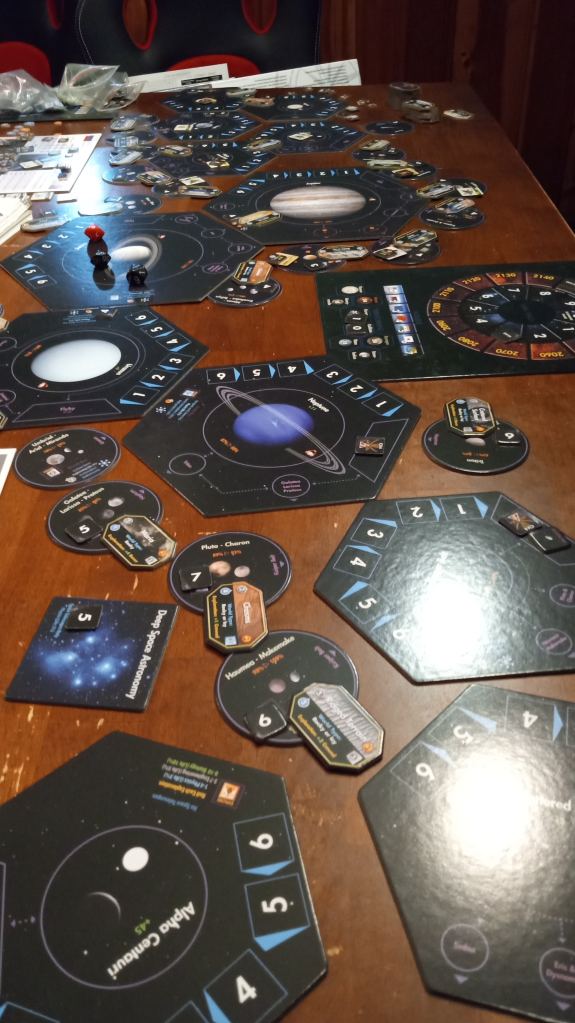
We break for a quick picture since I apparently hadn’t taken one in a while. Look how busy the Solar System is now. All those World Cards out now! Stuff in space!
You can see the World Card discard pile is almost twice the height of the draw pile. I’ve been a busy boy!
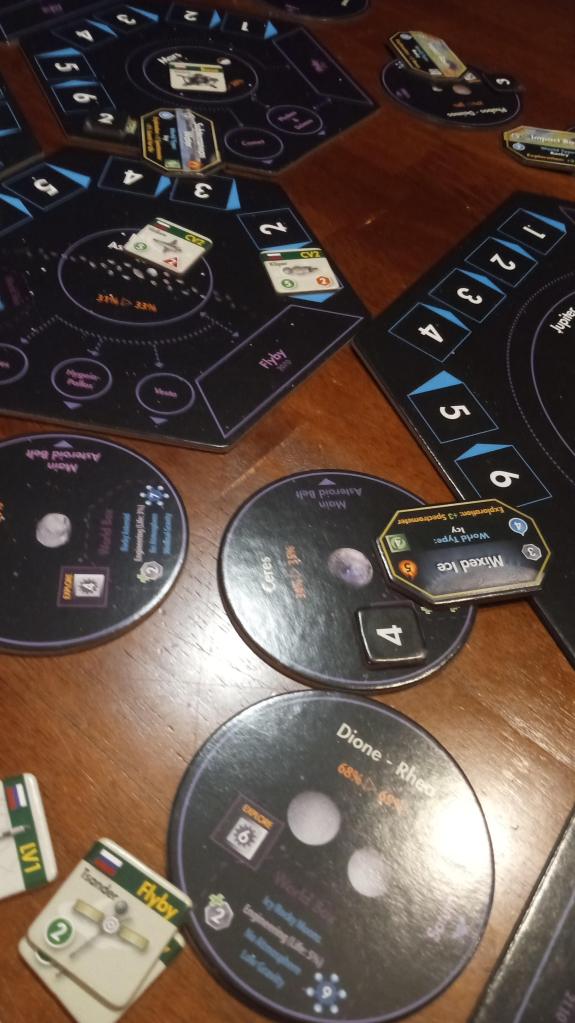
2116: My Rover finally lands on Dione & Rhea (I guess it lands on one of them, but the card shows both…so let’s just say Dione). Hey, my Callisto mission is a success! The next mission is Titan….with Humans. (These missions have “CV” listed next to them, meaning the Depletion is required to be done by a CV crew). Io also gets a Depletion. Jupiter is being generous. Tselina’s settlement gets bigger.
2117: I break Renda down for scrap as resources are more important than money out in space. Gagarin gets Unreserved out at Tselina. Spend 2 Bill on a Space Telescope. Komarov fails its Recall Roll. I get another Depletion on Io and a lot of successful mining rolls.
2118: Nothing much important, but the telescope gets a Depletion on a far off shot of Proteus waaayyyy out there.
2119: 5 Billion is spent on 2 Ore, 2 Supplies and 1 Fuel for the Transportation phase during the beginning of the next decade. Volkv fails its Recall roll. My Probe arrives at Sedna and gets a successful Depletion! New Mission: Mercury.
2120: New Event: Immigration.
Okay, it looks like I’m getting the same events over and over again. I SWEAR there are 21 different events on this chart, I’m just rolling the same ones! I’m sorry! This is what random means!
Anyway, North America drops to Neutral, but I get them and Japan back up to Free Trade agreements. A Chinese base appears in the Asteroid belt. Not bad. If I’m hurting for money, I can sell them my Ore.
However, a new Pirate appears around Jupiter AND Saturn. Yuck.
I get 22 Engineering, 23 Biology and 48 Physics. Bomber Drones, Space Habitation and Matter Energy Conversion (I can now buy Physics points for cold hard cash). I also use Diplomacy and cash to get Space Flight as well to get out to Saturn.
Vostok Settlement grows on its own, and I choose Vigorous Space Diplomacy to get more chits to get more Science.
I Unreserve Komarov on Tseling and spend 8 Billion on Titov to go Pirate Hunting as well as 3 Billion on a Mercury Orbiter for that Mission. THe LV-4 Launcher doesn’t get recovered. But Dione gets Depleted, and I’m able to get another Settlement on Tselina. More VPs!
2121: 8 Billion to get Renda back and 6 Billion to load it up with Supplies. Also get a LV-2 launcher to get it out to Jupiter quickly. Well, quicker. I also unreserve a lot of ships at Tselina. Ceres is hopping! Komarov finds the larger Pirate and gets 4 Tactics Points. Spend 1 for Direct Fire, and 2 to Reduce Damage to itself by 1. I get to roll 1d10 + 5 versus their roll of 1d10 + 3. I roll a 9 and they roll a 10. Yikes. I do 4 damage, and he does 3, but minus 1 for my Tactics, so 2. Sadly Komarov can only take 2, so we both explode.
Tselina builds a Small Spaceport.
2122: 8 Billion to rebuild Komarov on Earth. I realize Mercury has +2 for Crewed Exploration, so I’ll send them down the solar Gravwell and get that “easy” mission that way. Titov needed to wait for a Spaceport around Jupiter before it could go to Saturn, and sadly fails a Recall roll before I could get it out there since I didn’t want it just taking up space. Oops.
2123: Leonov deposits its goods in Vostok, loads up 4 Supplies to take to Tselina. The Mercury Orbiter breaks (it needed a 4 or less to find anything anyway). Increased the Settlement size on Vostok.
2124: Volkov fails Recall roll, but gets a Depletion on Io. But hey, I have yet another Base now: Zastara built on Calliso! Renda’s parts are going to be used to further build up this new shiney base.
2125: 4 Billion for a new Flyby Satellite that I launch toward the Sun. Because science. I land Leonov on Tselina and load it up on Ore and Fuel. Komarov and Gagarin fail their Recall rolls. I hate it when it happens to multiple ships at the same time.
2126: 8 Billion for a new Renda at home, with 3 Fuel and 3 Ore on it (14 Bill total). Another Dione Depletion from my little Rover there who has been hard at work.
2127: Another Dione Depletion! My Flyby Satellite poops out around Venus. Ah well.
2128: 2 Billion to Resupply Komarov, then it’s right back to Mercury for you, young man! Enceledus Depletion. Titov fails its Recall roll again. It’s so close to be able to get to Saturn.
2129: Renda lands at Zastara and dismantles itself. Mercury Mission is complete! It’s 2 points, but hey, it’s something! And Mercury now has a big ol’ 0 on it, so no more Science possible. New Mission is Chariklo…also with humans. And that’s round Uranus. Oi. The Dione Rover finally shuts off, but it did some fine work. Zastara now has a Large Supply Station.
Quite a collection of bases I have going on here!
2130: New Event! (Told you). Research Strikes. Yuck. Halve all Research gains of bases & damage each Research base by one (you see that in the picure above). So both the Research stations will permanently give -1 Research unless I spend Ore to fix them. Blah.
China drops to Neutral. But then I get both China & the EU (finally) up to Free Trade. 53 Billion produced. NPF Base on Europa (Japanese this time), another Pirate around Saturn, and one around Uranus. Asteroid appears around Earth and in the Asteroid belt….ironically. Even with the Research strike, I manage to cobble together 26 Biology, 40 Engineering and 50 Physics. I get Space Refining (-1 to mining rolls), Practical Anti-Matter and Trade Routes (cost me 10 Billion, but worth it) and finally Destroyers so I can build these:
They have drone fighters on them and those Pirates won’t know what hit them. They’re also worth more points at end game. Unfortunately without Space Elevators, I have to build them at a base, so it takes work (and a lot of Resources).
Vostok and Tselina both grow a size on their own, and I get a Vigorous Space Economics Policy because…why not? I’m running out of things to pick (The military track is pretty pointless in solo games).
I spend 8 Bill for Renda in what seems like a vicious cycle, with 6 Bill to make Tselina a Large Spaceport. Titov is resupplied and ready to head out to Saturn. Volkov goes with it for good luck. 4 Billion for a Rover to head to Titan so I can get some Biology tech with the end goal for Terraforming Callisto for VP.
LV-2 fails recovery roll on launch. Tselina Settlement is increased in size. Zastava now has a Small Spaceport.
2131: Titov and Volkov look for Pirates. Now this is 2 ships looking for 2 ships, which are easier to find. Technically, that makes it +1 for each side to find the other, for a net +2, so we will find each other on a 6 or less. I roll a 4 for them and a 7 for me. With all my tech, they only get 1 TP for that, so combat begins. You can only do combat with one pirate at a time (I guess the other one leaves its friend to die like a coward…awesome). I get +7 to my roll, it gets +3. We both roll 8. 4 Damage to him, 3 Damage to me. I spread my damage among my two ships, leaving them both barely standing and with another Pirate to deal with. Uh oh.
Komarov checks out Venus and gets a Depletion, but fails its Recall roll. Zastraya now has a Large Spaceport. It can build my CV-5’s!
And apparently Mir needs to check its lights, it’s going Super Nova!
2132: Gagarin (you can see in the above picture) gets unreserved and takes off for the Earth Asteroid. Tereshkova takes off for the Mars Asteroid. Do my two damaged ships get into more combat? I actually try to get them back to base before combat happens, but the Pirate spots me and I only get 1 Tactic Point, so escaping is not possible. I only have +4 to his +3. Here’s hoping for kind dice. I roll 10, they roll 4. Phew. 1 Damage to me, 4 to him. Hooray! Volkov gets destroyed, though, but the Pirate goes too!
2133: I use some of that Pirate Loot to buy a new Flyby Satellite. I rebuy Volkov and a Launcher to launch it. I’m aiming for the Sun again to see how far it’ll go. I send Volkov toward Saturn directly. Titov tries to complete the Chariklo mission, and fails its Recall roll. Oh well, worth a shot. It was damaged so was -2 to everything. Tereshkova mines 3 Ore from the Asteroid Belt Asteroid. I build a Small Mining station on Zastrava to get at that Subterranean Water, which will be important for later Terraforming.
2134: Unreserve Komarov and break Renda down again. Spend 3 Bill on an Orbiter. My Space Telescope turns off, getting me a little bit of Science over the years, including a Depletion on Mimas this year. Thanks! I increase Zastrava’s Mining station to a Large Mining Station.
2135: Leonov gets Unreserved at Tselina. Komarov gets an Earth Depletion. I almost forgot you can actually do Science while Orbiting Earth. It only has a value of 3 and can only be done by CV’s, but hey, it’s right freaking there. And I want Bio tech! Gagarin gets 4 Fuel from the Earth Asteroid. Zastava gets its first Settlement.
2136: Titov is repaired at Tselina for 2 Ore. Then I get Vapor lock…I probably stare at the board for 10 minutes then just go to the move phase because I can’t figure out what to do. The Reserved Leonov goes to Sutakata, the Japanese Base on Europa to buy Fuel. Komarov fails Recall roll. Titan Mission is a Success! I find Frozen Methane there. Nice. Rover also succeeds there. The new Mission is a CV Mission….on Pluto. Yeah. That’s gonna wait a while.
2137: No bases with Ore & Fuel on them at the same time right now. I need to fix that. I spend 2 Billion on Europa to get 4 Fuel on Leonov. I get another Depletion on Titan.
2138: Titov Unreserves at Zastrava. Komarov Unreserves on Earth. Volkov hopped over to Hyperion and Depleted that. Good work!
2139: Dismantled Komarov for 4 Billion dollars to use to buy Physics points next year. Leonov Unreserves. Move Tereshkova to Sell Ore at the Chinese base in the Belt to buy even MORE Physics points! Get another Dione Depletion.
2140: Only 5 years until the first End of Game check! Event: Publicity Campaign.
I swear, 21 Events!
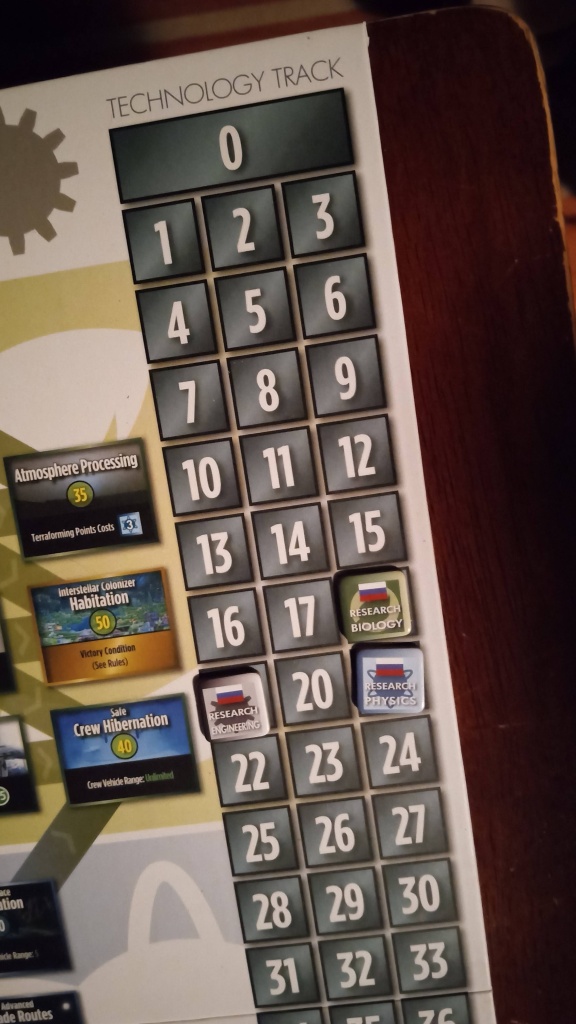
I choose Chariklo to make it easier to finish that mission. EU Goes back to Neutral, and I don’t care as 1 Billion isn’t much of a difference at the beginning of the decade, and they don’t have any bases to trade. Mir gets 7 Biology, Vostok gets 8 Supplies and Zastroya makes 6 Supplies. I transport through Trade Routes 10 Supplies from Mars to Callisto. Ganymede now has an Indian Base where I can sell Fuel for 2 Billion a piece. Pirates at Mars and Jupiter. Asteroid at Venus and Saturn. 13 Physics, 26 Engineering and 57 Biology total. I buy Terraforming and Nanotechnology with a little help from Political Markers. I use the last of my Political Markers to get Closed Cycle Life Support. I then spend 17 Billion to get Advanced Anti-Matter (x.04 Transfer Rate!). Mir and Tseling Settlement grows on its own.
And now I’m in the 2140s. I officially start rolling to see if the game is over in 5 years. I should have about 20 years of gameplay left, but who knows, it could be as short as 5. I have to get Callisto Terraformed quickly if I want those points, and I need to get as many Settlements on it as possible. I also need to get a metric boatload of technologies discovered in 2150 to not get penalized as I’m not assured to make it to 2160. Then again, I’m not assured to make it to 2160 so..
Oh well, we’re in a race to the end here. ’till next time!
Without a bunch of tourists getting migraines and occasionally dying.
Anyone else remember those stories from Disney World? Just me? Anyway.
So we’ve gotten ourselves situated to have more Robots in flight, got some tech to let our Humans make it all the way out to Mars or Venus (but why go to Venus? To cook ourselves?), and made our chances of keeping both of those things last in space a bit longer. Looks like we’ll have a productive decade on our hands. Let’s see what the 2040s have in store!
2040: I get a picture from our new Neptune Orbiter of Triton. But it’s ‘meh.’
2041: The Triton mission is a success as the Orbiter turns itself off. Starting the decade off right. Mission chits are now Mars and Ganymede.
2042: The Orbiter around Jupiter also stops working. I paid good money for these dang things. Our human mission to Mars takes flight.
2043: A new Jupiter Orbiter + Probe is launched, I also chuck a Space Telescope up there because my ability to get science is starting to get scarce out there. Oh look, it breaks in its first year. Fantastic. But at least my humans have landed on Mars, collected some science and succeeded on their Recall roll, so they can stay longer than one year.
2044: Humans get Science on Mars. A little anyway, but the Recall roll is a failure, so they have to return to Earth. Hrmph. I launch a new Space Telescope that does…nothing.
2045: I get a successful depletion of Deep Space Astronomy with my Telescope! No life found or anything, but hey, I’ll take good news anywhere I can find it.
2046: Our Martian explorers safely return to Earth. A parade is held. Nothing much else happens this year. Now, keep in mind, each and every time something moves on the board, you have to make a roll (except if it’s just ticking down on the interplanetary travel tracks) to see if the engines crap out. The chance of failure is only 5%, but you’re rolling a LOT, so it’s going to happen. And the chance is even lower with humans, as that 5% is lowered by the CV value of the ship, so it’ll only fail if I roll 3 or less for the ship that just landed….but it CAN happen. So I count my blessings when I get them.
2047: I convert all the Politics Markers I’ve gained so far into cold, hard, cash in order to get my shuttle back up and running (2 Billion is 2 Political chips….I’m not doing very well this decade) and then immediately launch it back into space. My launch vehicle is unable to be recovered, so that’s 3 Billion I’ll have to look for in the couch cushions. *sigh* However, what I did do, was spend the last 2 Billion I had to add 2 Supplies as cargo to the shuttle. I do this to build the base, Mir, in Earth Orbit. The point of this is that I can make it get me free Biology tech every turn, and also score Settlement Points for the end of the game (not many, but it’s better than nothing)
2048: My probe on Ganymede finds…some stuff, but nothing great. Humans check out a Near Earth Asteroid for funsies and get a depletion! No World card or any life or anything, but hey, I’ll take it.
2049: And I finish the decade off with yet another Deep Space Depletion! The little space telescope that could!
2050: So that was a ‘meh’ decade. Of course, most of that was due to spending half of my money on keeping all of those robots flying, and now that the decade is over….I don’t have any overages as I have one human flight and 2 robot flights. So, yay?
The event has me roll one extra time to spawn an asteroid, which spawns outside of the range for 2050, so no effect. I get two more nations up out of Neutral on the diplomacy track, but China, India and EU are still holding out. I get the standard Earth Production, +2billion for the two missions I have completed so far, and since I don’t have to pay anything, I get to keep all the money this time. Phew.
For tech:
Not great, but enough to get me Space Habitation, Plasma Dynamo Propulsion and Improved Component Design. Of course, Space Habitation would make base building a little cheaper. Had I held out a few years, Mir would have been cheaper, but….what are ya gonna do? Plasma Dynamos make my Heliocentric Multiplier .08, which affects everything that’s 3 or more distant from Earth, which is nice. Saving a year or two really adds up. Finally Improved Component Design lowers the chance of blowing up a robot from 30% to 27%.
I then set a Policy, and this one just gives me an extra 2 Billion every decade. Because money is nice.
Then we start the year by spending 6 Billion on Renda, a cargo hauler that can’t do science in space, but can turn Mir into a Research Station, which is my goal. I also get a satellite to launch to Pluto to get that mission out there (a 10 year flight).
My telescope goes dark this year, which is a shame, but it did good while it lasted. The Jupiter Orbiter did as well, but not before it got a successful depletion on Ganymede, fulfilling yet another Mission! 2 Diplomacy chits (one for the depletion, one for the mission) for me. I draw Ceres as my next mission. During the Building Bases step, Mir now has a Research Station.
2051: Sending Kliper to Mars again and purchased a Rover for Ceres. I send Renda back to Earth so it can get more supplies to make the Mir Research Station larger (and produce +3 tech). No tech is recovered this year as all my robots are broken, and everything else is en route.
2052: Purchased 2 supplies and Ore and am already worried that I’m tight on money. Woof. Man lands on Mars and accomplishes little. Mir now has a Large Research Station.
2053: Spend almost my last dollar on a Orbiter and Probe. Going to hit Mercury for some Engineering points. The Ceres rover lands and…fails. Mars, however, gets a successful depletion, though no World Card.
Renda lands back on Earth where I plan to mothball it and get some money back.
2054: I have no notes for this year. Huh. What did I do? Did I miss a year?
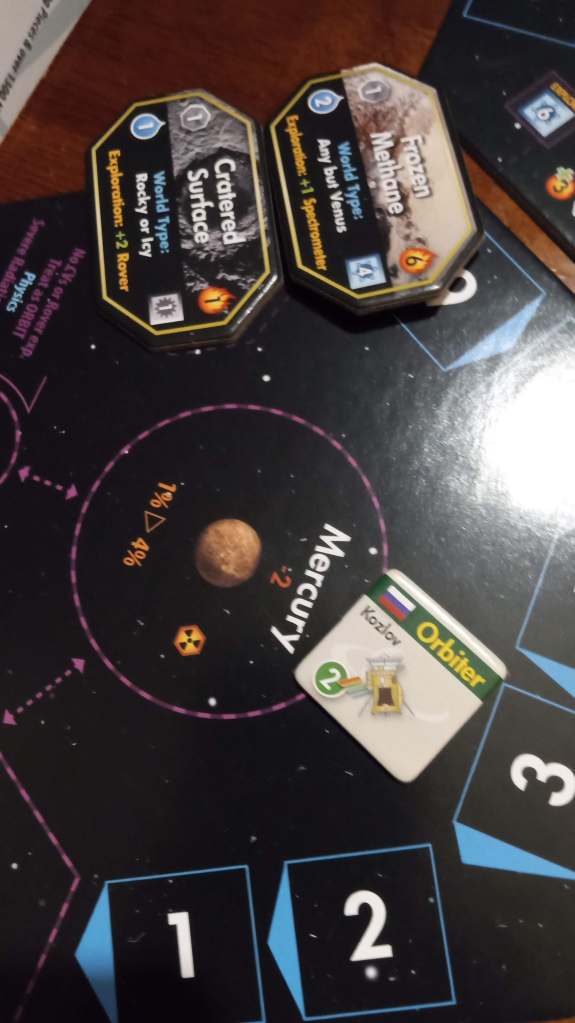
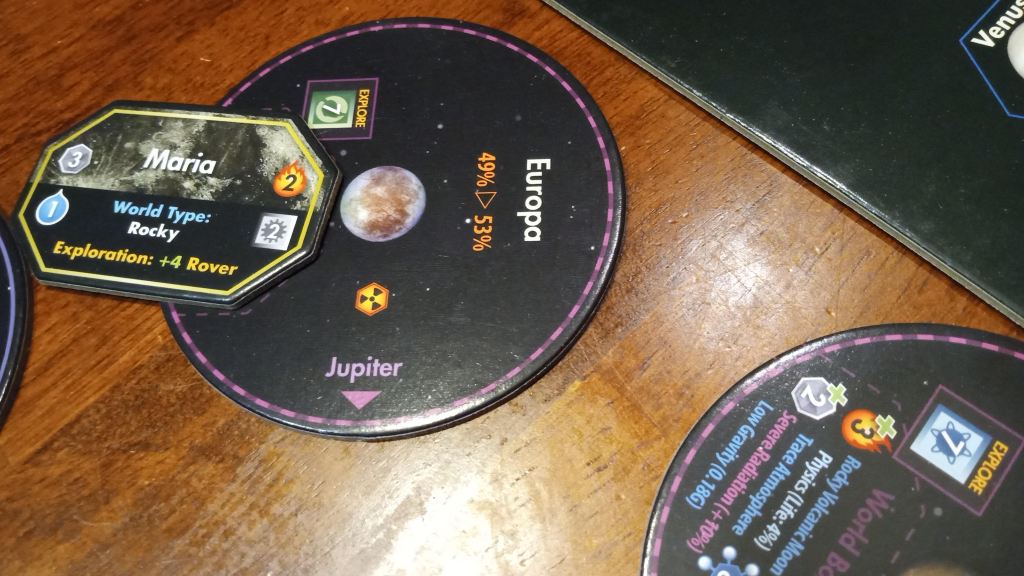
2055: Another Depletion both on Mars AND Mercury as the Probe hits paydirt. Mars gets a good World Card this time:
Due to the Mercury Orbter having a “Spectrometer” on board, I get to draw two World Cards and get to choose if they both could be played:
The Frozen Methane seems more favorable, so I stick with that. Looks like my luck is turning around!
2056: I spend a Diplomacy marker for a billion to drain the last of my funds to get the Konarov, a new CV (crew vehicle) to get more humans in space. I just send them to Luna to get more Engineering tech, and maybe a base friendly World Card in the future?
2057: Satellite gives nice long range pictures of Pluto (still 3 turns away, so was -3 to the roll). Both human spacecraft fail their recall rolls, but I got a successful Depletion on Luna at least!
2058: I spend 2 Politics markers for the money to buy a new space telescope. My Satellite gets a successful depletion off of Pluto! And, as what seems to happen often, it breaks immediately afterward. But that’s okay, though. The telescope is crap, it immediately breaks. Hrmph. My new mission is Phobos. Guess I’ll be sending humans there soon.
2059: The Mercury Orbiter finally turns off, but gets yet another depletion first. Looking at the board, there is now officially not a damn thing flying in space as my humans have now all returned to Earth. Huh. Weird.
2060: So we reach the end of another decade and get to do some bookkeeping. I get 2 Diplomacy markers for free, then roll an event. The event is “Publicity Campaign” where I get to raise the Exploration Value of a world by 2. Interesting. I choose Ganymede because that seems like a world that has a lot of promise for my future. I spend 3 Diplomacy markers to try to get the last 3 holdouts out of Neutral and succeed on two of them, so only the EU doesn’t want to be friends with Russia.
Can’t imagine why.
I now get 31B in Earth production money, and an extra 9 from Missions, Diplomacy and Policy. And even 40 billion is fine by me. That’s a significant step up. Mir produces 6 Biology tech points as well. Can’t argue with that.
No Non-player faction bases are placed. Nor are there any pirates or asteroids. Booooring. I end the round with 16 Physics, 29 Engineering and 30 Biology. I have to spend some Diplomacy markers, but that lets me buy Space Weaponry (doesn’t really matter much unless Piracy becomes a thing, but remember the -3 for each tech not researched), I get Space Missiles as well, to keep with the theme. Finally I get Space Operations to help keep my humans out there even longer (recall roll is now 5% better). For Policy I choose Space Settlement, maaaybe I’ll get a second base? Now that I look back, thinking I’ll have a second one in the 2070s was a bit silly to think about, I probably should have picked something else. Oh well.
And there’s 20 years of play. When I get going, it takes me ~20-30 minutes per decade. Time can vary depending on how many things I have flying at once, and how solid my plans are, and how quickly they’re ruined. That being said, you’ve read about 2 hours of play, and it’s 2060, and I don’t even start rolling to see if the game is over until 2145.
Buckle up, y’all.
So for 2060, I spend 4 billion to unreserve both CVs, another 3 billion for another Launch Vehicle to get both of them into space at the same time. I spend 5 billion for a probe/rover combo for a Ceres mission. Then 3 billion for a new Jupiter Orbiter which I’ll launch before the Ceres mission because it has farther to go. I collect no science this turn, and one of the launch vehicles fails to be recovered, but that’s it for the year.
2061: 2 billion to rebuild the launch vehicle and get the Ceres rover on its way. 4 billion for the Zosydka satellite flyby robot. I’ll throw it at Mercury and see if I can pull off a Grand Tour with it. *shrug* Why not?
Oh no! Kliper, who was landing on Mars while Konarov was landing on Phobos, rolled 01%! On a 1-3, its engines fail, and that’s just what happened. Funerals are held for the fallen astronauts that are now the first humans to be buried (or more than likely, cremated) on another planet.
2062: 8 Billion buys a new Kliper. Zosydka gets science off the sun before it is shot back around toward Venus. Konarov fails its recall roll on Phobos and must return, failing to get a depletion. But I did get a 5 Biology for failing the Recall roll, so I guess that’s a good thing! My Ceres Rover/Probe lands and gets some data.
2063: I purchase a new telescope. Hopefully from a new contractor because the last ones have stank. The new Kliper ship lands on Phobos as Konarov leaves. Zosydka gets pictures of Venus before it is slung toward Earth. Kliper fails its Recall roll and must return to Earth next year, too. Yeesh, Phobos is a harsh mistress!
2064: I hold back on spending cash because I’ve been burning through it pretty quickly, and clearly I’ll need it to resupply all these astronaut missions that have to keep coming back. The Telescope is able to return pictures of Eris. That’s pretty. Zosydka get a depletion on a Near Earth Asteroid! Those Silacate rocks should come in handy once I’m able to mine out there.
Clearly it was a full moon when I took that picture.
2065: 2 billion gets Komarov back into service. Still have 10 billion remaining. Koslav Orbiter around Jupiter finally makes it to Jupiter…and immediately breaks. *sigh* Zasydka takes a picture of Phobos..and gets the depletion I’ve been looking for! It’s got a nice Impact Basin on it. Mission chit now replaced with Hygiea (asteroid belt asteroid).
2066: I decide to scrap Kliper on its return, getting 3 billion back. I then spend 6 billion to build the Renda instead. This can’t do any science (the lack of green circle shows that), but it has a huge cargo hold (the 6 in the hexagon shows this), so I can use it to build a colony on Mir, and eventually get Mir able to build bigger CVs, once I research that.
I then spend 5 Billion on 2 Ore, 2 Supplies and 1 Fuel. That’s what is needed to build one Settlement on Mir. Settlements net you VPs at end game, and can start increasing production once you get a lot of them.
Komarov lands on Mars, and fails its recall roll again. Space is hard. But at the end of the year Mir has about 100 people living and working on it.
2067: Absolutely nothing happened this year. No science was collected as all rolls failed, but nothing broke or blew up either, so, yay?
2068: Our little satellite that could is out near Jupiter and gets a depletion on Ganymede! From a distance even! I should probably be going for Engineering and not Biology, but whatever, I’ll take it.
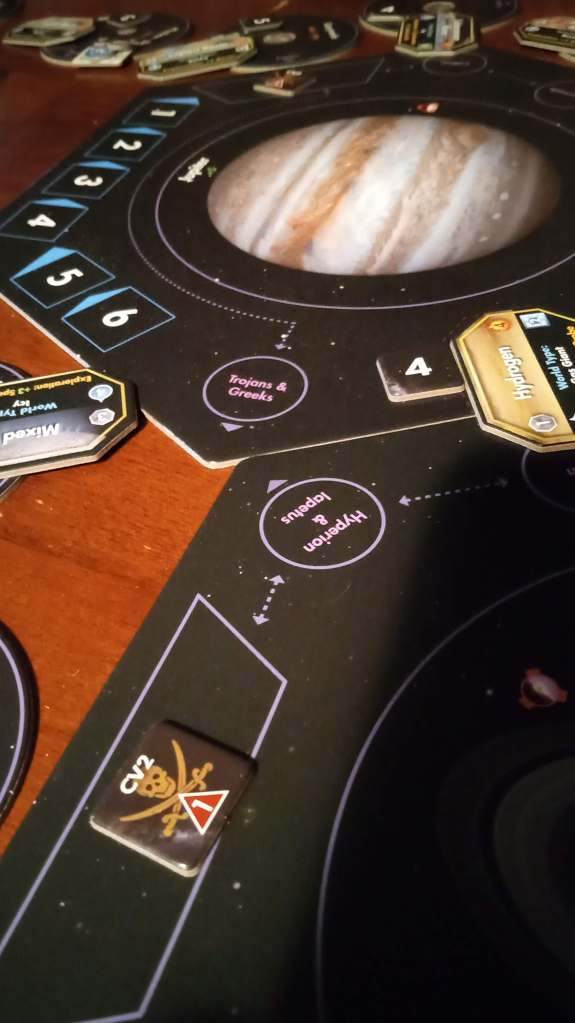
2069: I spend the last of my money to get Komarov back together. Zasydka gets yet another freaking depletion off of the Jupiter Greeks & Trojans. It even found Previous Metals on them! Why didn’t I take a picture? I’ll get one later once I start mining out there.
2070: Event roll is Immigration. Hey! 2 Free Settlements to Mir. Noice! EU still wants to remain neutral *ahem*.
Hmmm, I have written down that I got Improved Space Operations, but isn’t that what I wrote down in 2060? It does. Hmmm. I’ll have to run down and take a look at the tech tree and get you better information. Luckily we’re caught up now where my notes are done because I haven’t played 2071 yet as I’m typing this…
I do know that I picked VIgourous Human Policy, so I can have even more CVs out there, especially since I can now build CVs of size three with the new tech I got. But I have to confirm that tech, so I’ll be right back!
Ahhhhhh – In 2060 I just got Space Operations, not IMPROVED Space Operations. Pretty sneaky sis. Welp, I checked on that tech, and played another 15 years. I also have this. At one point I said: I have to tell the kid to get in the shower in 30 minutes, so I’ll play for 30. Therefore I was keeping close watch of the time.
I played 9 years in 38 minutes. That’s about 4 1/4 minutes per year. For those who want to know how quickly the game plays, there you go.
You also now know I was 8 minutes late telling my daughter to get in the shower.
I’m not the best dad.
ANYWAY let’s see what I did in 2070. I scrap Renda and gain 3 Billion for doing that. I do that because now I can build Leonov, which may not be able to carry as much cargo, but it can do science AND mine its own resources! I also spend 3 Billion for a new Orbiter, and 8 Billion for Kliper. And 4 Billion for a launch vehicle that can carry Leonov. It’s a biggie.
The LV2 fails its recovery roll when it launches Kliper, so that’s 3 Billion lost. Zasyadky finally fails out by Saturn. It got a weak picture of Mimas first, though. What a great satellite! Kamarov lands on a comet and gets some science, and Leonov lands on a Near Earth Asteroid…and fails its Recall roll so can’t mine which is why I put it there. Oops.
2071: I buy a new Zasyadka (my spelling is terrible). I hope I can continue to get the gains I got from the last one. I get a few small science gains, but nothing special this year.
2072: I resupply Leonov, I also load 2 Ore & 2 Fuel on it, so by the end of the year Mir now has a Small Supply station on it.
2073: The space Telescope dies. The Asteroid Belt Orbiter dies. Zasyadka dies! Leonov, however, mines 1 ore out of an Asteroid around Earth. You get one resource for free, then you roll a die. If it’s equal or less than the modifiers on the tile + World Card, you can get a second one. NEOs have a +2 Ore and Silacate Rocks which are 2 Ore, so I would get a second on a roll of 4 or less. You also get a bonus if you roll a 1 or 0 (obviously with modifiers), so you can get up to 3 resources with one roll. This isn’t a great site for mining, but it’s something.
2074: I buy a new Orbiter, Komarov poops out on the comet, this time Leonov gets 2 Ore.
2075: Took a risk and had Leonov do science as well. Got 2 Engineering and no recall. Had it take 1 fuel.
2076: Spent 4 Billion on a Rover; Leonov drops off its load so Mir is now considered a Large Supply Station. I can resupply all my CVs from orbit now, saving me on Launch Vehicles. And though I need LVs for all Robot Explorers, I could build them in space with Ore and Fuel mined from NEOs or Luna. Or further out if I want to wait the time. As my ships get bigger, this becomes more reasonable to do.
2077: 2 Billion to resupply the Komarov after its comet return; My Orbiter stops working; Leonov gets some supplies from those Asteroids.
2078: FINALLY get a depletion this decade!
That succeeds the Hygeia mission. It gets replaced by Saturn. I finish the year by Leonov mining more Supplies.
2079: I only have 1 Billion left, so I don’t do anything on Earth. Komarov fails its Recall roll, but I get another depletion on Hygeia. Leonov gets 1 more Supply.
2080: Our event this year is “Survey Error,” a random World Card gets drawn for a random location, and if it fits, it goes there, whether there’s already a card there or not. Mars is the world drawn, but the card (M Class Asteroid) can’t be played there, so the event has no effect. EU stays Neutral. Earth produces 31 Billion, + 2 Billion from my Policy, +5 Billion from Missions, +4 Billion from Alliances. Cha-ching! I have 3 CVs in flight, 1 RE and 1 Base. No expenses to pay.
I roll for NPF Bases and score nothing, but then I roll for Asteroids and Pirates and…
Guess it was a New Moon when I took the picture. But yes, a Pirate AND Asteroid around Earth! GASP! That’s going to make things difficult, because if Pirates find any RE’s flying past, they destroy it (40% chance). Any CVs, they hold them for ransom. If the CVs have combat abilities (The red triangles), they run like cowards. So you have to track them down and blow them up. Hrmph. The Asteroid is nice, though.
I get 16 Physics, 30 Engineering and 39 Biology to get Trade Routes (I’ll be able to move 5 Resources between bases and Earth during the beginning of the decade), Quantum Computing for better REs (21% failure rate now) and Mechanical Counter Pressure Suits (+2 to CV Science!)). I use all my politics markers to boost my Physics tech for next time as I want to get those transfer windows cut down because I’m starting to get close to not being able to science all these nearby locations. I must go further!
I choose Vigorous Robotic Policy. More Robots Please.
I purchase Zasyadka (fly by satellite) and Koslov (Orbiter) for my missions (Ceres and Saturn). Get new LV-3 launcher. Komarov lands for refueling; Leonov departs for Mars, but has to stall due to the Pirates. I do get bonuses to my Combat Tactics and Combat Rolls due to my tech (+1 to each), so I’m hoping that’s enough to keep any piracy at bay.
Pirates? At bay? Wakka wakka.
After all movement, we go to a combat phase, my first of the game…50 turns in. Each side rolls a d10, and if either rolls less than 4, they found the other. I roll 3, so I’ve spotted the Pirates! They rolled a 6. So now we get Tactics Points, I get the difference (6-3=3) plus bonuses (right now, just for the tech, so +1) which gives me 4 Tactics Points. Rather than risk getting blown up with all my Supplies, I spend 3 of those points and end combat immediately. So Leonov spotted the pirates on radar and flew in such a way that the Pirates never saw them. Phew.
When combat is over, the combatants may continue moving, so Leonov moves to the Transfer ‘1’ spot on the Mars tile.
And hey, I finish the year out with a successful Depletion on Mars!
While I’ll miss the +1 for Crewed Exploration, the greater Supplies, Fuel and Biology Science production, not to mention Life, makes the Water a better find, so I choose the new World Tile.
2081: 2 Billion to resupply Komarov; Leonav lands on Mars and Komarov goes Pirate Hunting. The Pirates roll 2 and find me and end with enough points to flee combat. Cowards. Leoonav builds a base on Mars!
2082: I briefly think about building Titov, the big ol’ CV-3 with 4 combat ability, but that’s a bit overkill for this little Pirate. Leonov spends some time hunting the Pirate, but finds nothing. Leonov fails its recall roll when it tries to Science on Phobos.
2083: This time Leonov finds the Pirate, and I have 4 Tactics Points. I spend 1 for Direct Fire (a way of combat that results in more direct damage for the attacker) and 2 for +1 damage (I could also spend 2 for -1 damage to myself, but I want them GONE). So now we each roll 1d10 on a combat chart to see how much damage we do to each other. I roll at +4 due to my tech, my combat value and that Tactic Point spend. The Pirate rolls at +1 due to its combat value.
And we both roll 10. Looking at the chart that results in 3 damage for me and 4 for them. Since we’re both CV 2, that means we can each take 2 hits before we explode. So we both explode.
I lose a ship, but I gain a tech marker for the loss of a CV, I get 3Billion of the Pirate’s ransom money (it always starts at 5 and the winner takes half) as well as a Politics and Victory marker. I call that a fair trade.
2084: Now I can launch my robots without fear, so off they both go, I put the satellite on the LV-3 so it gets there a little faster.
2085: I Resupply Leonav to go Mine some Asteroids after a brief stop getting Supplies on Mir last year. I guess nothing else happened this year. Lots of Transfers.
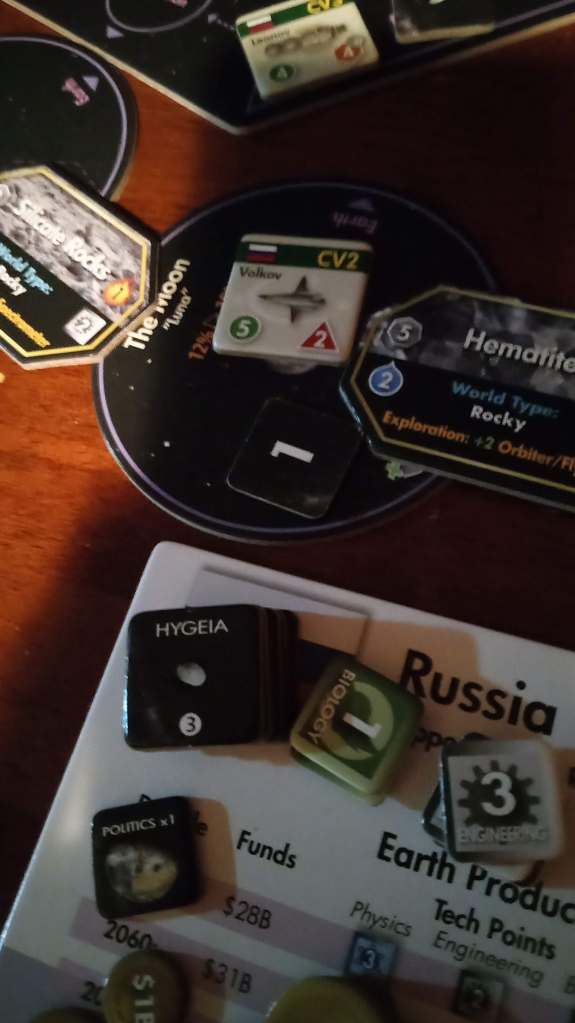
2086: Risking going over my limit to get another robot out there, 3 Billion for another Satellite, I wager one will break before decade’s end. I still have a lot of money, so I get Volkov (which is the same ship as Komarov, with a different name) and a Probe. LV-1 fails the recovery roll, but the newly hailed Volkov finds Hematite on Luna!
MUCH better for mining Ore. Zasdyka gets a depletion on Europa as it’s moving past Jupiter on its way to Saturn; Leonav harvests that Asteroid, getting 3 Fuel (Asteroids are mined just like any other site, but what you actually earn is rolled on a chart. Then the Asteroid goes away and you earn a Victory Marker).
2087: Nothing has broken, so let’s get some supplies up to Vostok on Mars. Spend 8 Billion on Redna & 5 Billion on Ore, Fuel and Supplies. It launches toward Mars, and Leonov gets in behind it with its Fuel garnered from the Asteroid. I get my first Depletion on a comet (Physics seems to have a smaller ratio of 3s and 5s), as well as another depletion on Hygeia.
2088: Only 2 Billion left now, but no real plans for it. Tsunder Satellite rolls a 01 on its first outing near the sun. In sympathy Zasyadka shuts off BUT it gets a Depletion on Saturn! Mission accomplished. AND I rolled a 03 on the Search for Life! And Saturn has a 2% chance….SO CLOSE! The next Mission I draw is for Jupiter.
2089: I spend the last 2 Bill on a Space Telescope to make up for the lost Satellites. Koslov Asteroid Belt Orbiter turns off. So does the Hygeia rover, finally. See? I knew I wouldn’t go over on having too many RE’s in play. Vostok now has Research Station and Mining Colony (not built on the same turn).
2090: Another Immigration event! Shame I didn’t build a settlement on Vostok yet. So Mir gains 2 more Settlements, bringing it up to 5. I get 46 Billion in cash. I also get 12 Biology from the two Reserach Stations. Nice. No NPF Base (but there would have been one in 2100), nor a Pirate, nor an Asteroid. I have 27 Physics, 35 Engineering and 35 Biology. I get Ultra Heavy Launch Vehicles (can build LV4s), Advanced Life Support (can move humans 2 “spaces” away from a supply station!) and Fusion Fragment Engines (.07 transfer multiplyer) & Fighter Drones.
For Policy I get Space Diplomacy to get an extra Diplomacy marker at the beginning of every decade. I think of it as getting a free 2 tech points.
I have now caught up again to where I actually am in play, and this seems like a lot of words (ha!), so I’ll end this post here. This game is vastly different than my last, where I played Japan which has superior Robot technology, so I wasn’t using humans and bases nearly as much. This is completely different way of thinking about what I’m doing. Neat!
Looking forward to getting humans in the Asteroid belt. And if I get a Supply Station there, to Jupiter! And Terraforming Europa is a possibility!
I’m sure you’ve figured it out by now. I like space. There’s a lot out there. It’s exciting. And it’s filled with something that we’re in desperate need of back here on Earth.
Hope.
Sure, arguments can be made that everything we need is right here around us, and sending billions of dollars out into the coldness of the void is just wasting resources. In a lot of ways, that is a fine argument.
But in other ways it’s silly to think that fighting over our borders and resources down here is the way to go, when one asteroid could provide enough metals for an entire planet if we could figure out how to get it here and extract it. Energy wouldn’t be a problem if we could harness solar energy outside of our atmosphere and get it down to us cleanly. Even things like gravity prevent some manufacturing and biological development from continuing, so what if we could create laboratories outside of Earth’s gigantic gravity well?
What if?
These are huge questions with no easy answers, and I don’t claim to have any of them. I’m just a nerd who likes to philosophize. Get a couple drinks in me some day…
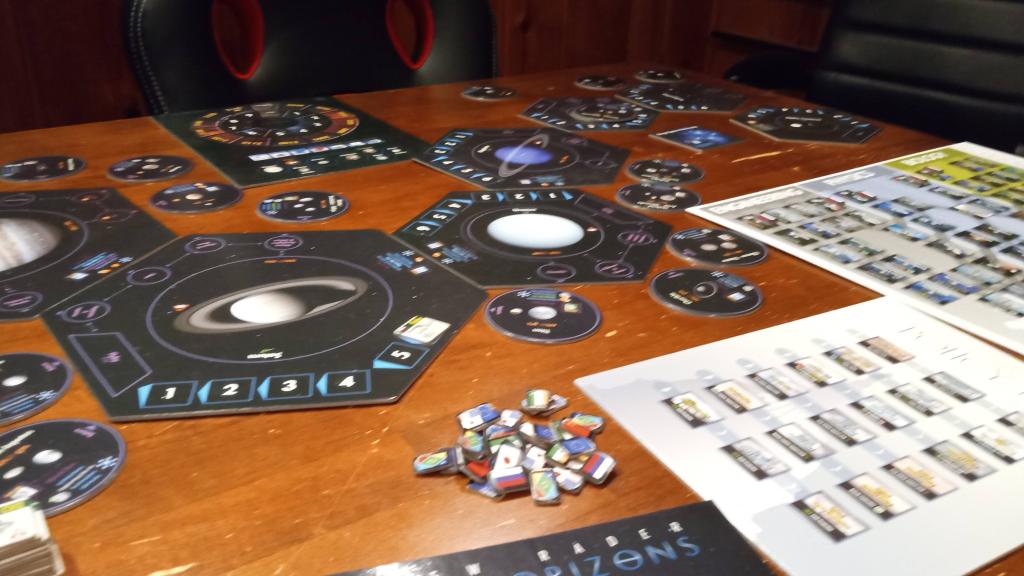
But for now, I’m going to play one of the grandest games I own: Stellar Horizons, by Compass Games. This lil’ ole game starts in the year 2030, and plays out year by year until you’re rubbing elbows with Alpha Centauri and terraforming Mars while astronauts are jumping up and down on Triton for funsies in 2169. It’s a slow ride (play time is 8 hours or so), but a fun one. It’s a Space Agency simulator that plays from 1-7 players. There are shorter scenarios in the box, like a short race to colonize mars, or to save Earth from a meteor strike, but the full game is where it’s at. So that’s what I’m doing.
There’s a whole lot going on in the game, but the good thing about it is that it starts relatively small (kinda), and grows as the game goes, so it’s not crazy complicated right off the bat.
I mean, as far as the games I play go….
So buckle in as we transport ourselves seven years into the future….
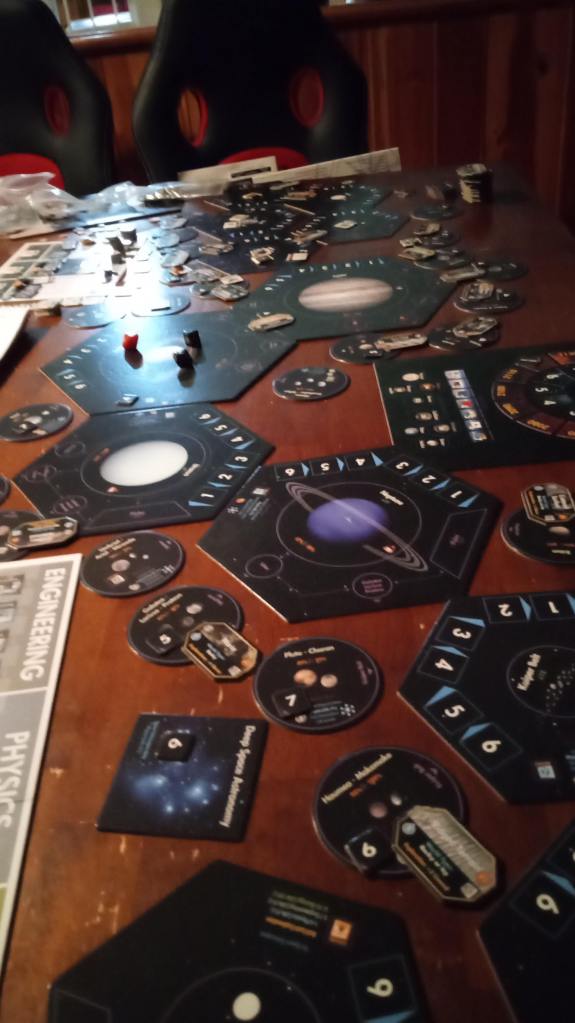
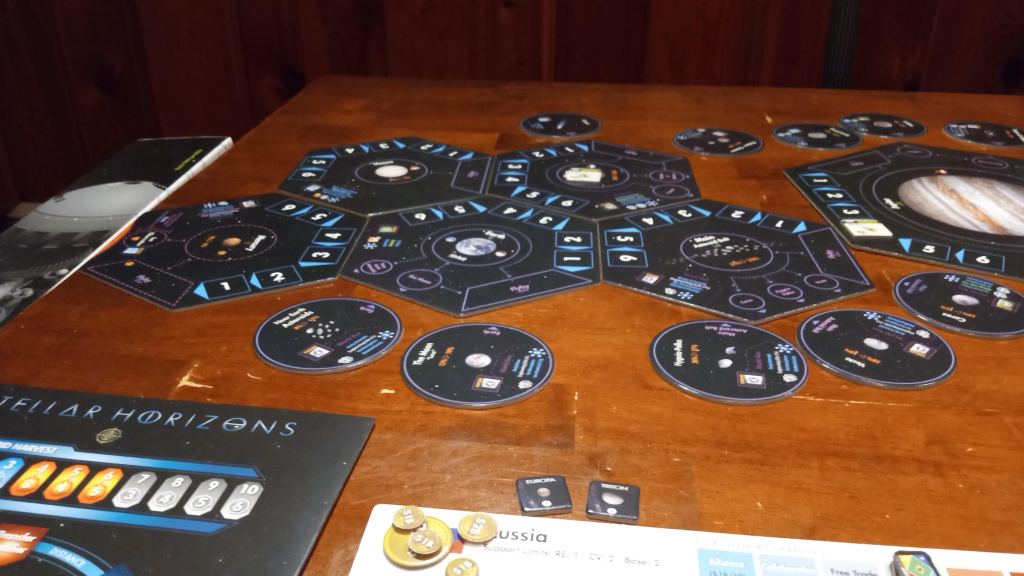
Space is laid out in front of us, and much like how space looked from the Hubble in the early 90s, it appears to be awfully fuzzy. Sorry about that. I’ll try to get better pictures in the future (heh). You’ll notice the game is BIG. There are probably more efficient ways to place the planet and moon tiles to get them to fit on a table better, especially if you don’t lay them all out in a line like this, but I like them to at least be slightly in an order relative to the sun.
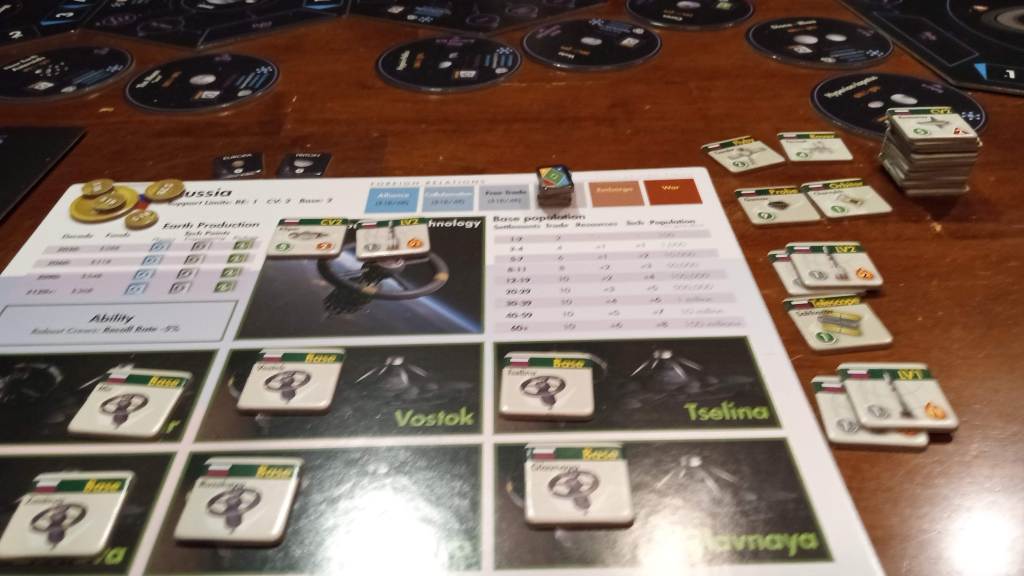
I shall be playing as Russia. Due to the death of their former leader in 2024 (ahem), Russia has been on a bit of a kick to rebrand itself and improve its place in the global economy. It has decided to do that by greatly increasing its space program, putting it back on par with the American, European and Chinese agencies. Russia starts with some technologies already in the can, as well as having fairly robust human crews, gaining a 5% bonus to all rolls to see if the humans can stay out another year. The governments have decided that getting science on Europa and Triton is a priority this Decade, which is good because I have an Orbiter already en route to Jupiter, but Triton is going to be a hike, so we’ll have to figure out how to get something out to Neptune for that.
We also have a small shuttle able to get humans out to the Moon and Near Earth Asteroids right off the bat. Not sure what I’ll do with them, if anything, as human exploration is often fruitful, but expensive. Perhaps I’ll start with robotic exploration and if I find something nice, then I’ll send the humans out to milk it dry. I dunno. Stellar Horizons is a GIANT sandbox, which is what makes it fun. So let’s play, shall we?
We start with 30 billion dollars.
I’ll just let that sink in.
Ah.
Wouldn’t that be nice?
Anyway. We can spend that on building our ships here on Earth. We can also use this phase to build ships on bases out in Space, but I don’t HAVE any bases yet, so we’re just going to focus on Earth for now. I think my long range plan is going to be chucking a whole lot of robots into space so that they rust over and die by the end of the decade, so I don’t have to pay upkeep costs in 2040. You see, you have a limit to how many things you can have out at once that you check at the beginning of each Decade, for Russia, it’s 1 Robot, 2 Shuttles and 2 Bases. Due to the Political Policy Russia starts with, you can actually have 3 manned spacecraft flying, but as you’ll find out as you’re reading this, there’s modifiers a-plenty for EVERYTHING.
So I’ll spend my money on a bunch of Robots. Orbiters, Space Telescopes, Rovers, you name it. Also a bunch of launch vehicles. I don’t have the tech for reuseable launch vehicles, so it’s going to cost me at least 2 billion each time I put something into space. Oof.
So in 2030, Russia has launched an Orbiter to Neptune, and a Space Telescope into Earth Orbit. Each of these had a 5% of failure during liftoff. You roll percental dice, so it’s a straight 5 out of 100 roll to see if each thing just explodes and doesn’t happen. It stinks, but that’s the simulation aspect of this game kicking in here.
At the beginning of the game, Russia also has an Orbiter spinning around Mars, as well as one already en route to Jupiter. There is also a flyby satellite on its way to Saturn. Those take time to get there (space is big, if you recall), but I can work on getting science with the Mars Orbiter right away, along with my new Space Telescope.
You get Science by adding up the Science number on the robot you’re using + the number on the heavenly body you’re exploring. For every multiple of 10, you draw a chit out of the type that body represents (either Physics, Engineering or Biology). For Mars, it’s a 6 Biology. Add that to the 2 on the Orbiter and I’ve got 8. Not enough to draw a chit, but for any fractions you roll a d10. If it’s that number or less, you get to draw a chit as well.
BUT, you also have to roll to see if the robot breaks down. For that you have a 30% of happening. So in truth, you roll 3d10 each time, 2 for the percentile chance of something breaking, and 1 for the chance of finding science (you can forgo 1d10 on the odd time that you have an exact multiple of 10 for finding science).
So for my Orbiter, I peer down at Mars and…roll a 10, so I find no Science, AND I roll a 17, which means the Orbiter immediately goes dark. Wonderful way to start the game. However, you still learn something when your stuff breaks. I get to draw an Engineering chit because you learn stuff when your stuff breaks.
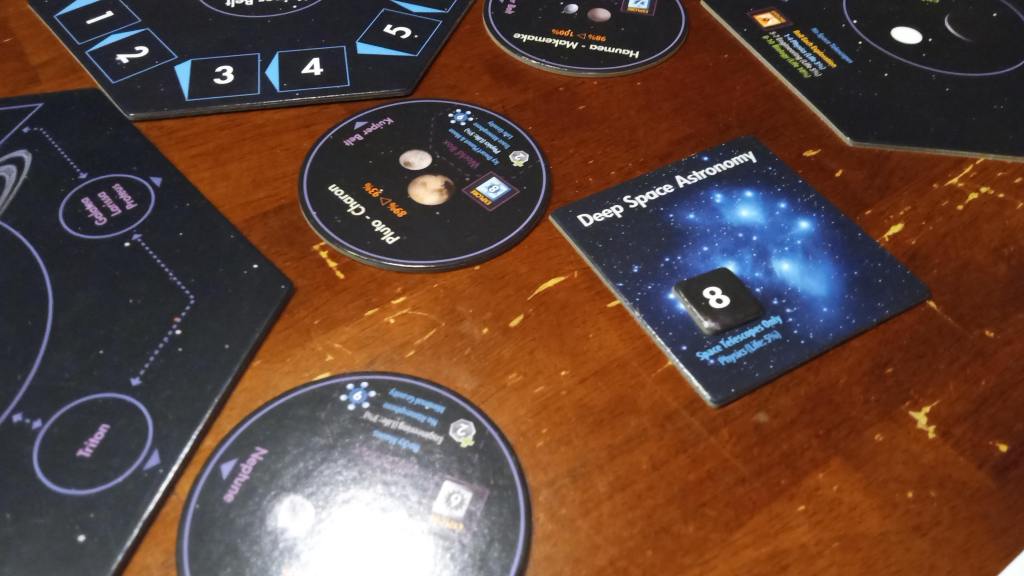
Now your Space Telescope has to stay in Earth Orbit, but can be used on any location on the board, however, that site only counts HALF of it’s science number. Usually you use it on the Deep Space Astronomy space, because only Telescopes can use that spot, and it has a “9” to start with, so half of that is 4.5, and .5 is rounded up, so 5+1 is a 6 or less to get Science. Not bad.
Of course I roll 7. *sigh* At least the telescope didn’t break.
So not much happened that first turn. Some things were launched and flew through space and some things broke. Science is slow. I’ll try something else next turn and see what happens.
2031: While I wait for things to fly through space, I buy an Orbiter and fly it to the Moon. That only takes one turn (year) and that way I can get some immediate returns.
Or I roll high again and don’t get jack squat.
2032: I launch a new flyby satellite to go past Jupiter and eventually past Neptune to help satisfy the two missions, just in case my luck continues on this path. I get some science from the Rover. FINALLY get my first Depletion.
What’s that, you ask? Whenever you pull a chit that is a 3 or better (There are 3’s and 5’s in each pile o’ chits, but not many of them), or if you’re using humans and drawing more than 1 chit at a time, your total is 3 or better, you score what’s called a Depletion. It’s named that because the number on the object you’re studying is Depleted by 1, making it harder to get more science out of it. However, you also gain a Politics marker because people like it when you make discoveries. You also get to draw a World Card, which is a special token that if it matches the world you’re on, modifies it in some way. (Deep Space Astronomy doesn’t have a spot for a World Card, so you don’t bother drawing one, your telescopes aren’t THAT good).
Deep Space’s number drops from 9 to 8 here because I apparently found 11.1% of what can be found out there.
You also get to roll to see if you found a sign of life. Odds are usually really really small (though larger in areas like Mars and Europa, where we’re naturally hoping to find signs of ancient life). Here there’s a 5% chance of seeing life among the stars. I, of course, don’t roll in the 5% zone. So really, all I got out of that was a Political Marker. Don’t get me wrong, that’s a good thing, you can exchange those for money, or to improve your standing with other nations, which really helps you out in the long run.
2033:
So my new Orbiter reaches Jupiter and…
immediately goes dark.
This effing guy.
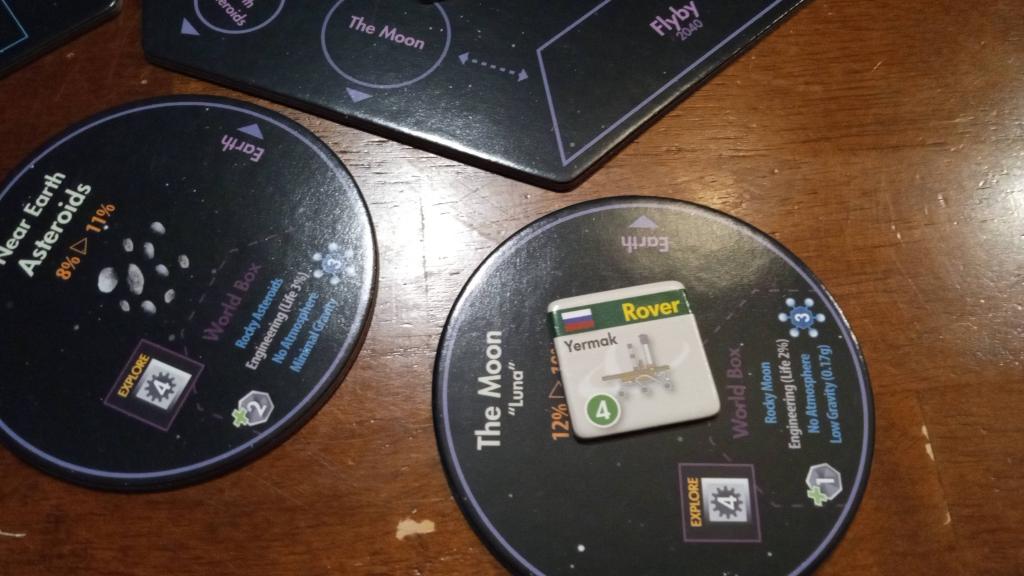
2034: I think I’m going to prep for Human missions around Earth at this point, ’cause clearly Russians weren’t meant for Robotic exploration. But luckily this year, I’m able to get another Depletion on the Moon right as the Rover shuts down after spending quite a few years on Luna.
No signs of life, and the World Card I pulled for it was only meant for a Gas Giant, so no change there. Yermak, we hardly new ye.
2035: I send my first human Astronauts to a Near Earth Asteroid and they get some science there (an Engineering Chit), but don’t make their roll and have to flip to their “Reserved” side, meaning they can’t do any more science until they get more supplies, which they’ll have to get back on Earth. So a 1 year mission, then back to Earth for 1 year of refitting the ship, then back out again. 2 billion to refit the ship too, not counting the cost of the lift vehicle. Luckily you get a free Biology chit when you fail the Recall roll. Also this year two of my flyby satellites, um, fly by and get pictures of Mimas and Europa, but fail to make Depletions and continue on to their next planets.
2036: Apparently according to my notes I had sent an Orbiter to the main asteroid belt at some point, because it stopped working this year? I don’t remember doing this as it was several days ago. Sorry ’bout that folks.
2037: Flyby pictures of Saturn and Uranus come back, both giving some fine science. I must have been low on money as my notes are sparse by this time.
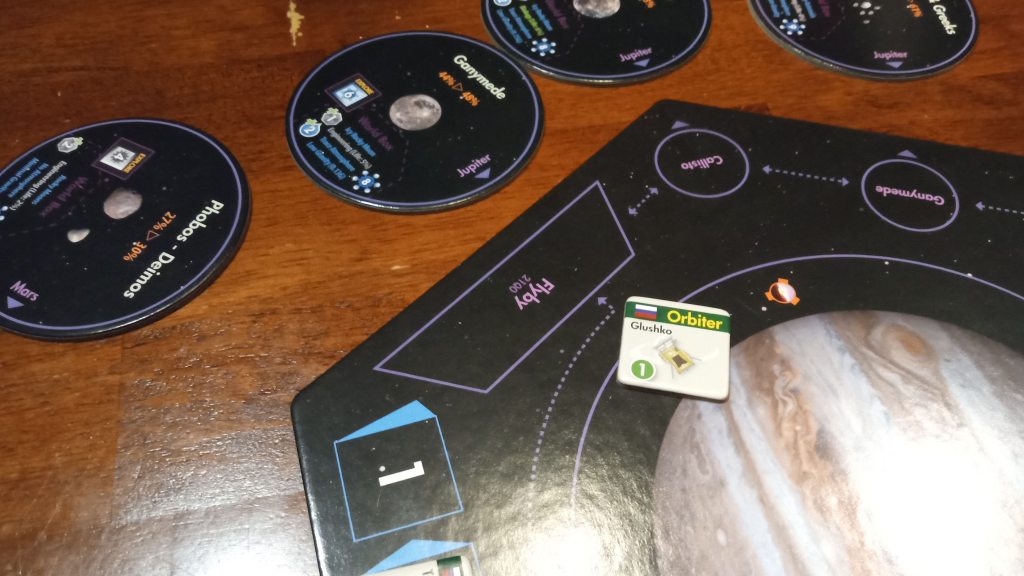
2038: Success! The Glusko II Orbiter gets a Depletion and my first Mission is complete.
Not only that, but I have a successful World Card pull, which means if I were to build a base there, it could produce any of those resources (modified by whatever’s under the card). Also makes me want to get a Rover down there as it’s an 11 even before I add the 4 I get from the Rover, so I already get a Biology chit automatically, and a second on a 5 or less? I like that.
The Mission chits get you an extra billion at the beginning of every decade as well as victory points at the end of the game. You can only have one earned per decade, so if I score another one, it’ll get discarded and just taken as a Victory Point marker, but that’s still something, so I’ll still go for it. I draw a new Mission and get Ganymede, so naturally my Orbiter just has to turn its cameras to another Jupiter moon. No problem.
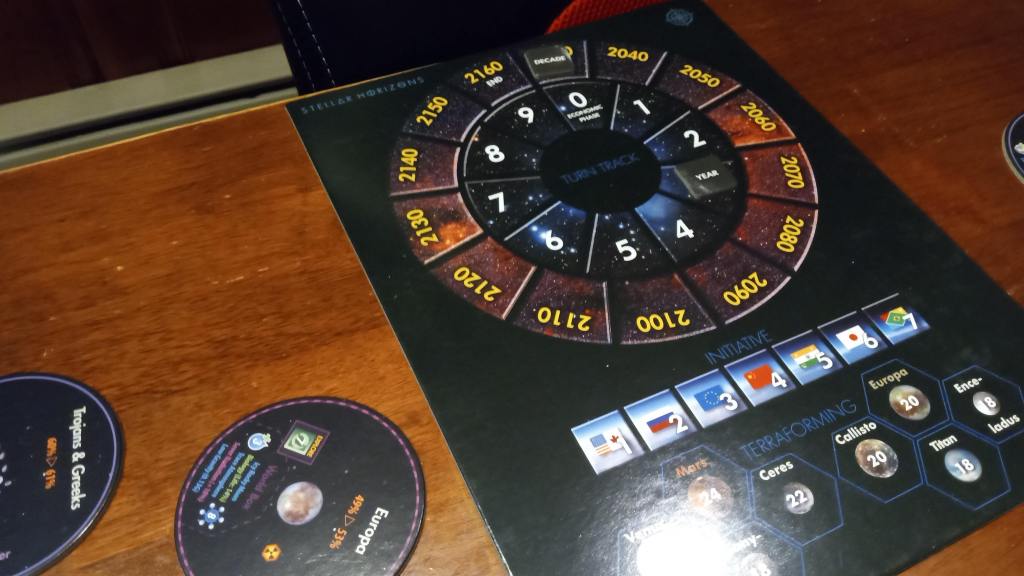
2039: I get some pictures from Triton for the first time, but nothing to write home about.
2040: We begin the new decade! So some new stuff happens! First, we get 2 free Diplomacy tokens. Hooray! We can spend those for a billion each. We can spend those for 2 Research, which is nice. We can spend them to try and influence our Non-Player Factions to like us better (good for trading, once bases are out on the board) and we can also trade them (at a 4:1 ration) for sweet, sweet victory points. We also roll on an event chart that can do all sorts of things, like give more money, influence politics, or hurl planet destroying asteroids directly at Earth.
Even aliens!
Ya heard me. Even in this hard sci-fi game, there is a small percentage chance for the arrival of aliens. There is an ‘*’ beside the “game changing” entries like that to say “only do these if everyone at the table agrees.” Because if you came here to slowly explore the Solar System and all of a sudden you’re PEW-PEWing the night away…yeah, I can see where some folks would be miffed.
Anyway, the event I roll would set a bunch of politics back toward Neutral. Considering they’re all already at neutral, it does nothing. Big deal.
So we do diplomacy. I’ll spend my chits to try and move all those Neutral folks out and into “Friendly.” The reasoning for this is each Friendly state gives me an extra 1 billion at the beginning of the Production phase of the decade. You get it at the roll of a 6 or less on a d10.
Looks like people are still bitter over Ukraine. Only two move up, but it’s beter than nothing.
Then I get production. Earth produces 28 billion dollars and a few research points itself, then I pay upkeep costs over my limits and…
Uh oh. I have a LOT of Robots in flight. Remember how I said I was going to have those robots die off so I didn’t have to pay upkeep? Um. I kinda slacked on that. I am now over my limit by 4, which is the maximum I’m allowed to be over. For having one robot too many, you have to pay 2 billion. For two too many, you pay 3 billion for the second….and 2 billion for the first. For three, you pay 4 billion for the third, and 3 billion for the second and 2 billion for the first. You can, however, choose to shut down a robot at any time to avoid this cost. I will choose to shut down a satellite that was moving past Neptune. While getting more science from the Kupier belt would be neato, I’m saving 5 billion dollars this way. However, I do want to keep everything else out there, so I start the decade already shelling out 9 billion. Ooops.
I then roll to check and see if any Non-player Factions have built a base. I roll percentiles and every body in space has numbers relating to the 1-100 chance. Each body also has a year that it will be built under. This early I think we can only get bases built around the Earth, Moon and Near Earth Asteroids. I don’t roll anywhere near there, so no bases are placed. Later on in the game, we add rolls to add minable asteroids as well as rogue Pirates. Neat, right?
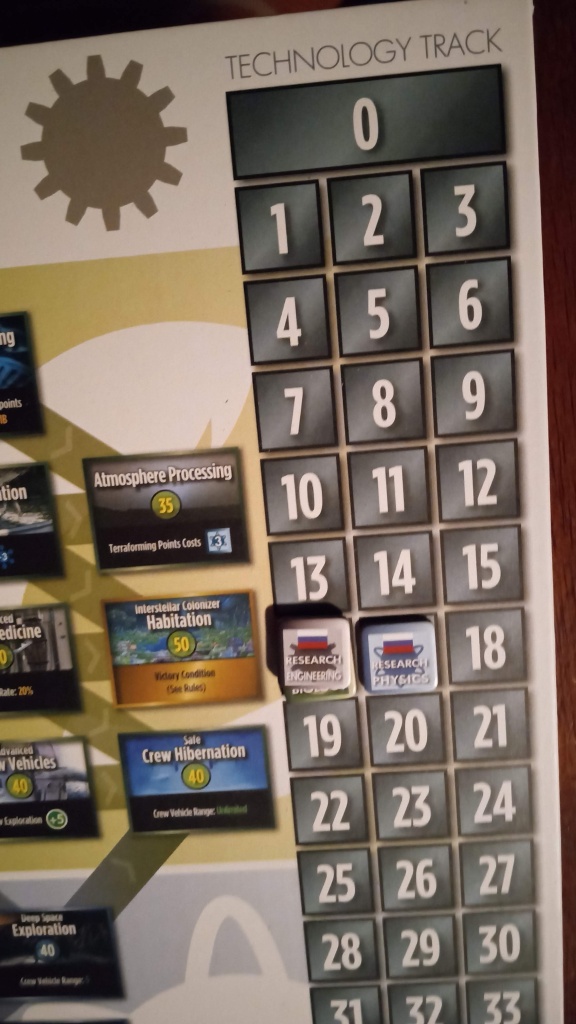
Now I can cash in my chips and buy new technology.
I was pretty consistent, with Biology and Engineering both at 16 and Physics at 17. Since early tech is 10, 15 or 20 points, it makes it pretty easy to choose. For Biology I got Space Habitation, lowering my Recall roll failure rate by 5%. Physics I took Advanced Astrodynamics so I’m able to fly to Mars! And Engineering I took Improved Component Design to lower that failure rate by 3%.
Sadly after spending all your tech, your remaining points are halved, so saving up for big tech jumps are a no-no. You gotta spend them when you get ’em.
Then you get the “Policy Step” which is a small tree of bonuses you can take for no cost depending on your strategy. Russia starts with a “human” strategy giving you +1 to the number of humans you can have in flight. I choose to add a flag (I couldn’t quickly find a Russian flag so I just chuck another one down as a place holder for the picture) to give me a +1 to the number of robots I can have in flight so I don’t get into the same mess I got in this turn.
And that’s it, then we go back into Production, then movement, then science….it picks up as Bases get built, planets get terraformed, Pirates get in the way. You’ll see.
But wait, WHY are we doing this? Victory Points, of course! You saw that I got 1 for completing a Mission when I was passed the limit for my decade, there’s also a Mission value based on their difficulty (Right now I have a 4 and a 3 showing, don’t know how much variability there is). You also get points for:
Reaching the end of the tech tree in the three branches (50 points for all 3, 30 for 2 or 15 for just one of them)
Having the most settlements on a Terraformed World (25 for a fully terraformed world, 10 if it’s half way there)
Exploring Alpha Centauri (15 with humans, 5 if just robots, 20 if both)
Building Settlements (point values based on distance from earth, 1 each in Earth Orbit, a little more the farther you get away, worth more on a terraformed world)
Having facilities on bases (“Infrastructure”)
You gain a half point for every size of ship you have in flight at endgame
You gain points for leftover tech points and politics markers at endgame
You LOSE three points for every tech not learned – this is a biggie which hosed me the first time I played.
When playing solo, you have a tiered system of victory:
Less than 100 is a Disaster (Think I ended with 61 points the fist time I played)
176 is the first Victory tier
251 is ridiculous.
I’m hoping for 151, which is draw. That’ll make me happy.
So that’s it. 10 Years of game. You play until 2145, then you have a 1% chance of the game ending. 2146, a 2% chance and so on. If the game hasn’t ended by 2169, it just ends because….just because. Right now I’ve earned about….9 points (not counting the tech points lost). I have 142 or so to go. I have 105 turns to get them, so it seems doable.
Right?
RIGHT?
(Does math, realizes he’s not even averaging a point per turn)
Get it? It’s the last few turns and I’m freeing Europe?
Am I showing my age with that joke?
Anyway, that keyboard riff is going to be going through my head this WHOLE TIME, so I blame that for any errors in judgement I make for these last three turns.
THREE TURNS.
I had the absolute minimum amount of Victory Points to continue on to the second half of the game, and now I’m trying to get 40, the absolute minimum to call the game a win. 20 is the absolute minimum to not call yourself an abysmal failure.
DO YOU HEAR THAT MOM, THAT’S WHAT YOU NEED!
Woo, where did THAT come from?
Let’s get to the game, shall we? Please?
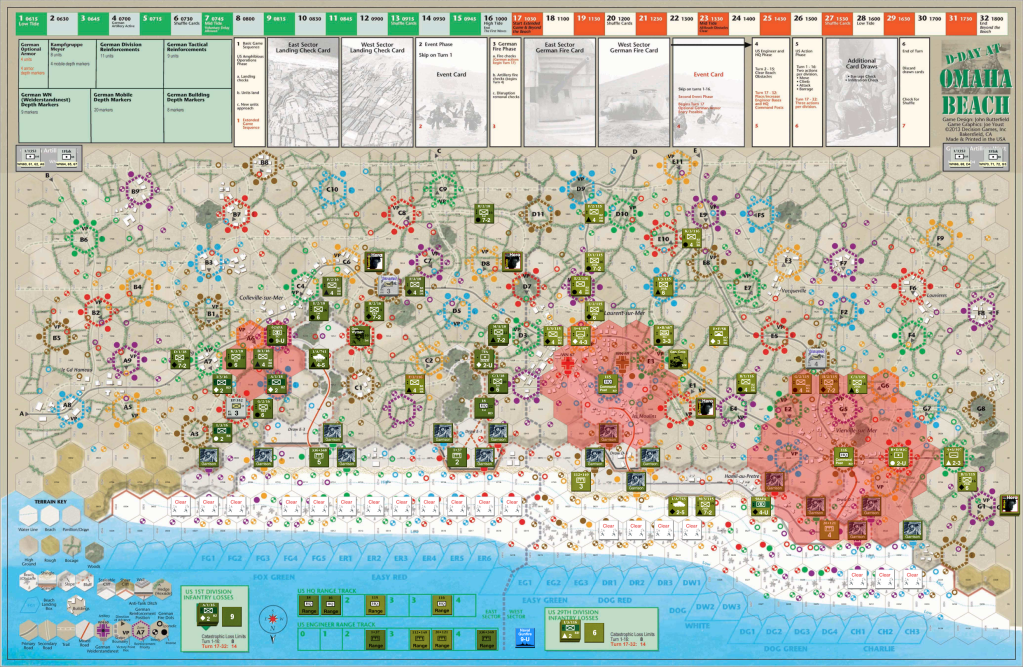
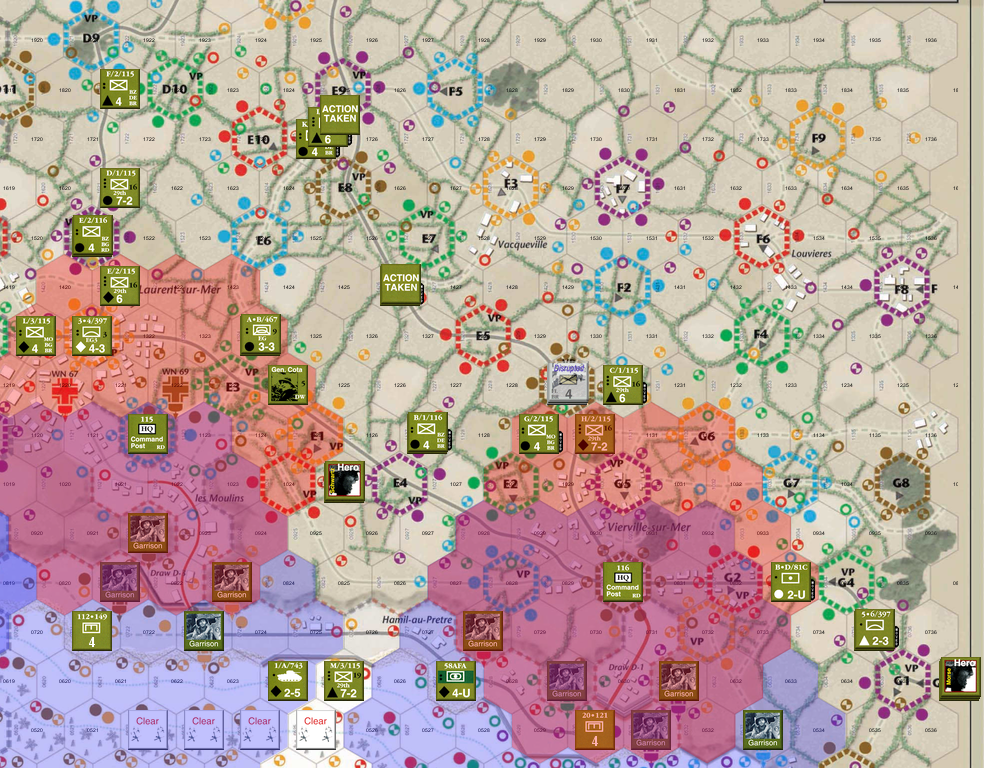
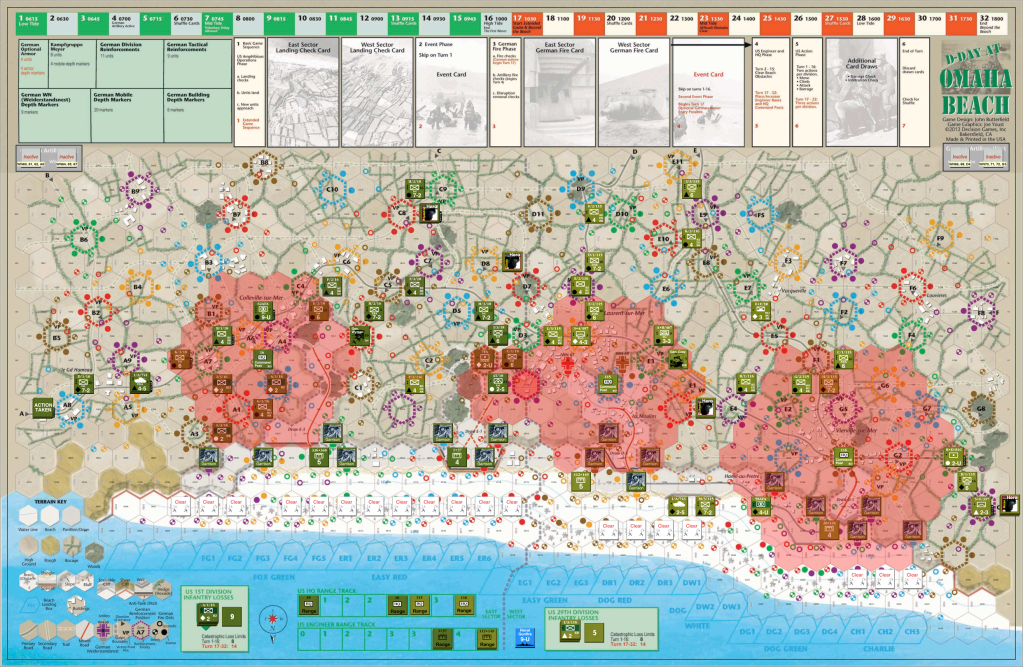
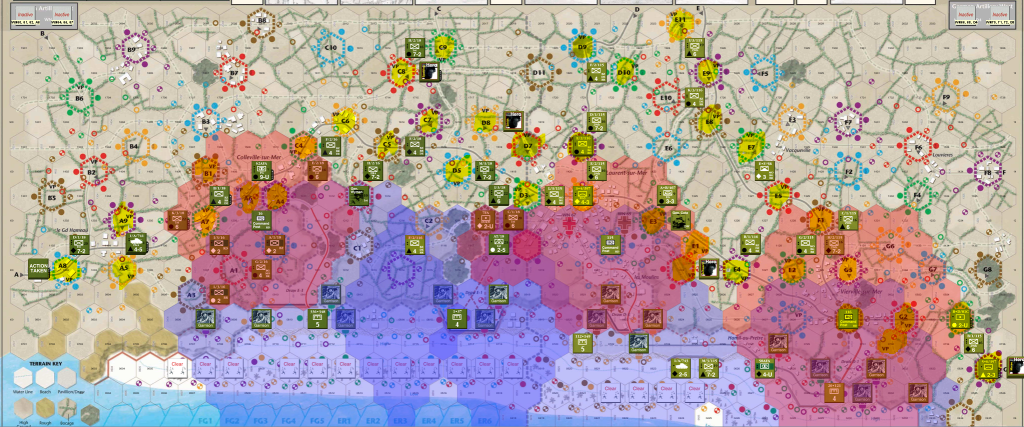
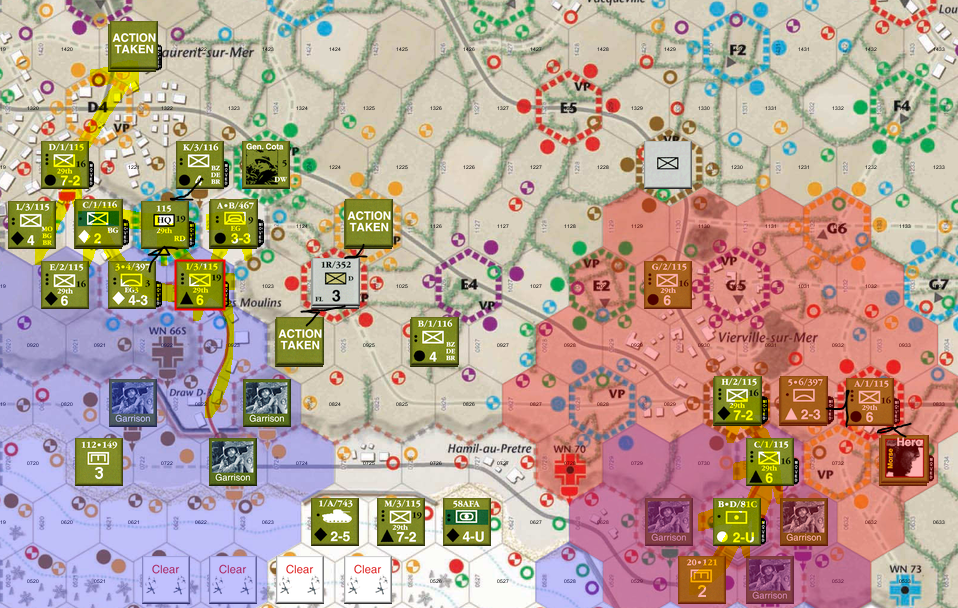
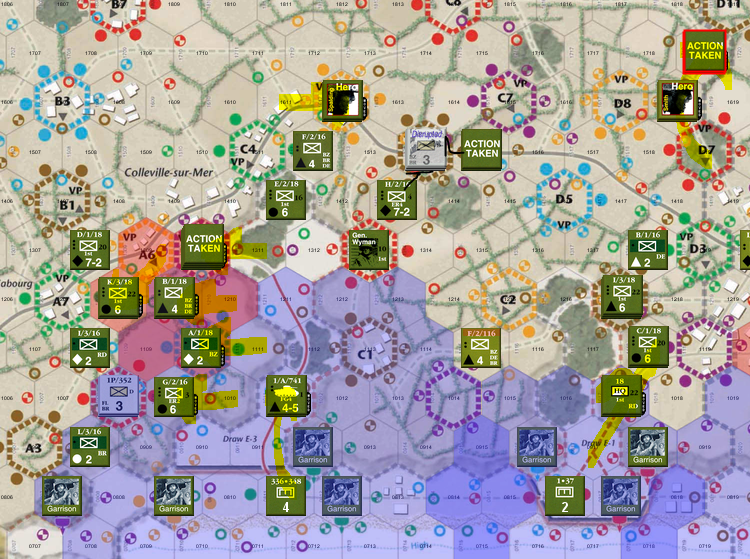
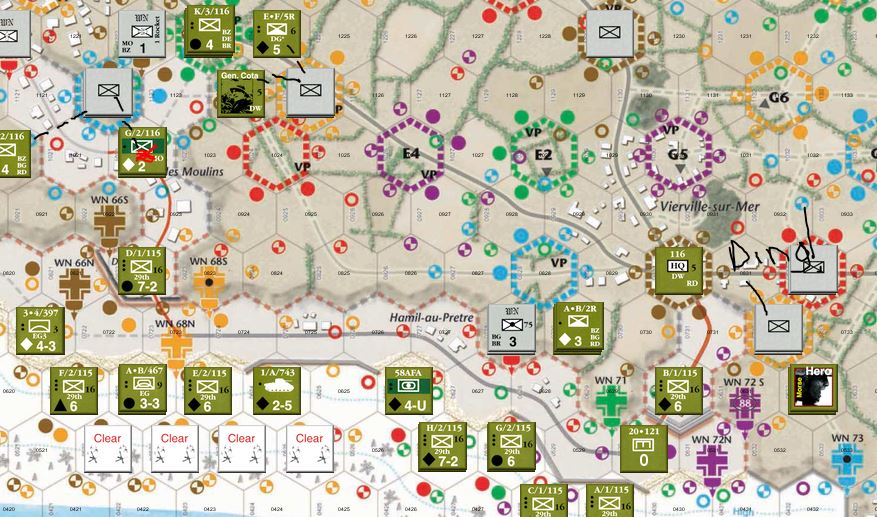
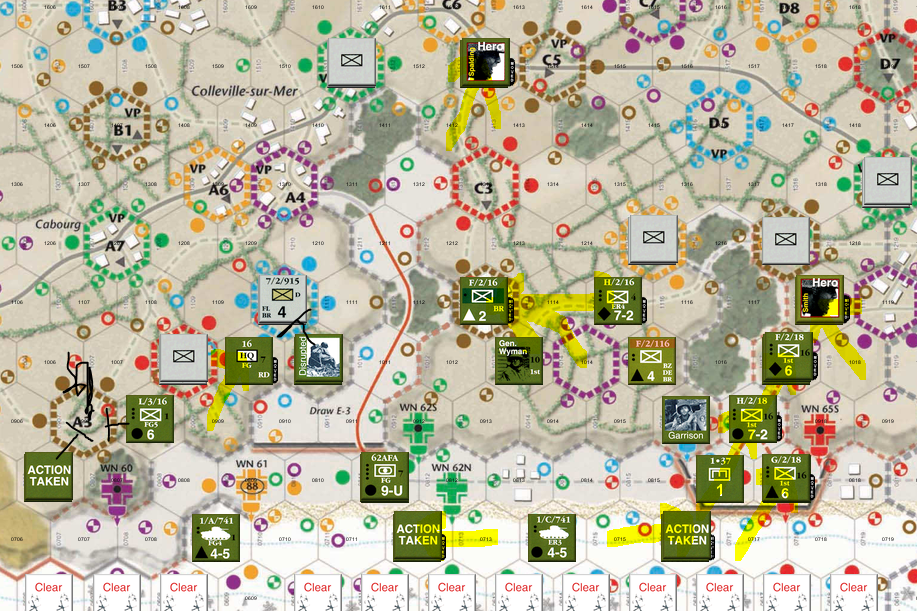
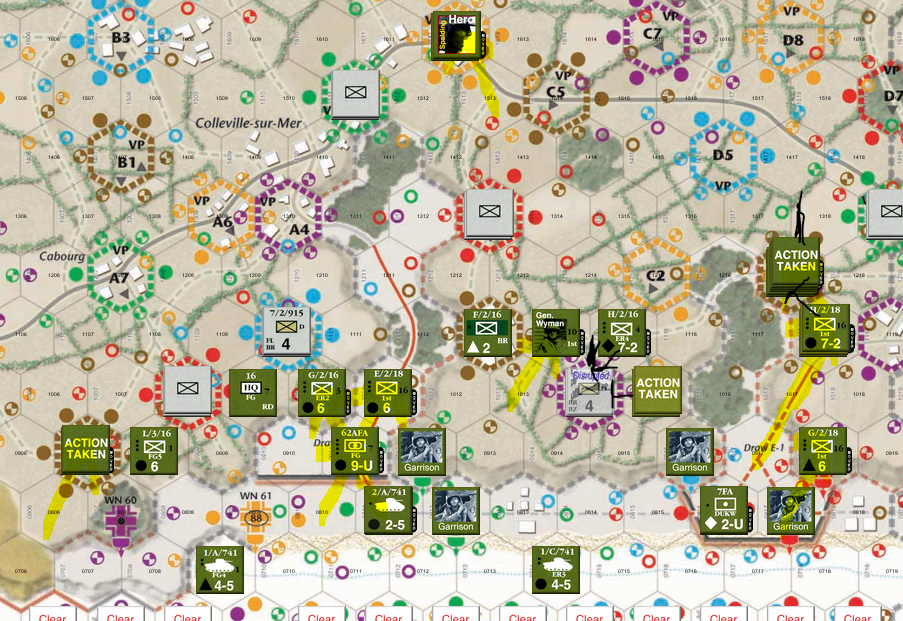
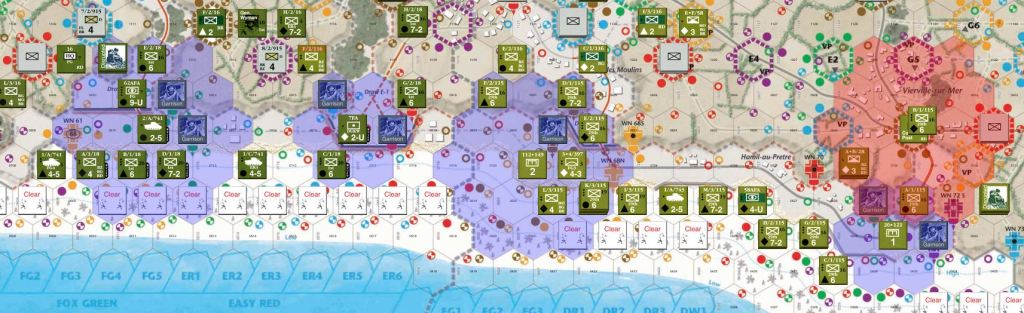
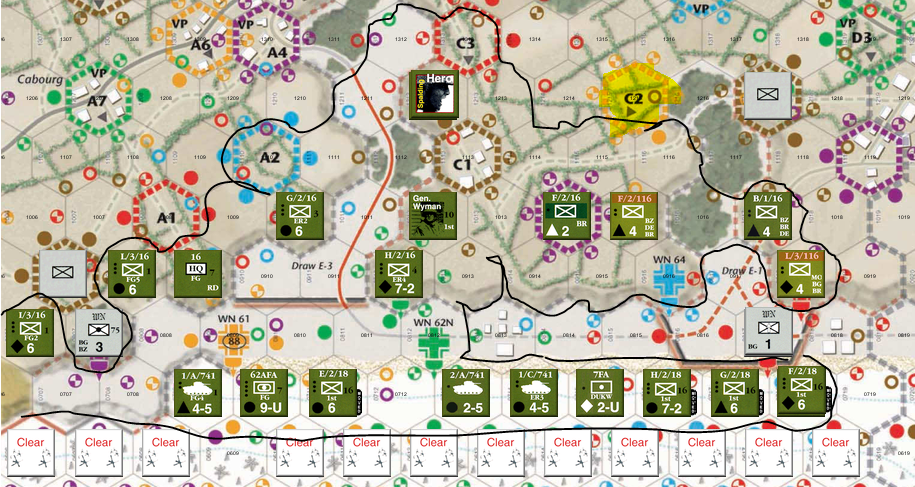
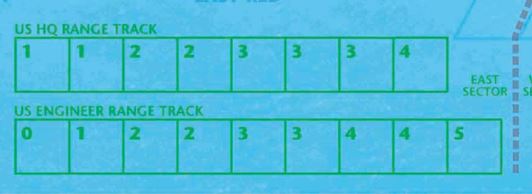
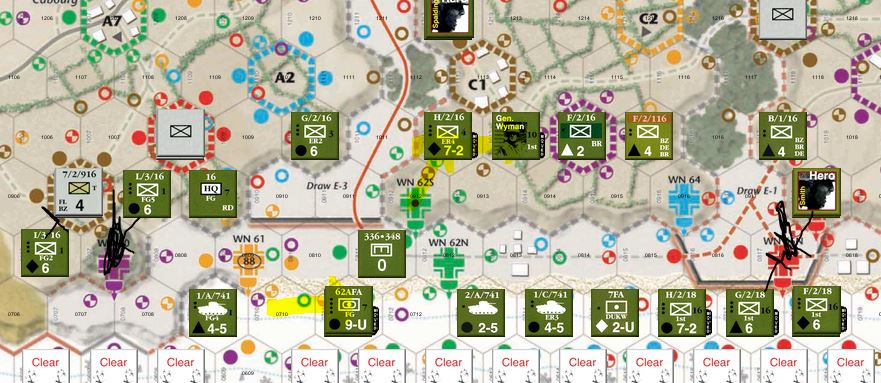
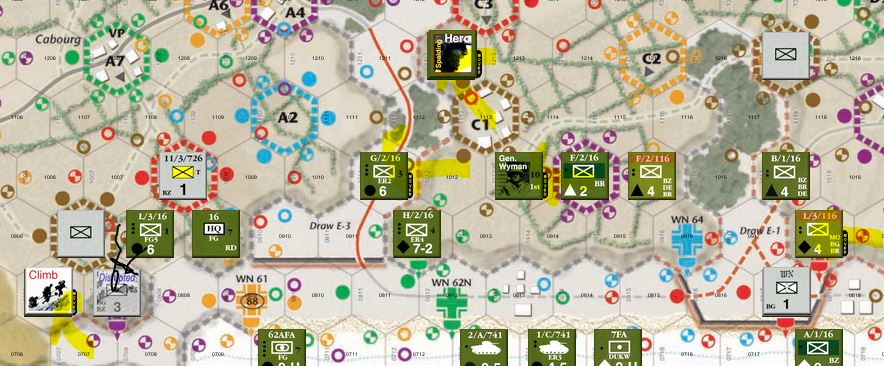
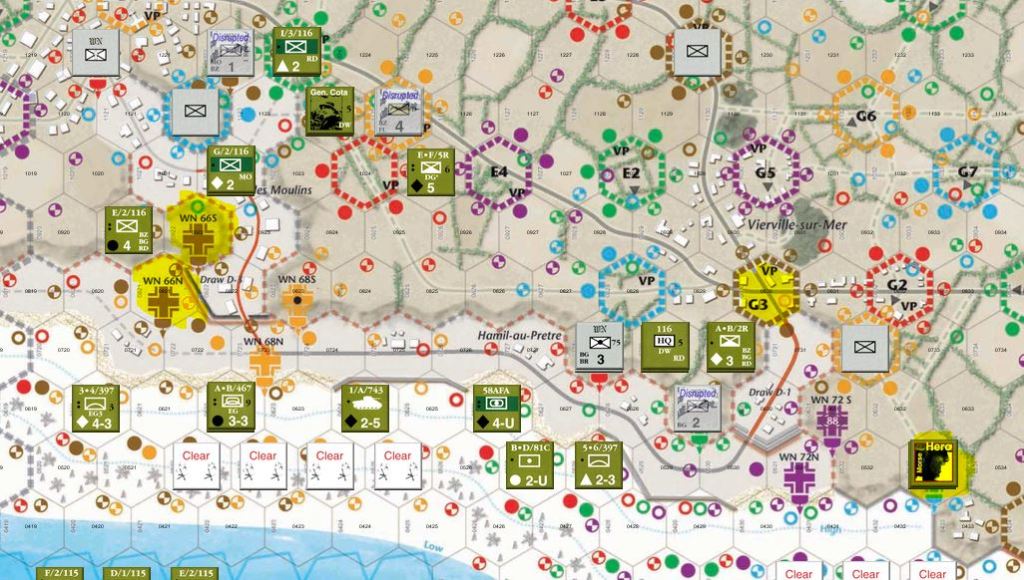
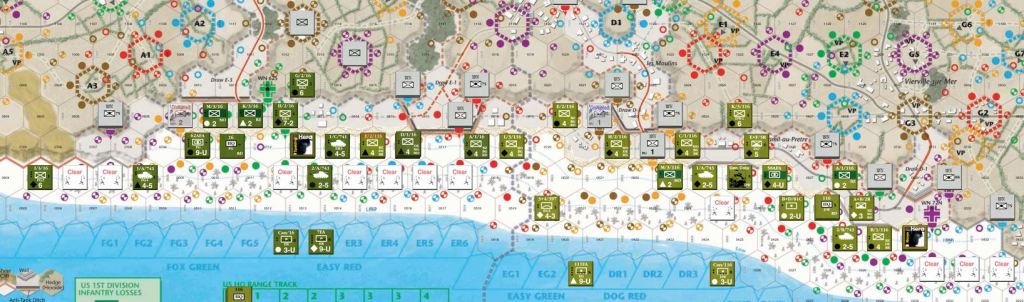
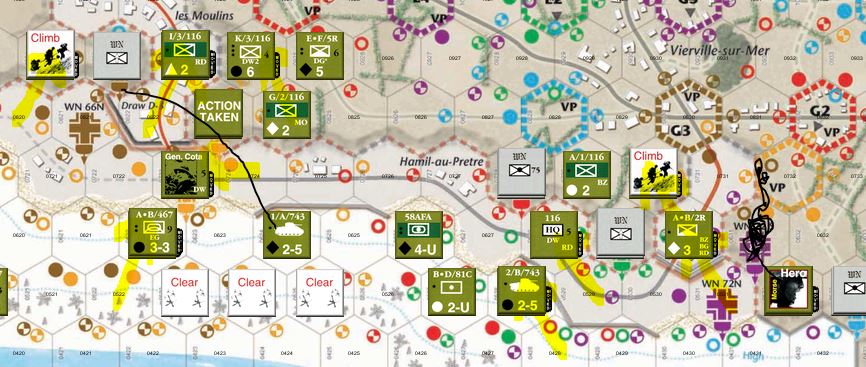
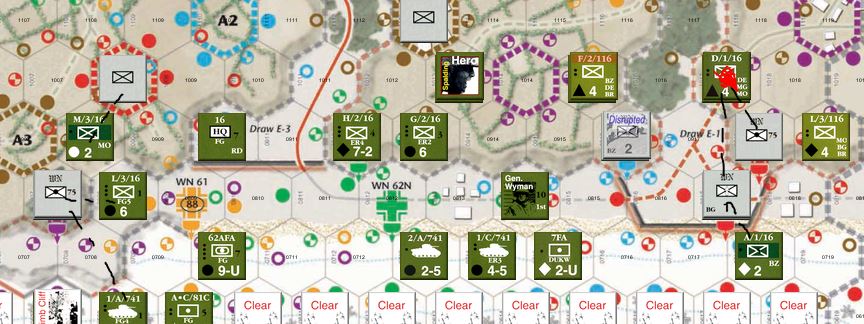
I’m not sure why the “Save Map” feature has the HQ Ranges on, but not the Engineering Ranges, but here you go, that’s what the map looks like at its fullest. Neato, huh? That’s a lot of chit right there. Er, chits.
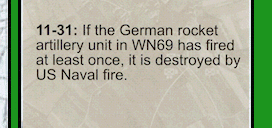
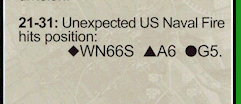
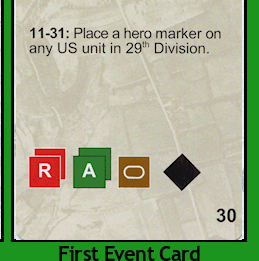
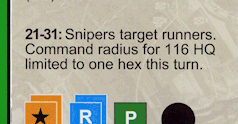
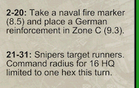
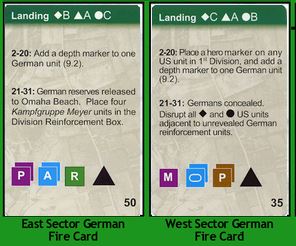
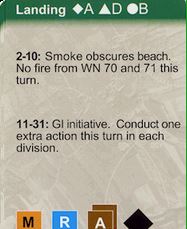
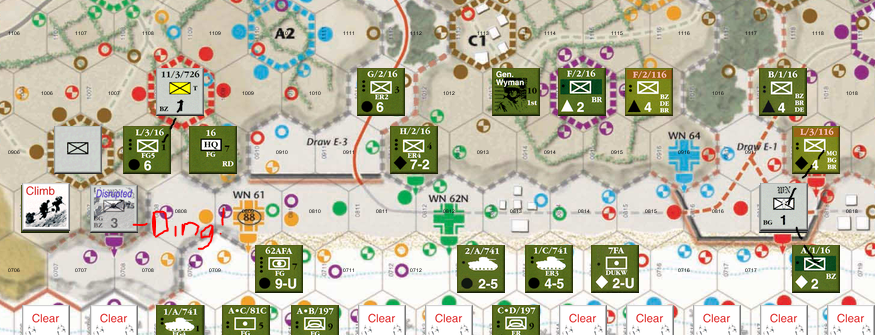
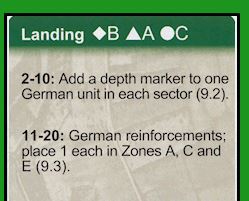
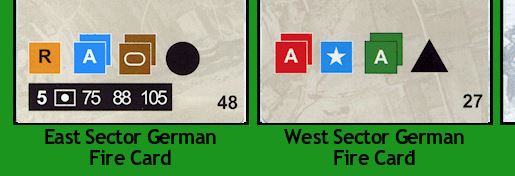
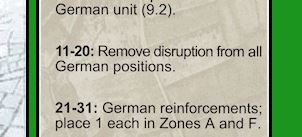
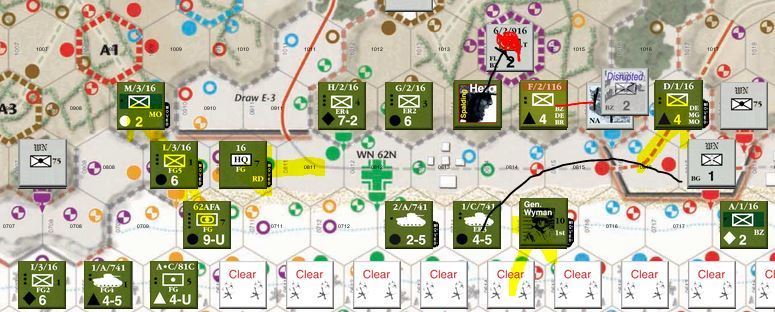
Luckily no new ones are added for Landing Checks or anything silly like that, so let’s draw our Event and get a move on. Take a Naval Fire Token. I should just use that damn thing.
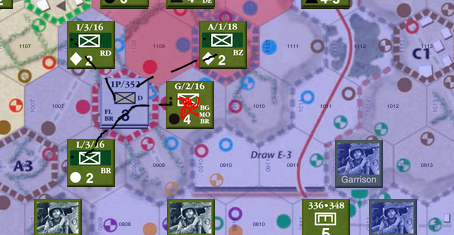
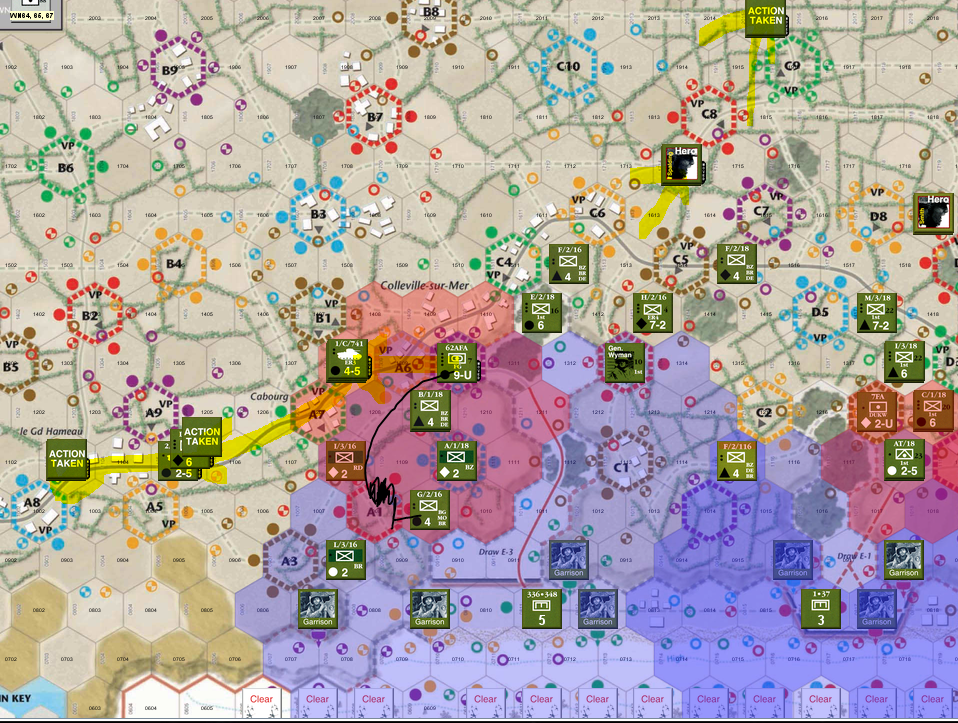
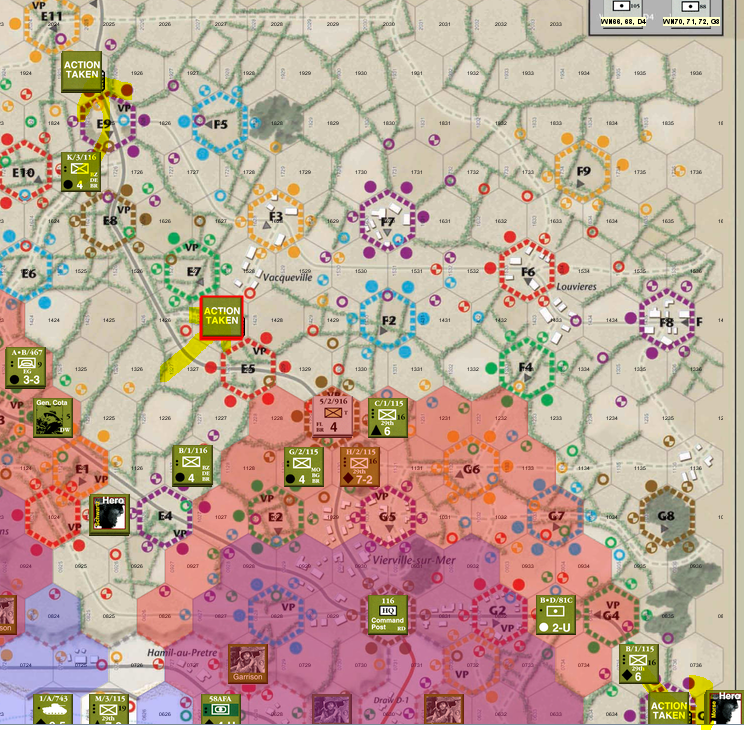
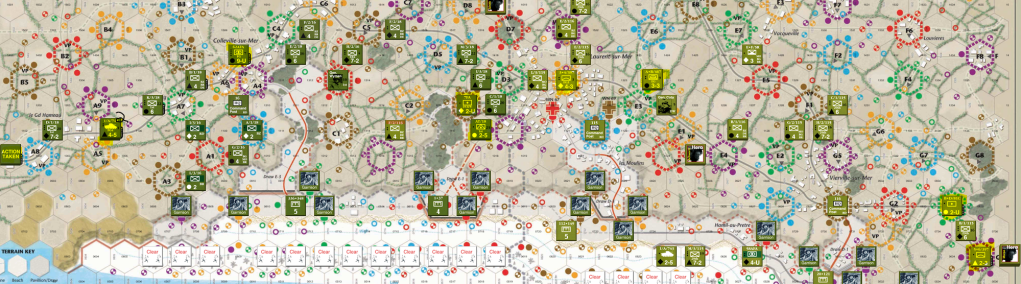
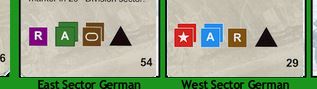
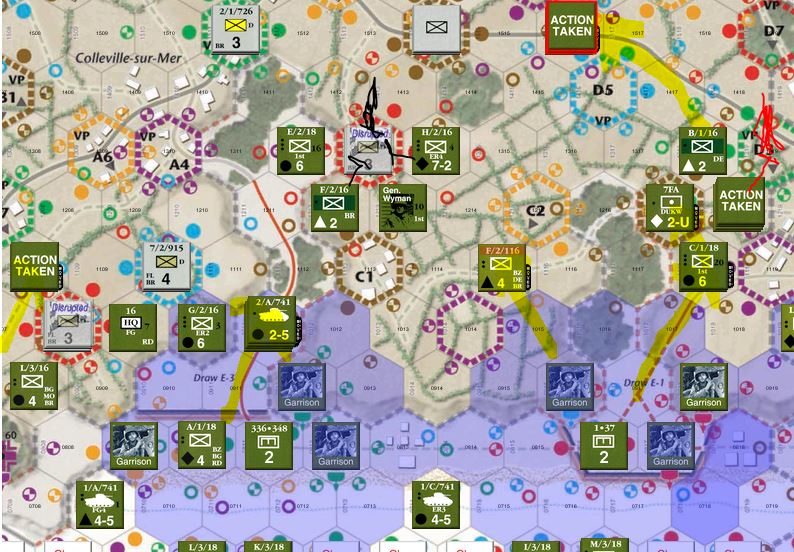
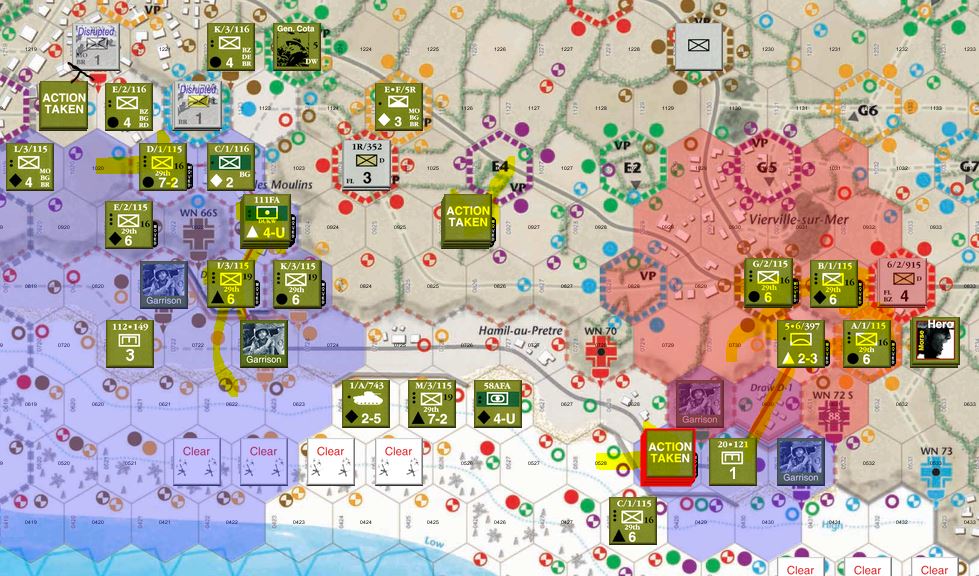
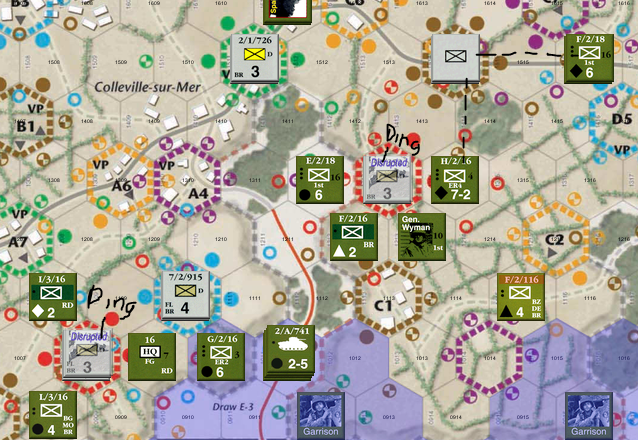
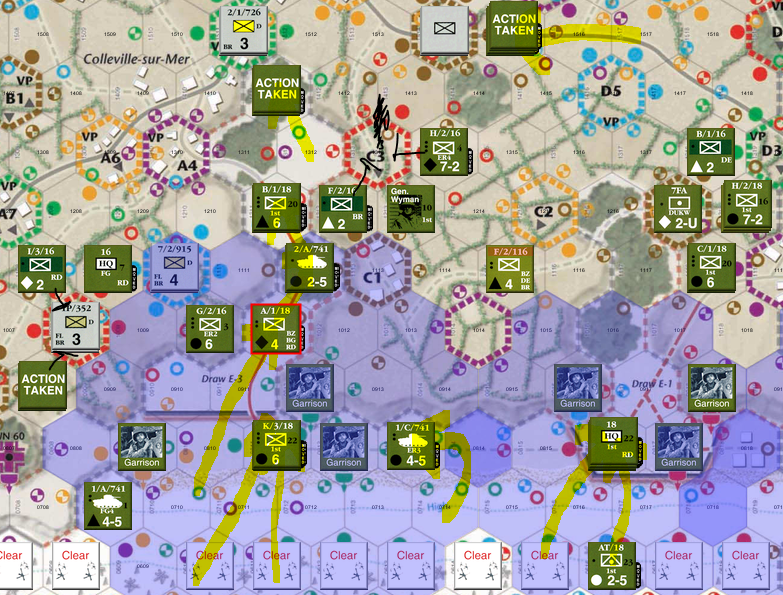
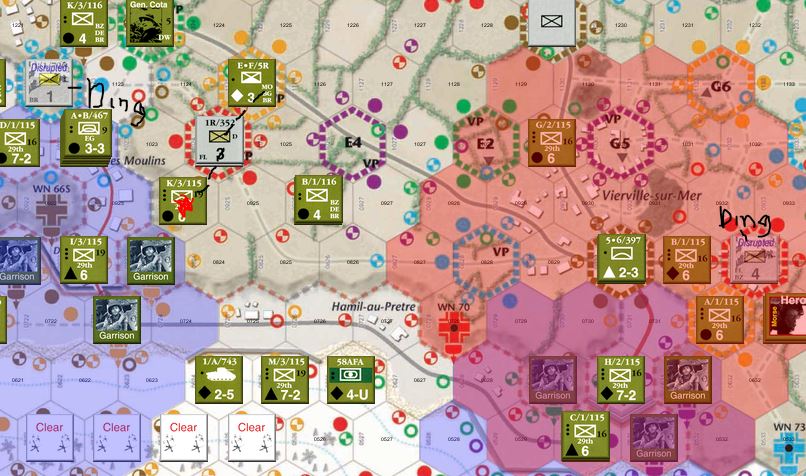
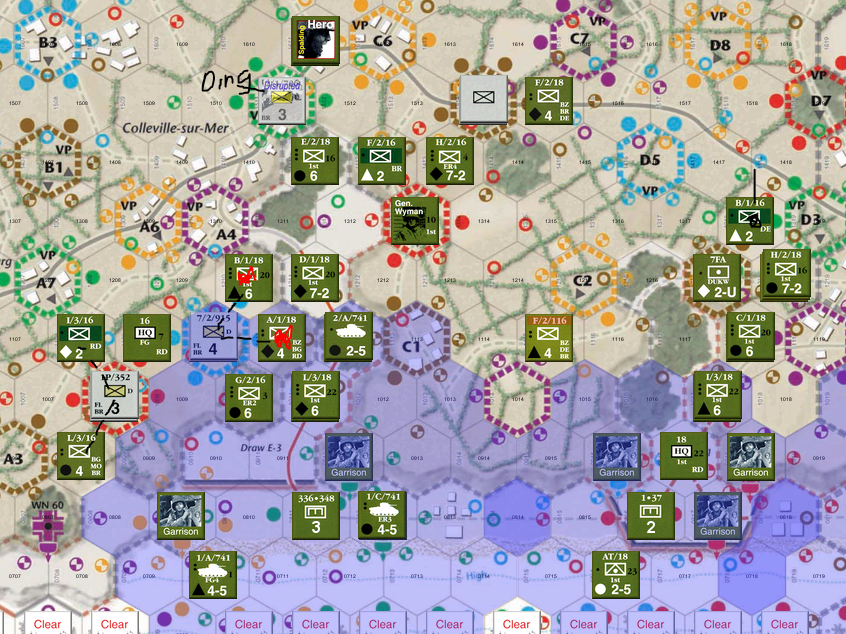
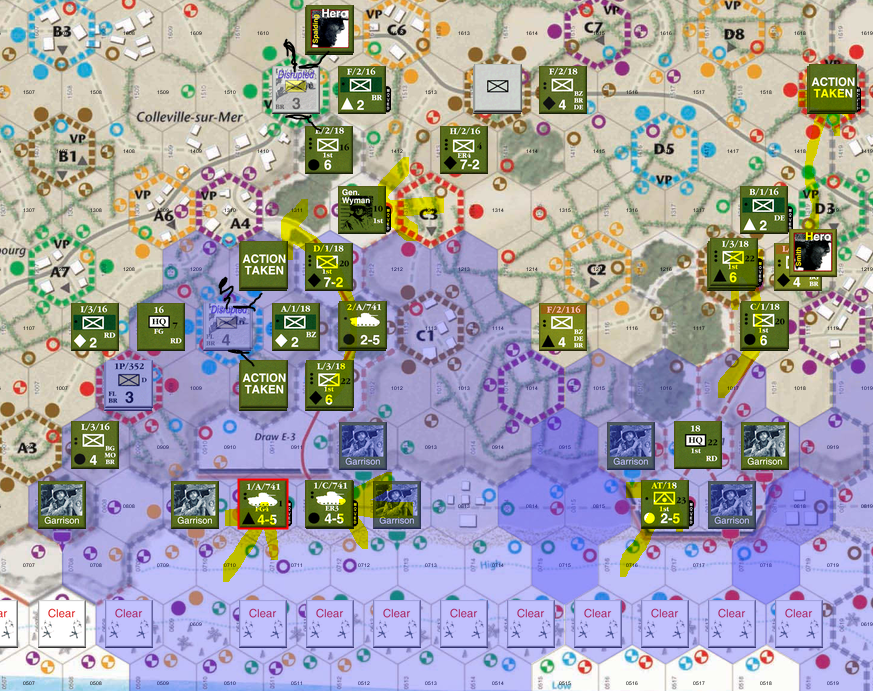
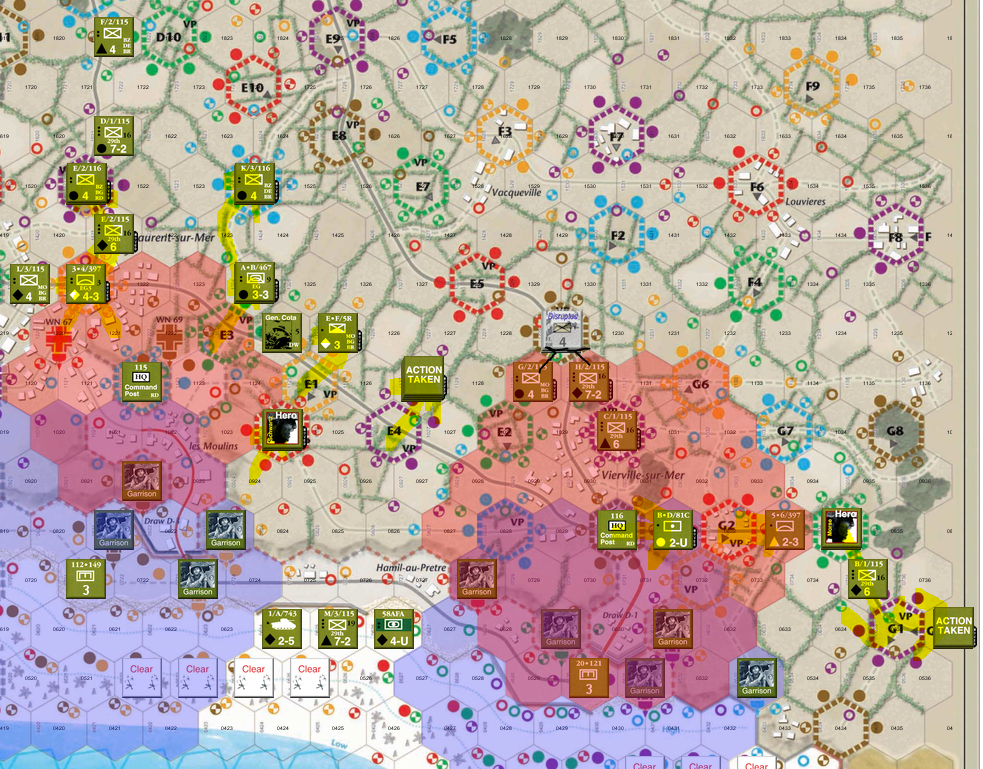
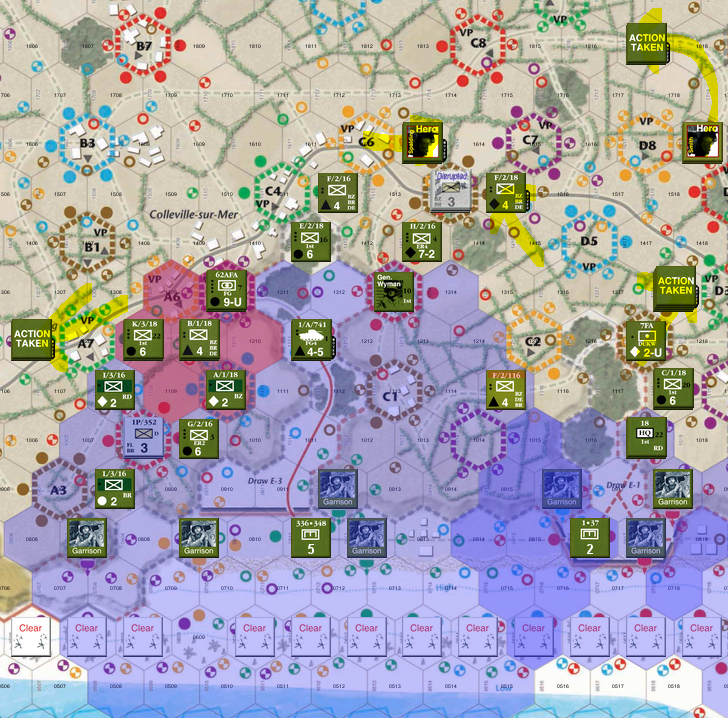
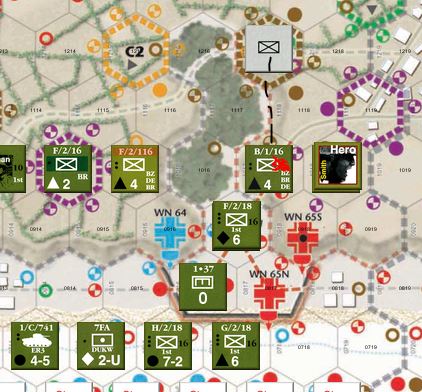
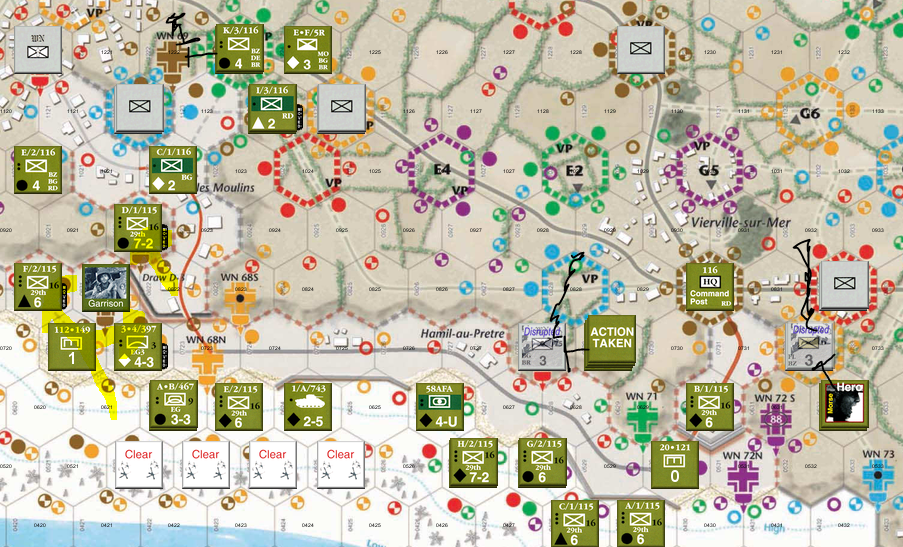
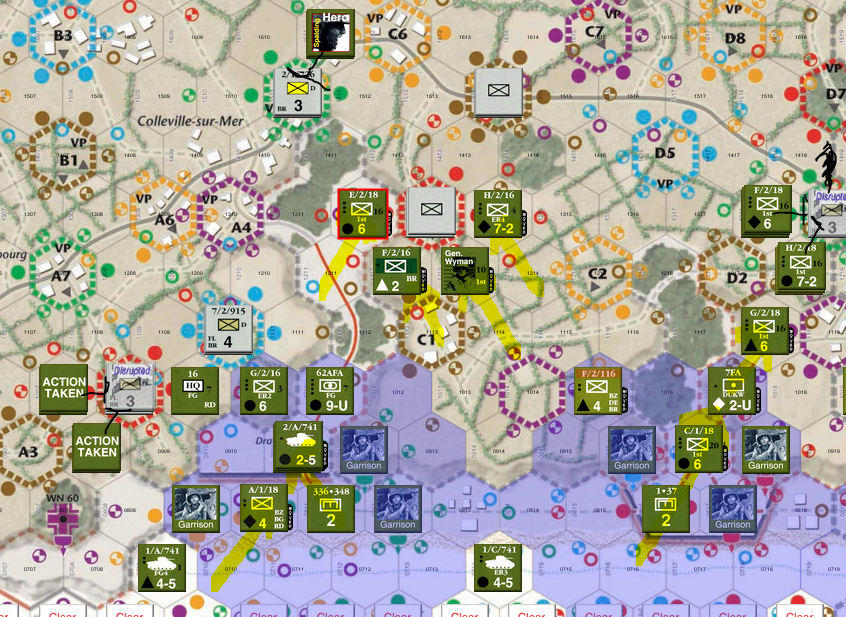
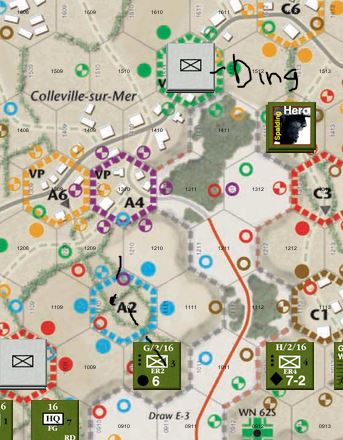
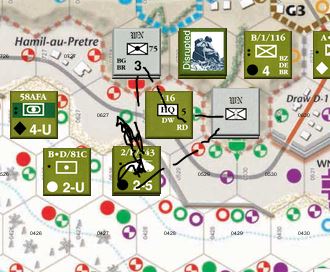
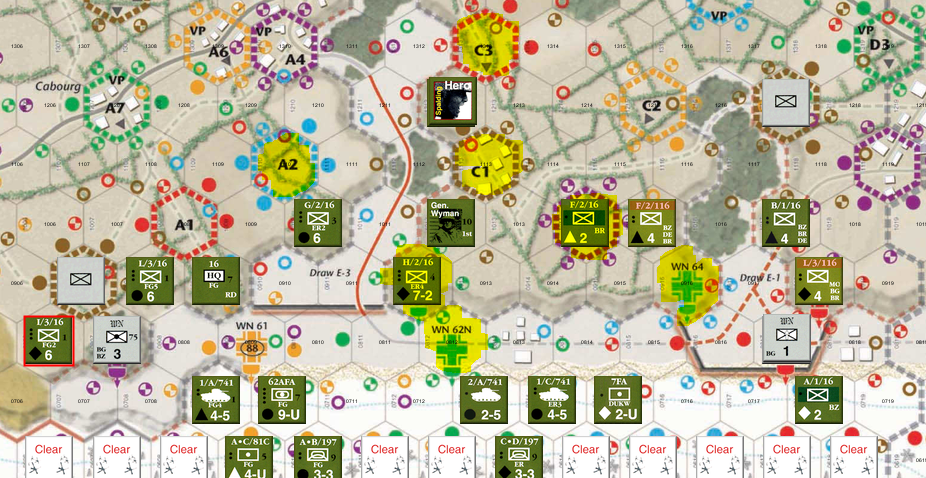
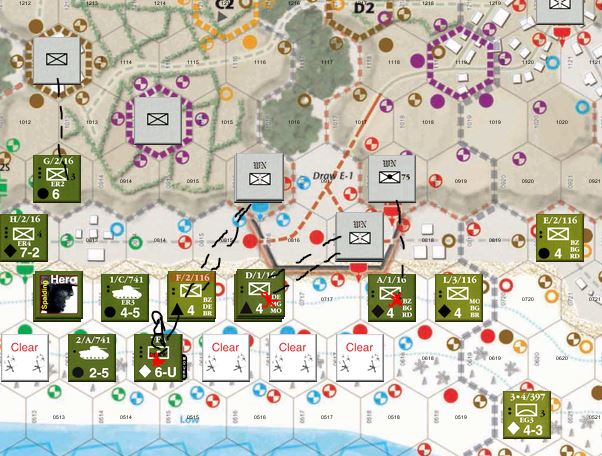
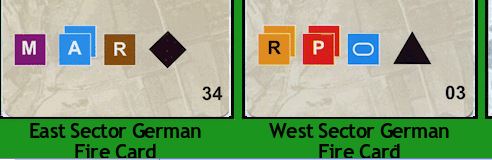
Now German Fire, there’s really only one thing that would really cramp my style, and that would be Red firing on the East Sector. Which is EXACTLY what happened. Oh, huh, a Purple Ambush in the West Sector did some stuff that’ll be…crampy, too:
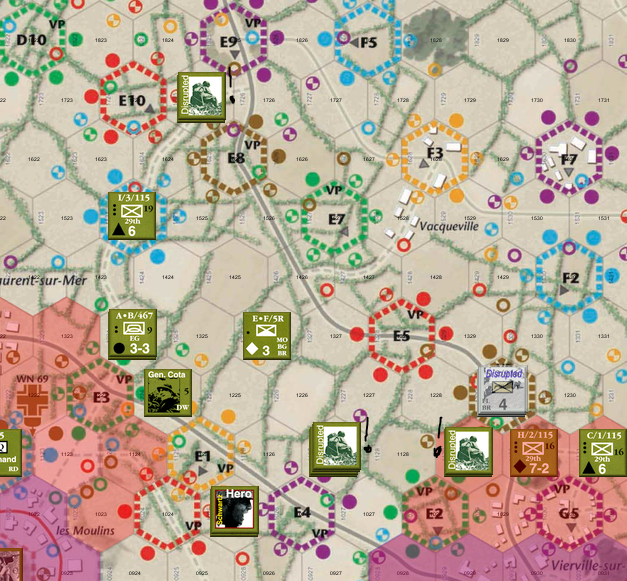
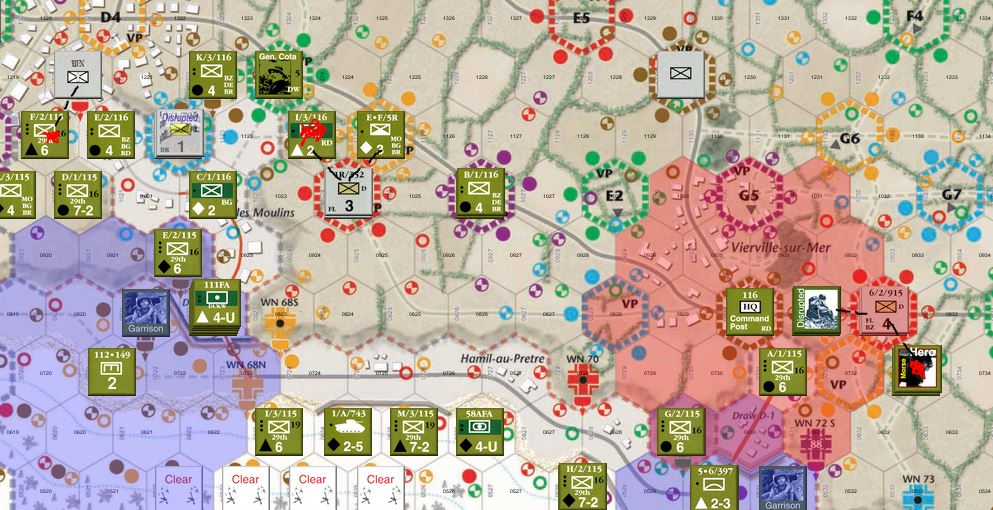
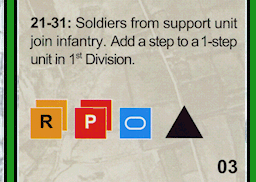
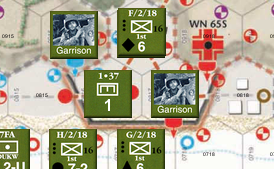
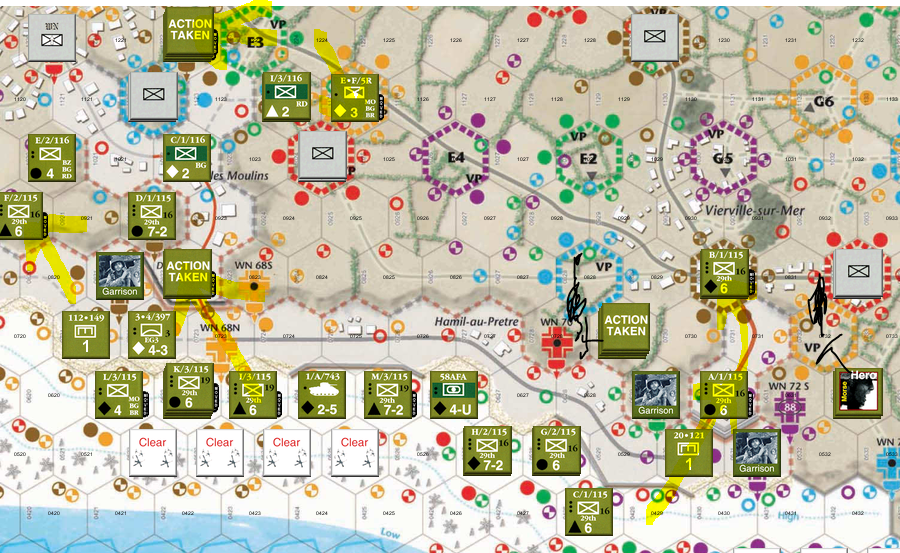
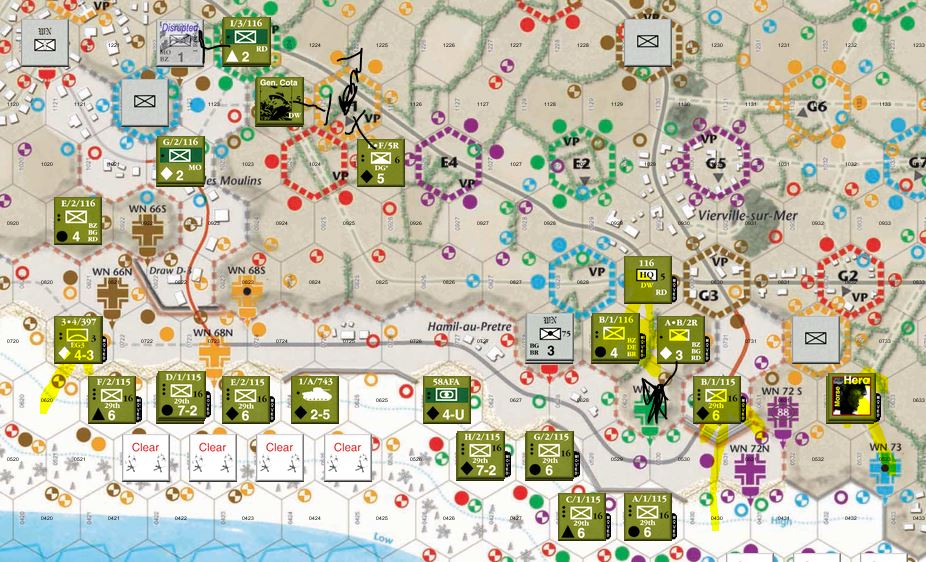
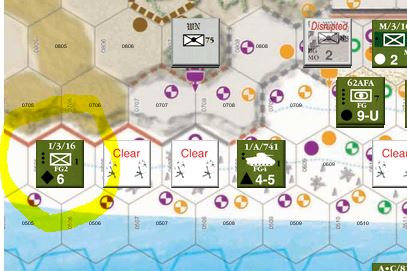
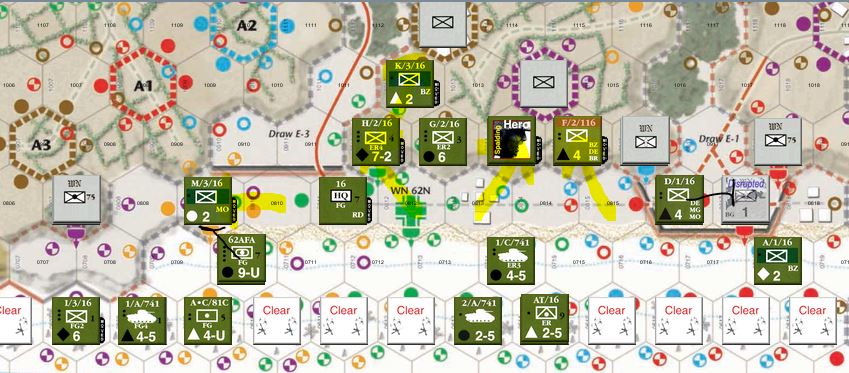
So G/2/16 loses a Step and THREE Units are Disrupted in the West Sector. The one deep in the South there is an Issue as I was going to have them continue further south with L/3/115 behind them to get 4 total VP hexes together. That shoots that plan in the foot.
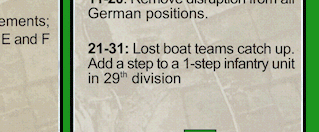
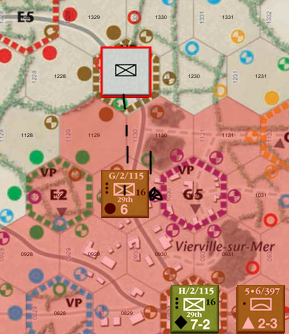
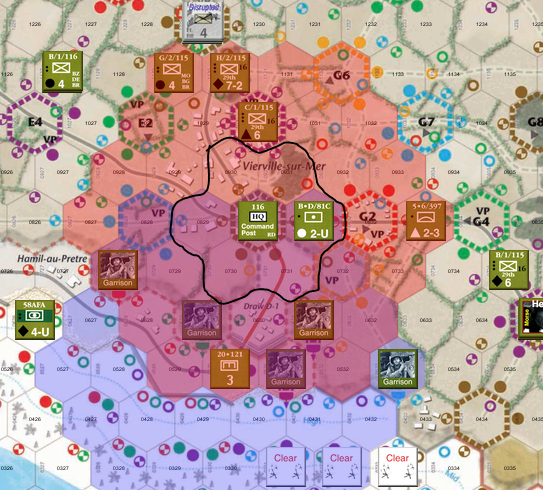
Huh. Ain’t that nice! There’s only one 1 step Infantry Unit to choose, so that made it easy. That’s a big deal because now they can Command adjacent hexes, allowing them to hold more than one VP site possibly.
Of course, they were one of the Units hit by Ambushes this turn.
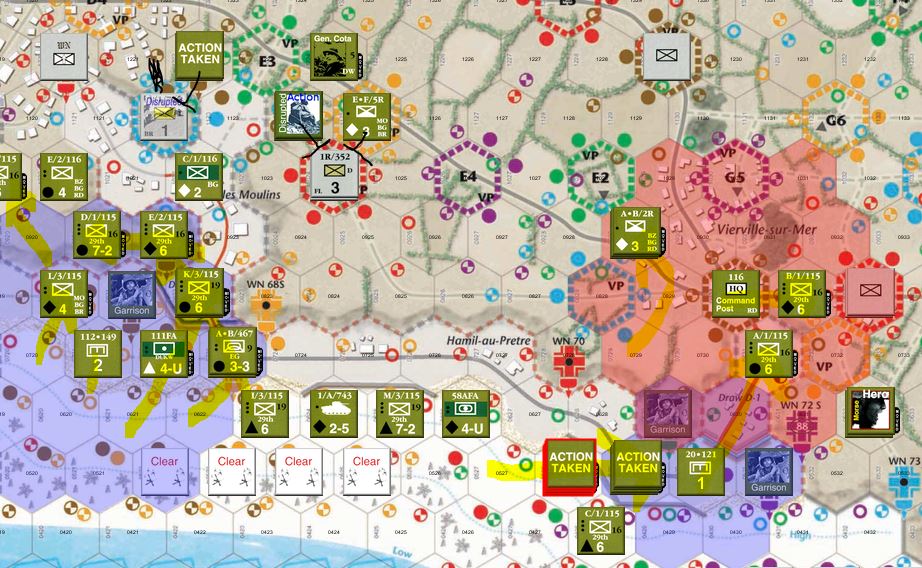
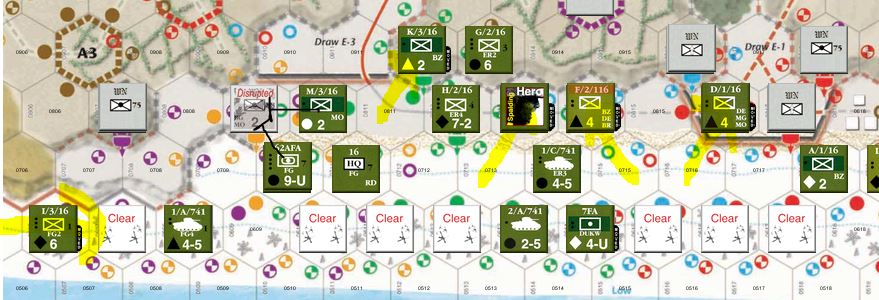
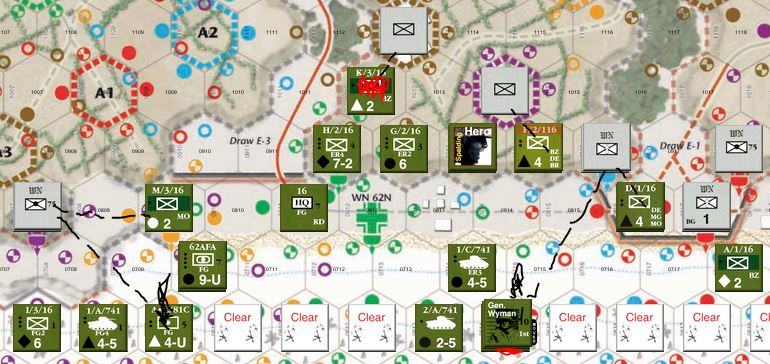
HQs and Engineers get bigger, which you’ll see as I do my Actions, and speaking of Actions:
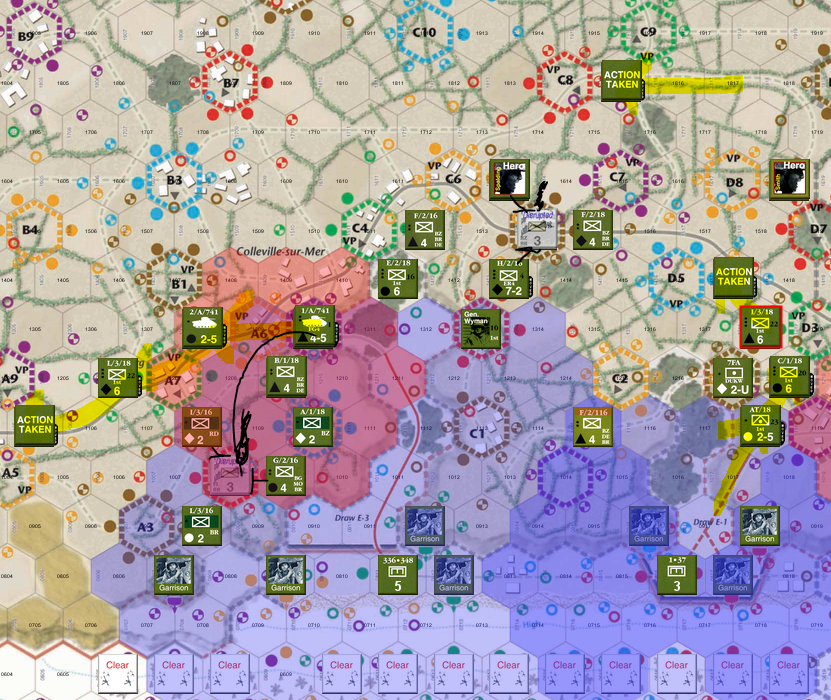
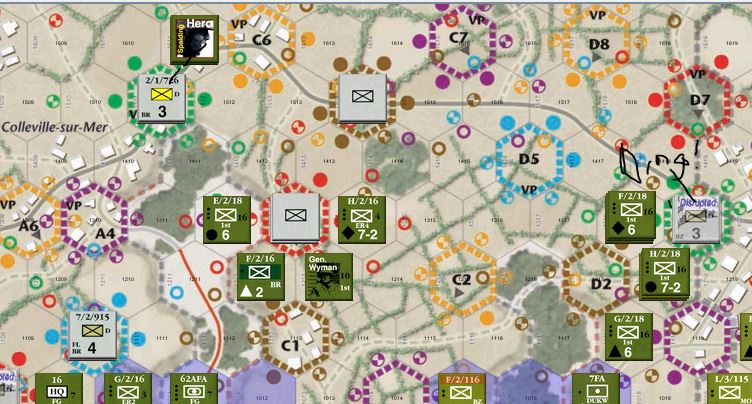
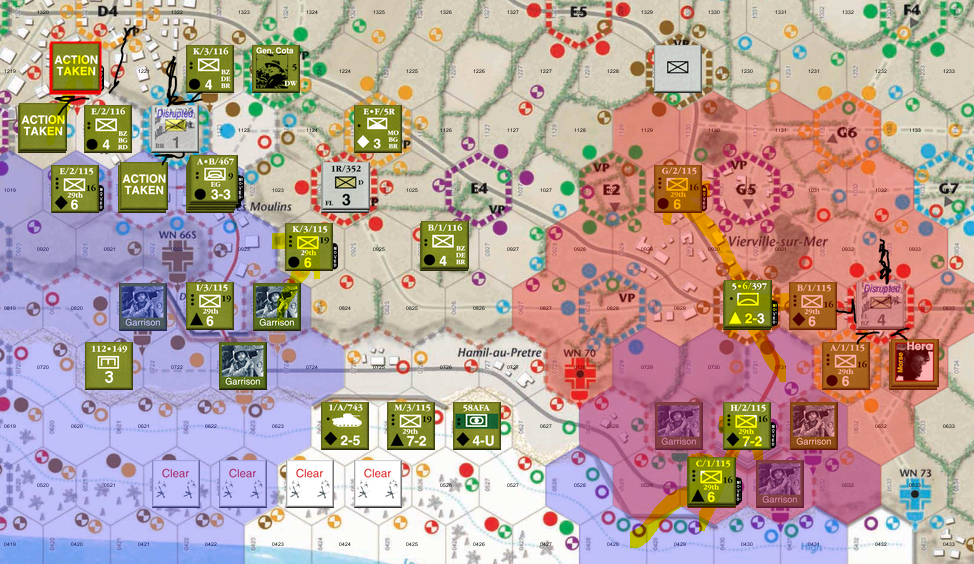
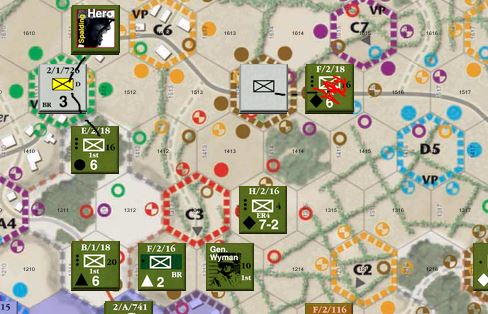
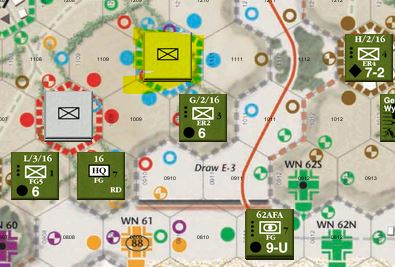
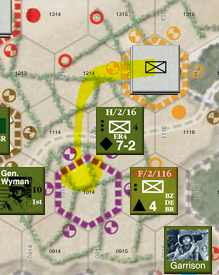
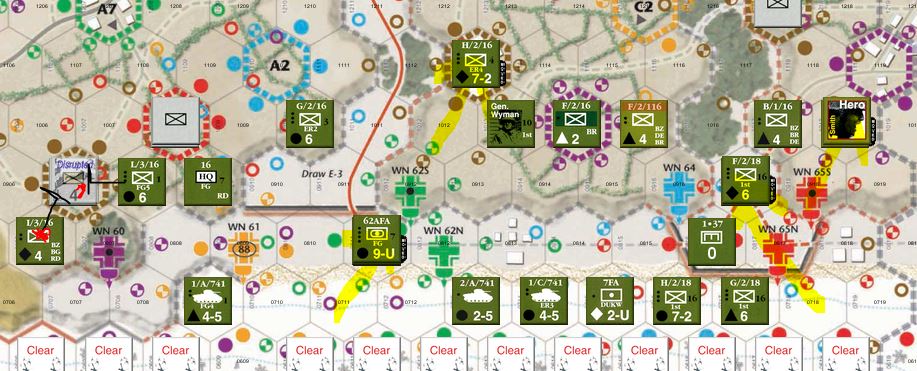
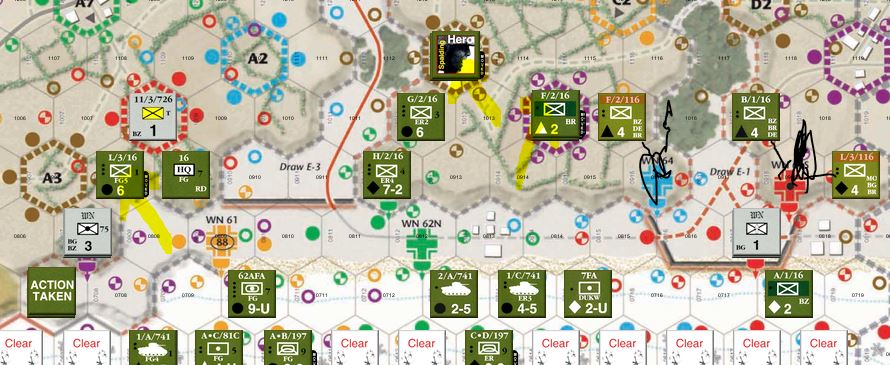
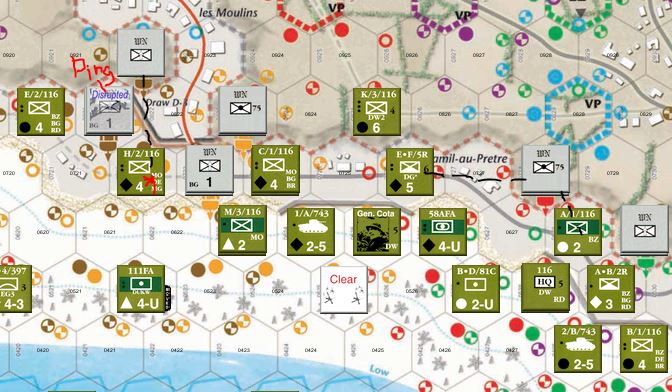
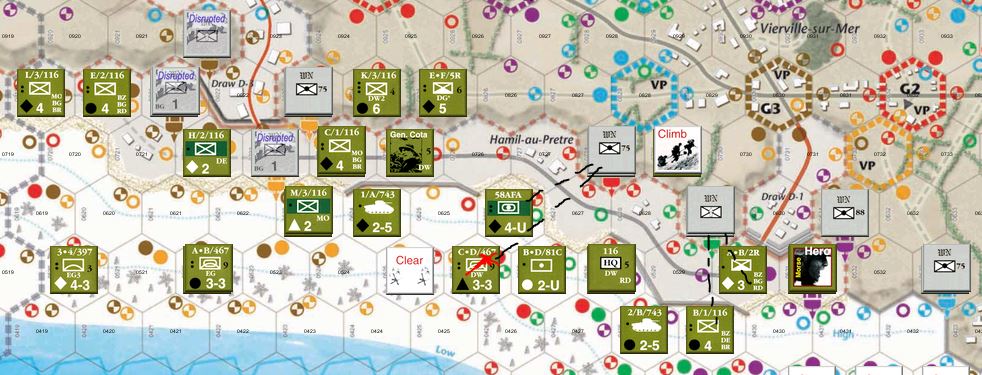
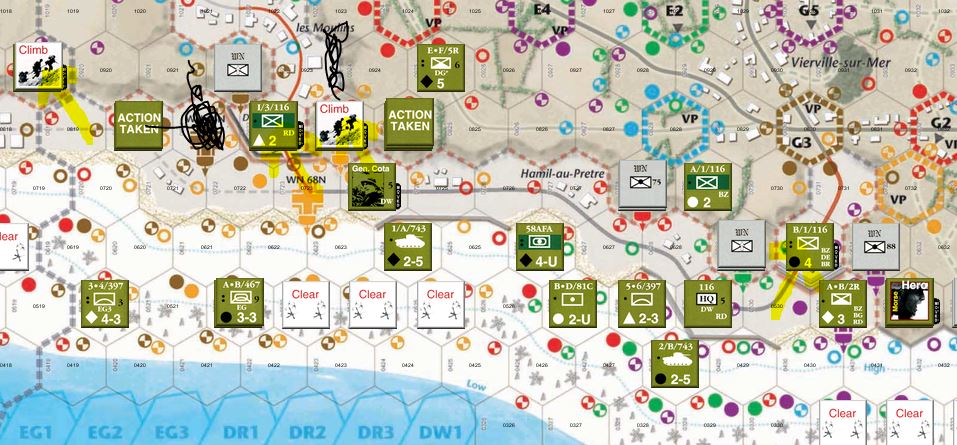
First time I’m using the Artillery of a 9-U unit (62AFA that’s under the 1/A/741 Tank) to support the Attack on the Red Reinforcement. Felt good. Think this is how 90% of how the Units will look at the end of the game, really, I’m sitting on a lot of the VP spaces so far. Not going to get many off board, unfortunately.
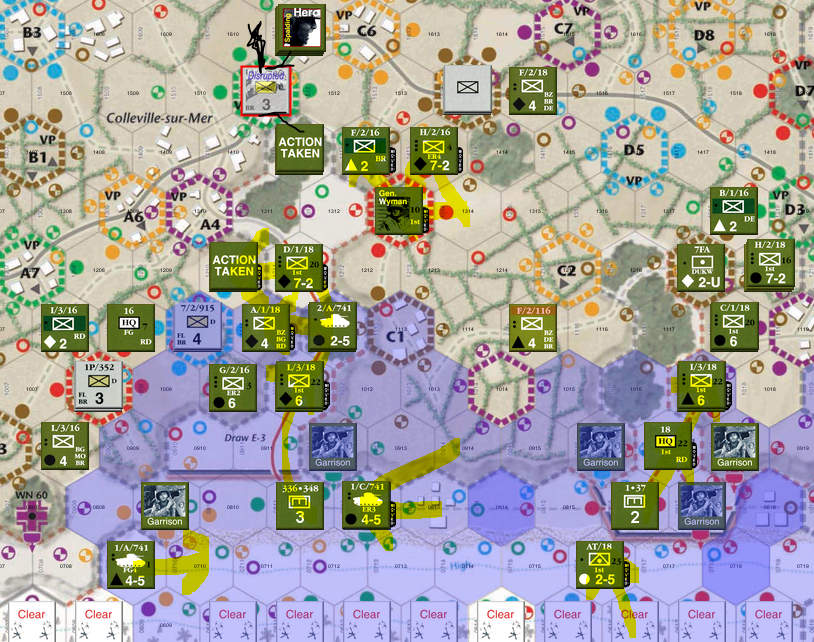
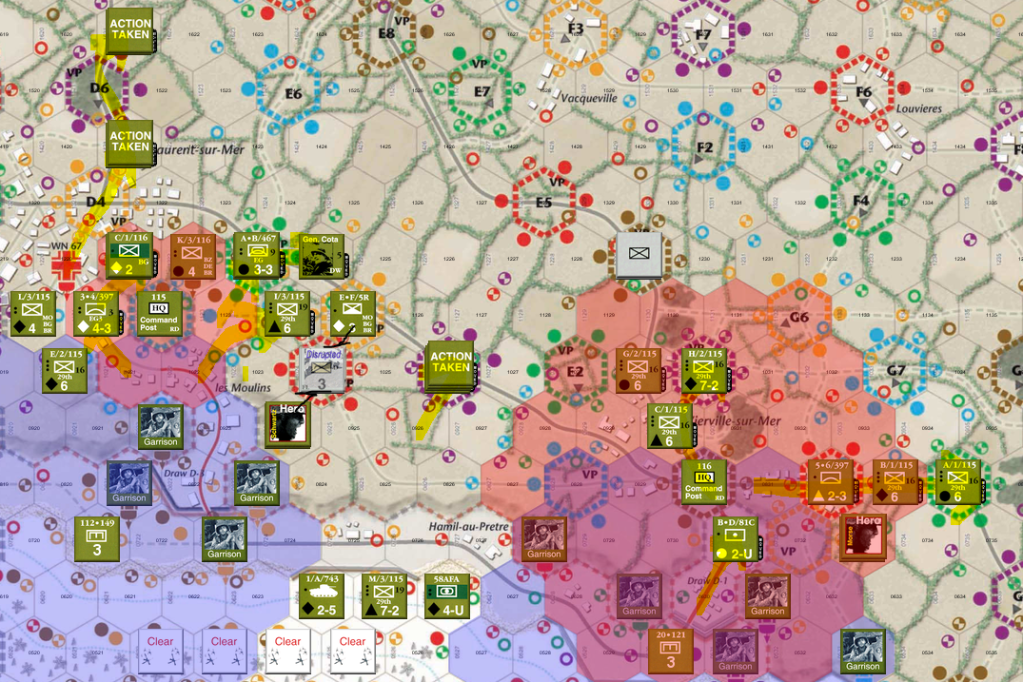
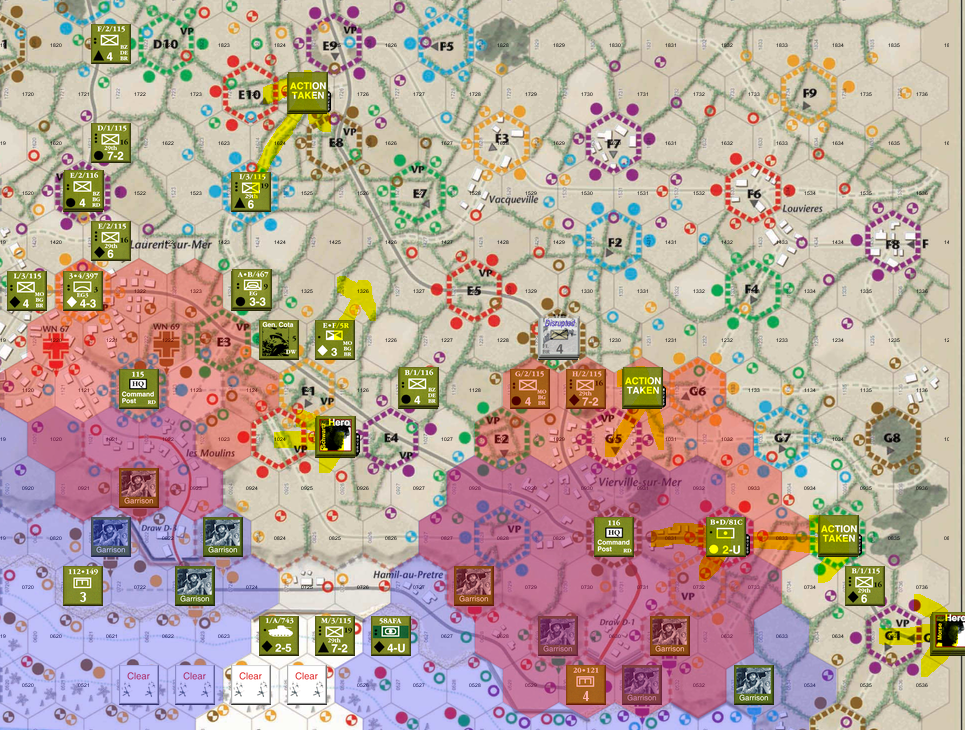
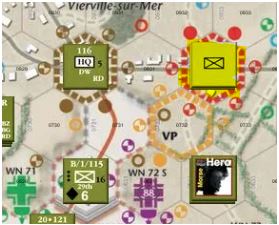
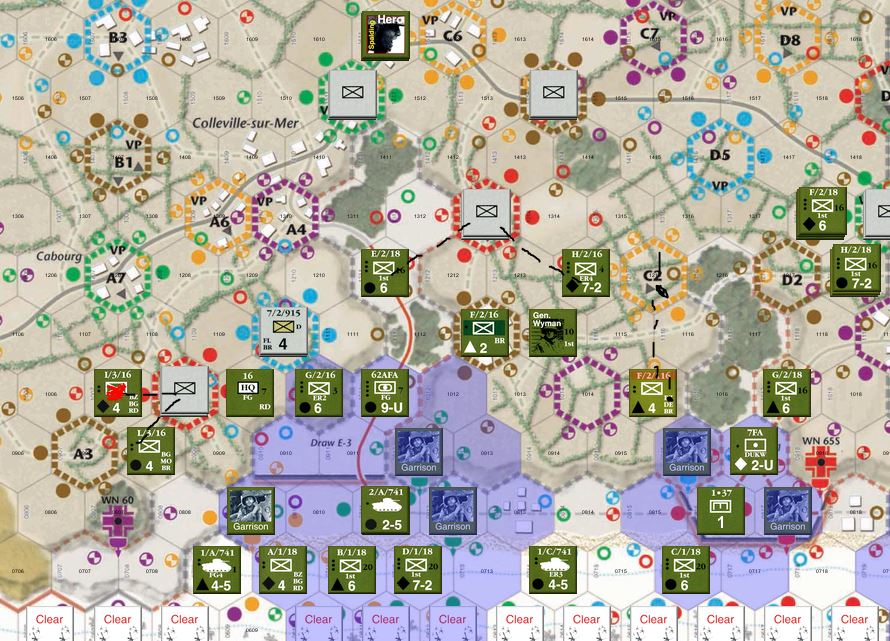
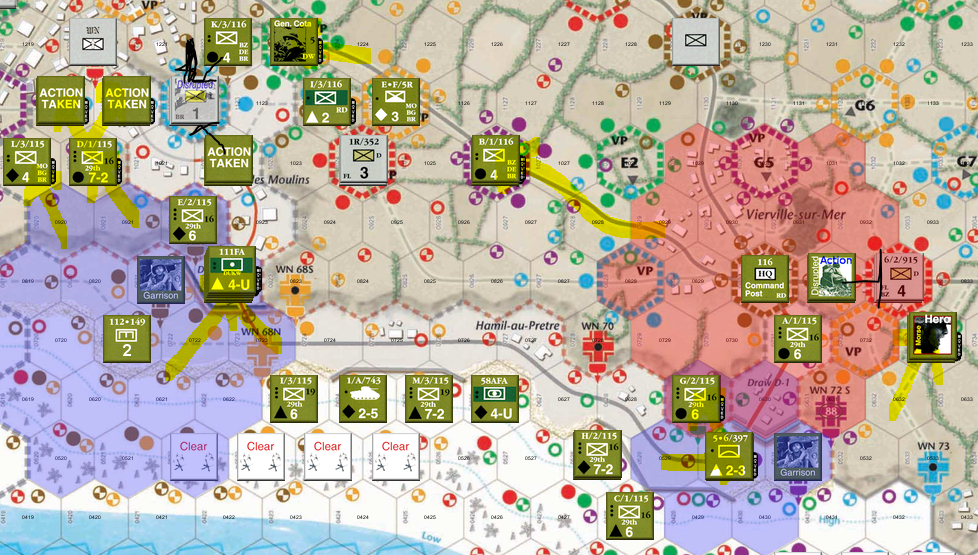
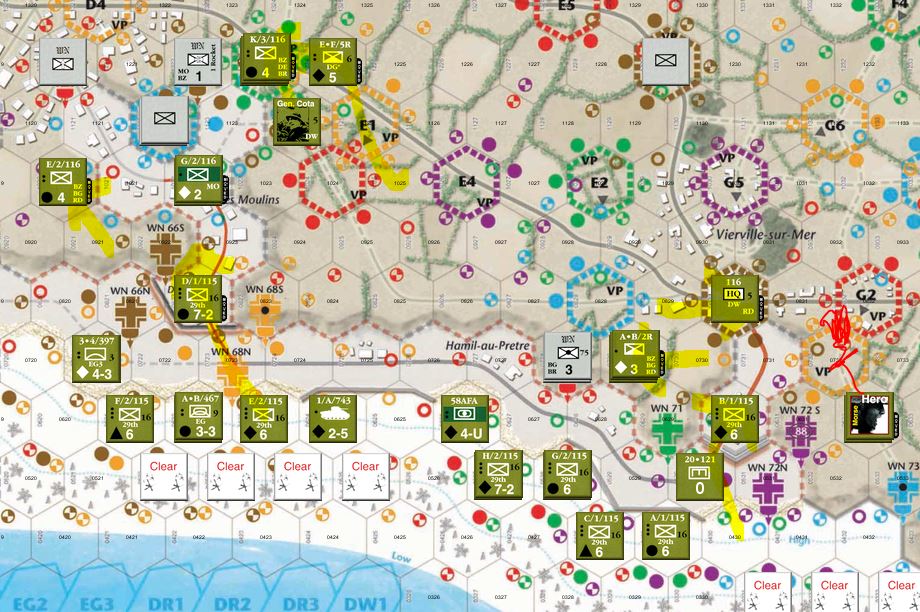
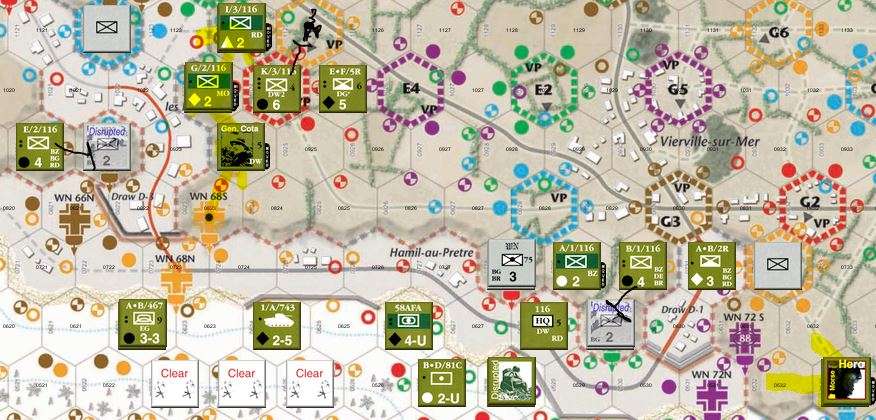
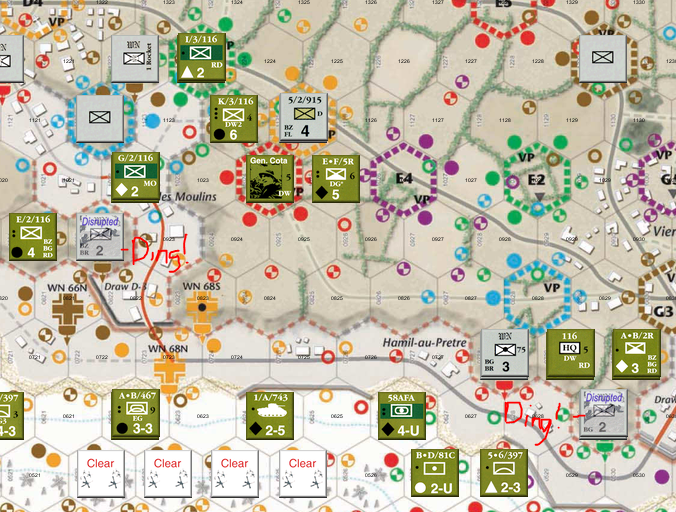
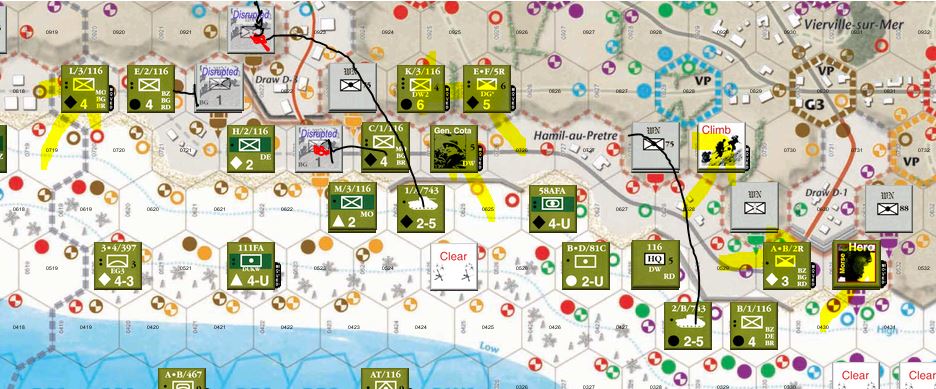
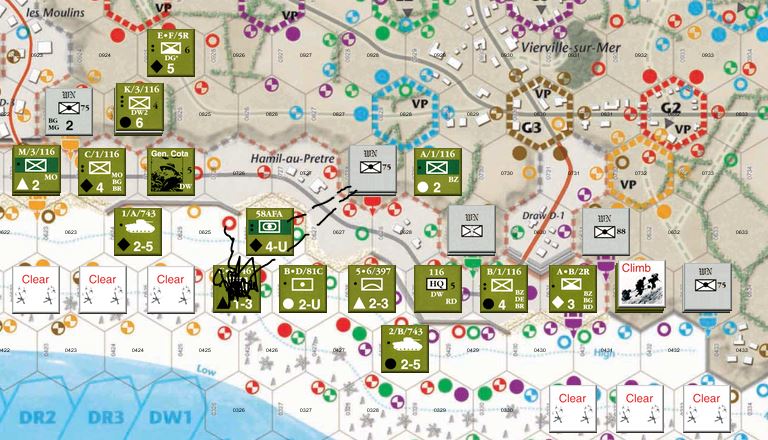
Similar here, lots of movement just to get Units next to VP spaces. Most already in position, if not there. Also trying to get as much as I can out Exit G.
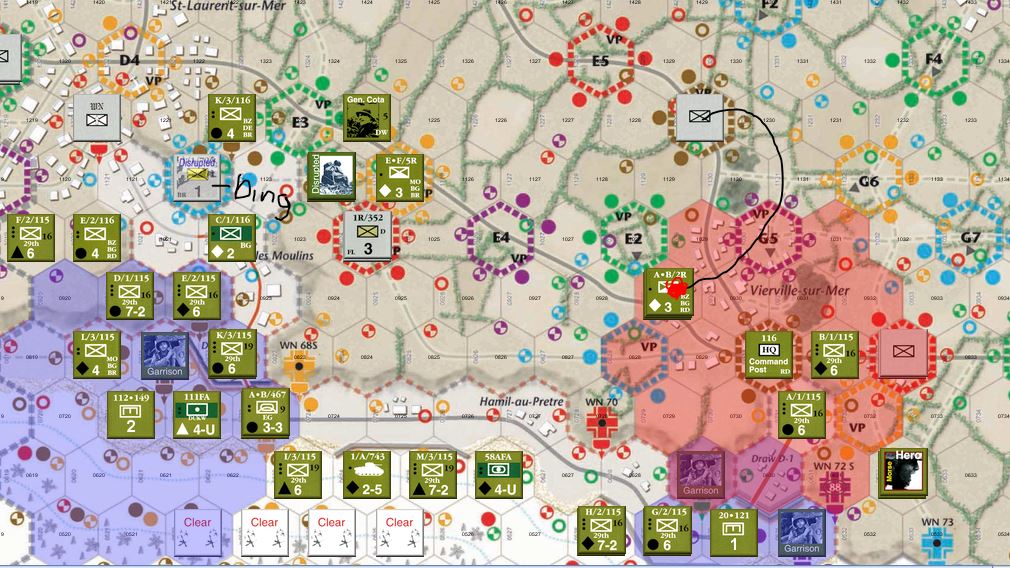
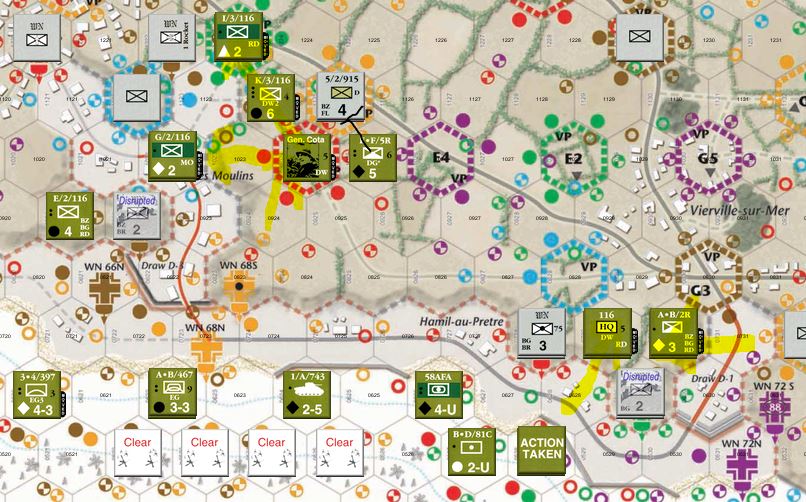
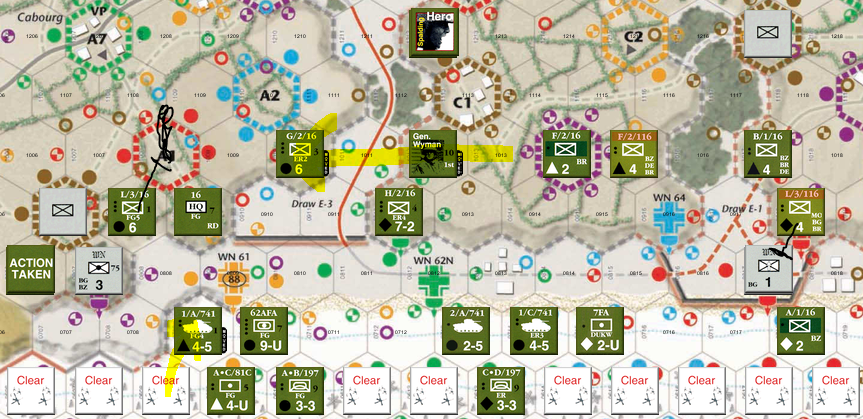
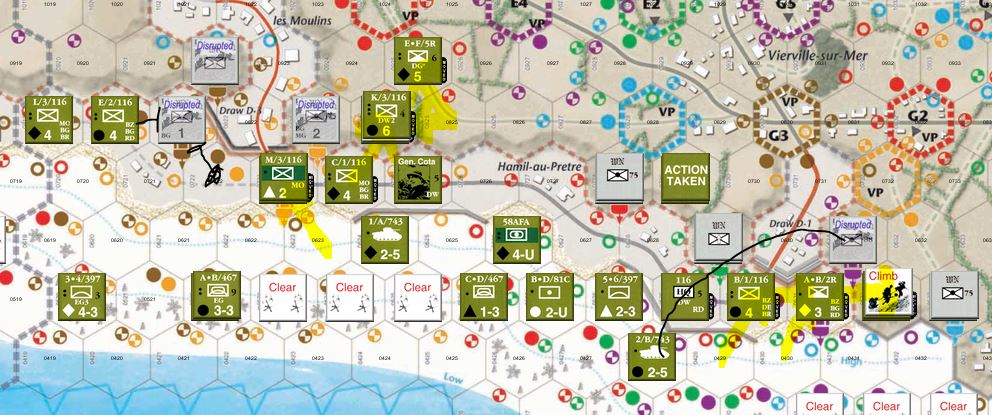
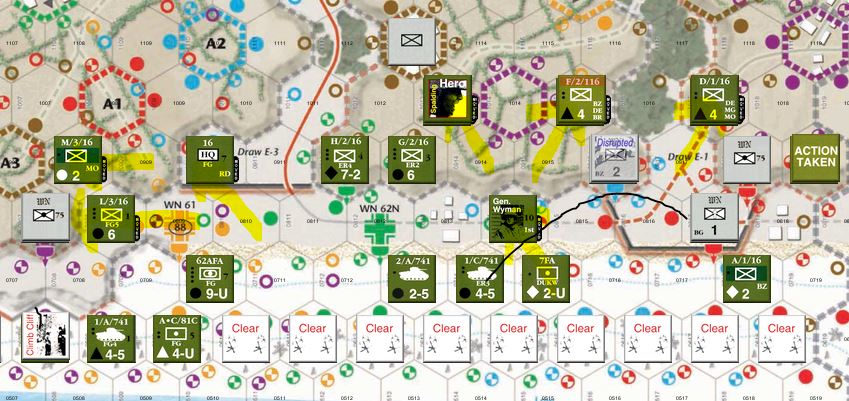
But that’s it. That’s Turn 30. That went by quickly, didn’t it?
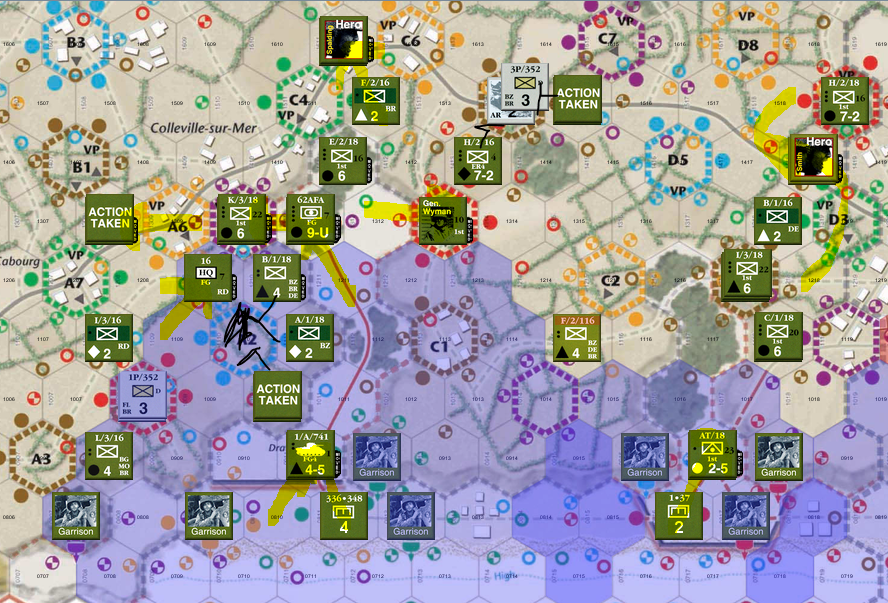
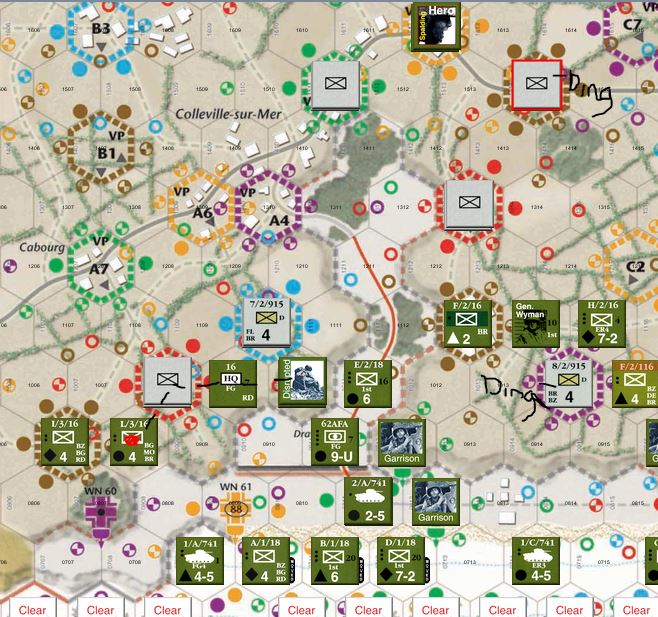
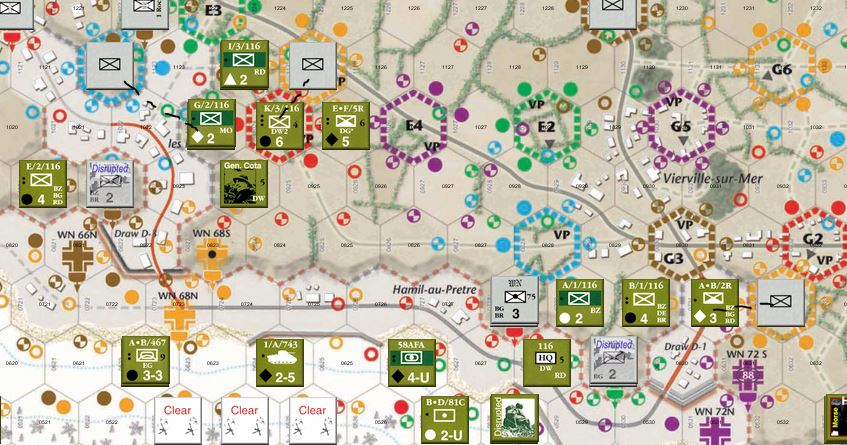
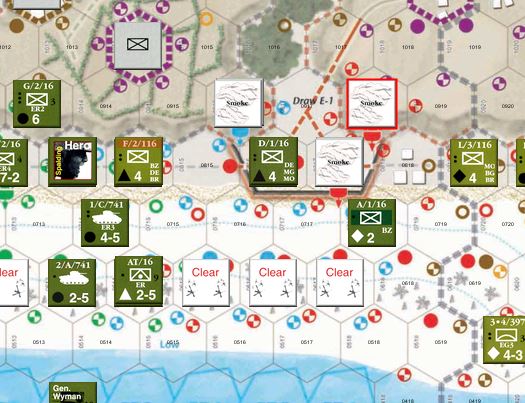
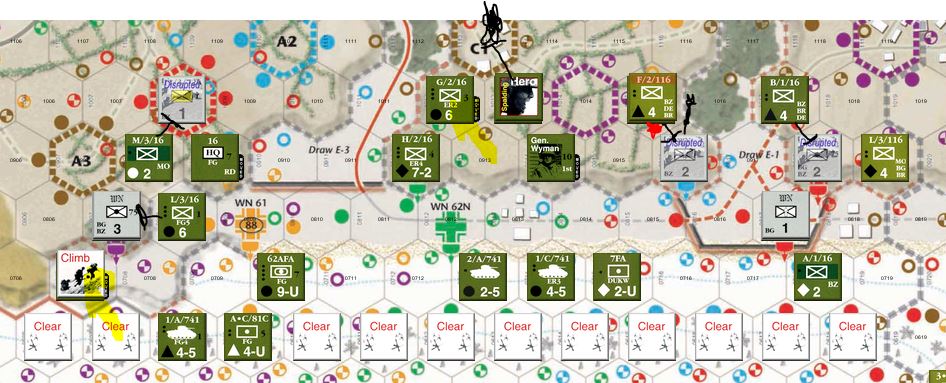
Turn 31 will be quick, too, as absolutely nothing happens…I mean, all the Germans unDistrupt. But that’s it, really. I FINALLY get to have my tanks use their 4 hexes of movement on a road, so that’s fun. So that’s something. But it’s just setting up for endgame.
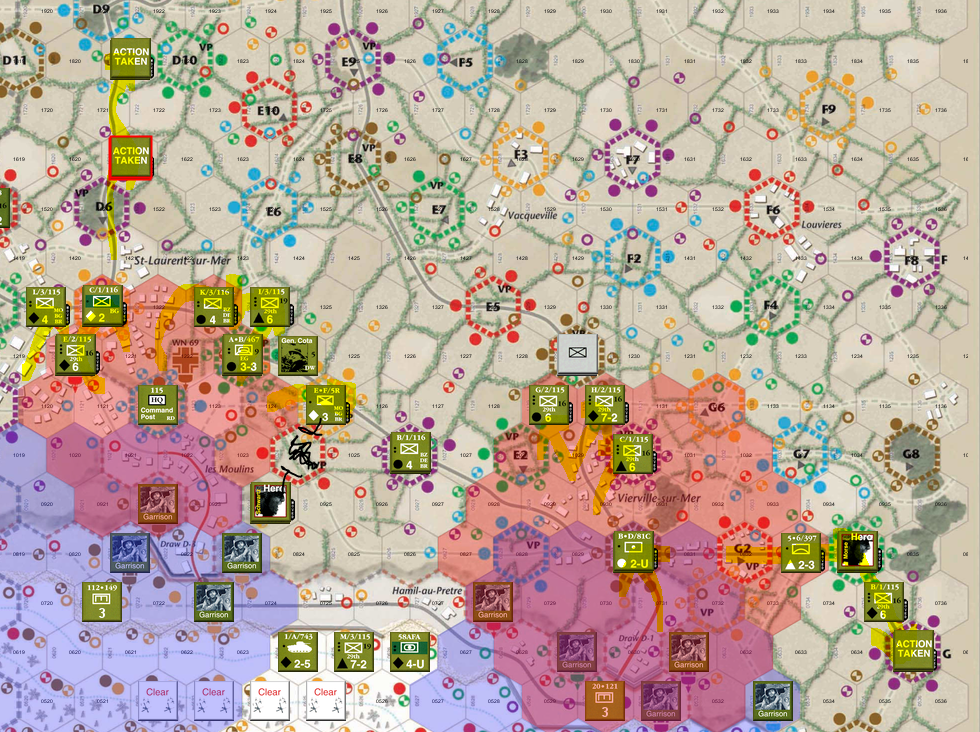
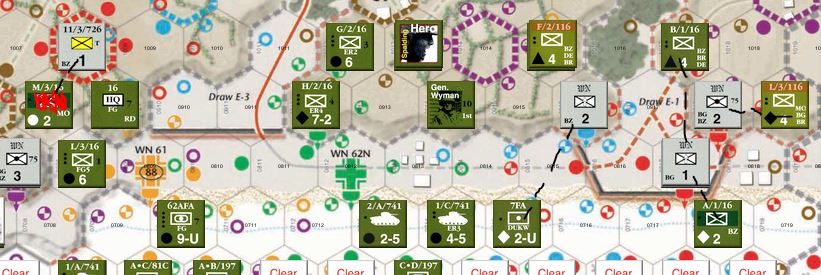
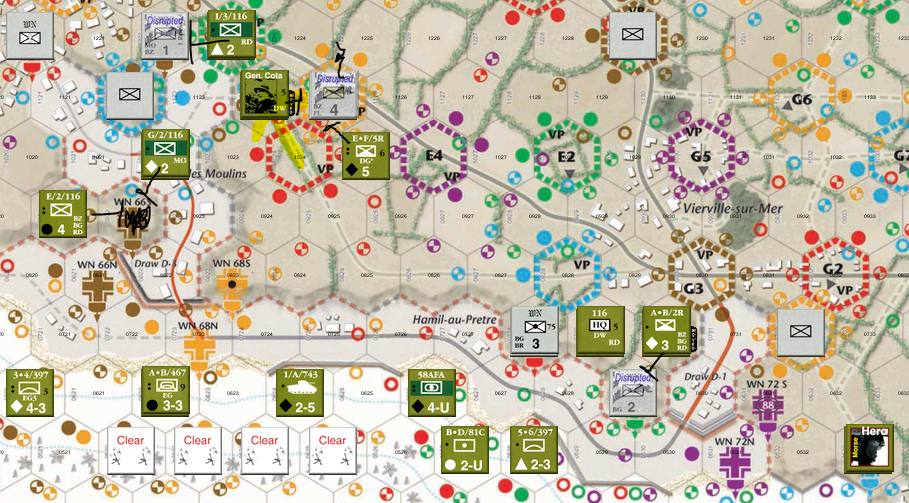
I’m effectively holding Normandy upside-down and shaking it, hoping any spare VP will fall out of its pockets. (Oops, forgot to draw the attack on the Brown Reinforcement on there in the middle. You can be assured I blew it up)
Turn 32 is much the same. Moving to take VP spaces, and getting the last unit off the map that I could. I almost got a Unit off exit C far South, but I wouldn’t have US Communication at Exit C, so it wouldn’t count (though I was one hex off of being able to do that), which denies me 3 points. Drat. It’s those little things that I’m one hex off that’s going to kill me, so let’s get that last picture of the map, and I’ll show what points I got.
A byoot.
Let’s just go down the list. One VP for each German reinforcement position you control in a hex on or adjacent to a major road, or a minor road leading off the south edge of the map. Luckily all 42 of these are marked on the map with a “VP” on them, because DANG. Let’s see what I have.
That’s 38 of the 42! DANG! Just the group on the far left there did I miss. And we all know what a quagmire that Eastern flank was, so that’s easy to notice.
4VP for each Draw that’s open. It’s open if you control every hex and it’s completely clear of Obstacles (the engineers have complete access to all hexes). Since HQ and Engineers can extend control, we’ve got that on all 4 in spades. So 4×4 is 16. Boom.
1 VP for each non-infantry, non-HQ unit on the high ground.
That’s 2 tanks on the left there, for 10 total units.
1 VP for each armor or regular infantry STEP that moves off the map from a lettered exit hex, but only if you can Trace US Communication blah, blah blah. I only did that from exit G and I have Communication from the HQ over there no problem. I only exited 5 steps though, but still, nothing to sneeze at.
1VP for each ranger infantry that exits from the south. Never did that. Never tried. Should have. 0.
SUBTRACT 1 for each WN you don’t control. 0
SUBTRACT for each German unit in the Kampfgruppe Meyer box – 8.
So 38 + 16 + 10 + 5 – 8=
61
Decisive US victory.
HO
LE
Crap.
I must have done something TOTALLY wrong. There is NO WAY I got the highest scoring possibility. Mind you, I just eeked over by 1 point, but good grief.
Maybe I got really, really lucky, as I felt like the German forces were pulling a TON of “no action” results during the German Fire Phases during the section section of the game, or getting “Remove Depth Marker” results when that didn’t do anything, etc. Also, all of their Reinforcements were down really, really early…which felt off to me, but I can’t see anywhere in the rules about reshuffling them, and I looked…a LOT.
But you know what?
I had fun playing.
And that, I guess, can let me pontificate on my philosophy of gaming.
We game to have fun.
Games are for PLAY. Sure, you can take play seriously, but play is play. And if you don’t follow rules, you might as well just go out back and play Calvinball and do whatever the heck you feel like. But if I spent every waking moment fretting over getting everything “right” rather than just playing, then I wouldn’t have been enjoying myself, and if I wasn’t enjoying myself, I wouldn’t be playing (in my opinion).
So I call that a win, at 61 points, or at 19 points.
This whole blog started out with High Frontier, a game with a LOT of rules. And even with that big ol’ game that I’ve played a lot (a freaking lot), there was one or two rules that someone in the comments pointed out to me. They weren’t game breaking, but it was something. What you didn’t see was the years….literal YEARS of starting and restarting games of that and failing and failing again to get games off the ground (heh) while I tried to get the rules down. Yet most of the time, I had fun anyway. I knew I was screwing up, I knew whatever my final scores were ended up being wrong, but I got a little be closer each time and still had fun anyway.
And, of course, by the time I got the rules down they just changed editions anyway, but I digress.
So what you’re seeing with all these later posts is the trying and failing I’m going through. I’m playing these games, and I’m having a great time….but damn if I’m not failing a lot.
So odds are when this post finally sees the light of day and I show it on BoardgameGeek, I’m going to get several people to point out how much I messed it up, and I’ll learn from that. And I’ll do better next time. And I’ll feel bad that some of you might be following along to learn how to play, and I’ll have failed you if you were using this as a tutorial.
But hey, if nothing else, this will count as one of your failures. A step on your path to playing it correctly. And maybe, just maybe, you won’t feel bad if you play a game for hours and hours and end up with a weird score at the end. Maybe you’ll just say “Hey, I had fun anyway.” You’ll flip the the rulebook the next time you sit down, facepalm when you see whatever you missed and go at it again.
(Watch, in some fluke I happened to play a perfect game and I’m putting all this crap out here for nothing. HA!)
Oh well, at the very least I hope you at least had some fun reading of my exploits on the beaches of Normandy. Maybe you learned a thing or two. Maybe you know what to watch out for when you play. Maybe you know which parts of the rulebook to focus on, and which not to bother. Maybe you know never to trust this blog again.
All I know is this has been several months of working on, so I can take a bit of a break now while I think about what to do next. I think it’ll be something I’m a bit more familiar with, and maybe something a bit easier and a bit shorter. ’cause I’m tired. That was a bit much.
Here’s my obligatory shout out to my ko-fi page. No big deal. Just a nice way to say you liked what you saw and appreciate my work. It’s okay if you didn’t, or if you don’t have the spare change.
I’ll end here as I began. Thanking everyone for reading, and being thankful that I never had to be in the situation that I just depicted in boardgame form. It is an amazing turn of events that I am here at all, and it’s helpful to have that perspective every now and again. Take a step back from the every day and just look at yourself and think “Wow.” Whether it’s the fact that these men had to run up a beach filled with machine gun fire to save the world for Democracy, or even the huge existential fact that we wouldn’t exist if a star hadn’t exploded millions of years ago. Just wow.
That’s right, only 10 turns left. If you remember, by turn 10, General Cota hadn’t even made beachfall yet, and by now, he’s been fighting for HOURS. There are Units that have been on the ground since Turn 1, though not many (since those were Tank units, most of which didn’t make it out of the water), but we have also lost quite a few Units. Thankfully not enough to cause me to instantly lost the game. But that’s not out of the question yet. East Sector is putting up quite the fight so far, and it’s going to take me a few turns to get into position to knock out the last German resistance. In that time it’s possible for me to take enough casualties to have command pull the plug on this side of the invasion. I have a feeling that won’t be the case, however, as I have a wave of Units coming in to knock the Axis silly. It’s just whether I do it in time to get the Victory Points needed to win the game or not.
Judging from history (MY history, not the actual history I’m playing out here), no, no I will not win the game, but hey, you never know.
So I do have a Amphibious Operations Phase as some Infantry is dropping on the East Side, including the last HQ chit (hooray!). And that’s a good card as nobody explodes on landing, nor does any artillery rain down. Excellent.
As for new Units, I just get one bit of Armor that’s also arriving on the Eastern Sector. I’ll have it come up on the Western Draw behind the HQ, so that if it gets set up as a Command Post, I’ll have something with a range of 5 able to back up some Infantry.
But let’s see what Events we get before the pain comes. Unless the Event is the pain, of course. Nope, just more Reinforcements that I can’t place, so we get to the firing:
Looks like some more Reinforcing and maybe some Advancing in our future, and let’s hope I don’t have any Triangles in any danger.
Note that 2/1/726 did not Advance, even though the Hex it’s on has an Advancement arrow. This is because of the obscure rule: Only units from the 352nd Division with Depth markers Advance. Since this one is from the 726nd, it’ll stay put. *shrug*
Pretty painful with Red firing this turn, causing 3 total Steps lost, including I/3/116 being wiped out entirely. Nothing from the other colors, however.
The Second Event is…um….uneventful?
So now I have my HQ/Engineers doing….things. Sadly in East Sector, I still have my one HQ section pinned between two lovers…I mean, German units. The other one just hit the beach, so it has to move up and find a space to set up its Command Post. Out West Side Command Post is doing pretty well, the other one is heading up the road, but can’t go much futher until that Blue Bunker goes away. Where should I set up the post, though? I kinda want to set it up right where the Blue Bunker is! Do I wait that long, though? For now, yes.
I increase the eastern most Engineers for each sector and hope that gets me somewhere. Now to the Action Phase.
Some big gains as the Western flank s finally cleared up and our first Artillery finally make topside, earning us some nice VP there. Big hits in the middle clearing up space to make that Draw passible once the Engineers are done. Just need to get the eastern side better, so I’m doing some maneuvering for that.
This was mostly maneuvering as I need to get MO onto the Blue Bunker. Also need that for the Red one I learned as well, so there we go. The Red Reinforcement has to wait a bit as it takes a while to get through the bocage so they can get flanked and properly shot at. And over there in the West everyone is getting in position to take down that Red hex and then I can start getting everyone out of that exit for max VP.
But that’s for a later turn.
Speaking of turns. It’s now turn 24.
I’ve got one lone piece of Artillery about to make landfall, so let’s see what happens there. No effect. I’ll be damned, it actually lands without hassle. And no new units approach.
As a matter of fact, no new units will EVER approach. What you will see on this board, is what you will ALWAYS see now. I can put away these Amphibious Landing Tables for good. Except the US Weapons Chart and Barrage Tables are on the other side, so I really can’t, but the sentiment is there.
Well that’s a fun one! Sadly it hasn’t fired, but I’ve also taken out that Bunker already (it’s the Brown bunker on the back of the Eastern Draw of West Sector), so no big deal. But still, fun to think that if they made a big show of force, they get blown away!
Both Red’s unDisrupt, and Brown fires to no effect. No problem there, I think.
And, um, absolutely nothing happens in West Sector. Green could have Ambushed, but there wasn’t any Circles available for them to shoot at, so I got lucky. Beyond that, there just wasn’t anything activating. Huh. Lucky draw.
I keep going with my same plan on the HQ and Engineers, so their halos just keep growing, second Event:
Huh, the Navy’s getting all sorts of uppity this turn! Let’s pull a card and see which position it is: Diamond, so WN66S.
GET MY BROWN PANTS!
No effect but probably startled a few people.
Actually no units were in any of those three spots, but still, fun to think about.
Well, that Red Reinforcement continues to harass me as it requires AR, which neither unit has, so it remains stubbornly. I’ve got more units coming out of the Draw, so that Blue Reinforcement should be folding up soon, so I hope overwhelming force should finally get it to go soon. Jeeeeeeez. Then I’ll be able to have the actions to spread my units around to take all those tasty VP spots along that main road there.
Big gains here, Vierville-sur-Mer is quickly going to be cleared out, and we have more Artillery making topside. Red Bunker has been cleared out and I have an HQ one turn away from making it out of the Draw. Blue Bunker should be cleared out too, barring any weird events. I’ve got that Red Reinforcement surrounded, so I think that should be going soon, too. Now it’s just logistics on getting those sweet, sweet VPs.
But now it’s Turn 25. 14:30.
No need to do Landing Checks anymore, so we can skip right ahead to Event Phase. Which doesn’t do anything, so let’s get to the shooting.
Lost a Unit on the back road, also wounding F/2/18 there. Luckily I have all those Units around General Wyman who can rush up and flank and offer additional support.
Lots of unDisrupting (I dunno, I kinda enjoy my weird capitalization with that word) and K/3/115 loses a Step. Could make for some problems depending what’s on that Depth Marker. Hrmph. Still doing okay, though.
Second Event has me removing all Disruption from German Units, but as you can see, that was happening anyway from the German Fire cards, so…nyeah.
In the Engineer phase, I raise the range of the two Engineers that are desperately trying to get in the range of those WN’s that could still get Reoccupied. Which would stink, right? The one on East Sector is still in blocked communication, but West Sector actually has two that could have some sneaky enemy come in and start shooting. I’d rather not have that happen.
Still don’t have my HQ where they need to be. I feel like I’m failing in that regard. Seasoned players are probably laughing at me. Or cursing that I’m borking a rule really really badly anyway and stopped reading weeks ago. *shrug* Either way, no changes there.
Let’s get to our Action Phase.
Dangit, forgot to move that tank (1/A/741) again before taking the picture, so I moved it AFTER, sorry ’bout that. Anyway, finally was able to knock the Depth marker out of the Green Reinforcement way to the south that Spalding had been working on for hours. Got people into position on the Brown Reinforcement on the same road. Also got everyone on position to take out the Blue one on the end of the Draw there. Will take all my Actions next turn, but should get everything freed up to move and take positions on all those VP hexes just south of them later.
I look like I’m fighting a lot of my own Units here, but after destroying the Germans, I was able to move my own Units into the hexes they occupied afterward, so it makes it a bit confusing. But hey, look, I have my HQ where I want it to be! The Red Reinforcement in the middle requires AR, so that’s being a right pain, but luckily I can get Gen Cota to bring that armored monstrosity to bear and help take it down. Now to get as much on those VP hexes as possible, as well as getting them off the board! I might not even bother with some of the enemy who are left, depending on my Action economy, but we’ll see what the Events/Fire Cards have to say about that. You never know what the game may throw at you.
Turn 26.
Huh. Ya don’t say?
Looks like a man named Schwartz proved himself finding out that they might need Artillery:
But:
Two big hits on the East raises my Casualty count (at 9 of 14) and an Ambush Disrupts a Unit as well.
Over on the West side, even this far away, these shots Disrupt G/2/115. And finally for the Event I have to add a Depth Marker to a Unit in each Sector. Woof. They’re digging in and holding position as best they can. They’re not giving up easy.
But hey! I can start another Command Post! Hooray! We can say Laurent-sur-Mer has been Liberated!
And next turn I should be able to get my first Command Post set up on the East Sector. Nice.
This one was a bit tough due to Action economy as the Engineering bubble only gives you free Move actions, not Attack actions. Also a bit tough on the Attention economy as my cat wouldn’t leave me the hell alone as I was trying to figure out what to do. Like, all those Units in the middle of Draw E-3 I forgot to move before doing that picture, so I just drew an arrow on them and moved them later. Sorry ’bout that. (NOT NOW KITTY!)
I was finally able to take down that Blue Reinforcement (needed FL and RD on that Depth marker), and I used General Wyman to get a free attack on the Green Reinforcement down south and get rid of it’s Depth Marker. My last Action was spent trying to spread some Units around on the West to get some sitting near the VP positions for end of game purposes.
More Maneuvering to take main roads here. And also finally taking down that Red Reinforcement in the middle with General Cota and Shwartz’s help. Also getting a few units ready to exit the map out of the ‘G’ exit off on the right there.
But that ends the turn. Bringing us to turn 27.
15:30. School’s out? Wait…(counts on fingers)….no, not yet. Close, though.
Nothing from the First Event, and the East Fire Card merely unDisrupts our Blue Boys. West Fire Card unDisrupts the Red’s as well.
The Second event gives me a Naval Fire Marker…but I already have one. And I really don’t need it at this point as now it’s mostly a logistical game. At least, I think it is.
I make my new Command Post a bit bigger, and try to even out my Engineering posts.
But now the Actions….as much as they are at this point.
The Blue Boys are finally gone, so the Red’s should fall soon after. Having trouble with Action economy as I’m trying to spread everyone around to get the VP spaces, and the Brown Reinforcement in the middle requires Artillery…because of course it does. I’ll have to send Spalding in to take care of it, even though I was happy having him hold C4 and C6 for those 2 VP. Smith is holding 2 VP on the West there, so I was going to send H/2/18 down south on that Road to grab more VP down there, but ran out of Actions. I also have quite a few steps of Artillery about to make topside out of Draw E-3, so I’m looking forward to that.
Had to zoom out a bit here as I’ve got a few Units happily taking that Southern road out of St Laurent sur Mer there, but things are clearing up quite nicely to wrap up the game(ish). Even have a few Units ready to leave the map out of exit G there. Of course, I have to make sure I keep Communication up to exit G at the end of the game or it won’t count, but if I keep, say, B/1/115 where it is, it’ll have communication in all the hexes around it, which connects it to the HQ field and makes it a nice bubble that makes the exit permanently open (unless something horrible happens).
And as I reshuffle the cards to form the Draw Pile for the last time, this is where something horrible happens on Turn 28.
I mean, can they at this point? This is just where I lay my chits down and see if I got things where they needed to be, right?
Right?
Wow! Nice! See, Butterfield likes you! Not like that Matt Leacock guy….
OW!
Oof!
Okay, maybe it’s not all cleaned up yet.
And the Second Event isn’t anything.
And now I finally have a Command Post on the East Sector.
It ain’t much, but it’s paid for.
Ah, I finally get to do something that I haven’t been doing. Don’t know if it’s because I’ve been forgetting, or if I’ve just never gotten the opportunity:
If a Tank Unit starts and ends on a Major Road – it can move FOUR hexes in a turn. YEEEEEE HAAAWWW. Oh wait, dang, that’s still a Secondary Road. Phooey.
Anyway:
I’m sending Spalding over to take out the Depth Marker on the Brown Reinforcement and eventually to hold the VP hexes on C7 and D5. I’ve got smith holding D8 and D7, and an Infantry unit following up that road to take the VP hexes at the end of it. I’m bringing in some Artillery to the HQ I’ve got set up so when the sphere of influence overlaps IP/352 there, I can rain hell down on it. Then I’ll fan everyone out there to get some points down that road.
Oops, forgot to move Morse before I took the shot, but picture him and his mates standing on G1. Anyway, a lot of spreading out here to hold on to as many hexes as possible. That single remaining Brown Reinforcement needed to be Flanked (no big surprise there), so I’ll get C/1/115 to do that in a few turns. But hey, I got my first Infantry off the board! Woot!
But you know what this means now?
It’s Turn 29.
29, 30, 31, 32. That’s all we have left.
*GULP*
Remember, since the one Event that would add the extra German defenders has not been drawn, we’re starting out at a negative eight point deficit. I honestly think I’ve been doing very well this game….a lot, though, coming from luck of how most of the Reinforcements came early in the game, so I was able to point my Units where I needed them too…and come to think of it, I haven’t had to deal with any Re-deploy actions, no weird Mortar attacks….nothing really debilitating. It’s been pretty by the book. Except for a few nail biting moments at the beginning when the Casualty count was getting high, this has been pretty by the books. Sadly, not a great showing of the “Beyond the Beach” Scenario, sadly. Usually it’s much more dynamic, with units flooding in from the South, moving and dodging and all sorts of things, but many of those units were already here before the Scenario already began! Hmmm…
Well, let’s not count our chickens. Let’s see what the cards have for us now.
The Event has us adding Depth Markers, but all my Germans have great depth. They’re talking Durat and…okay, I can’t think of timely German Philosophers.
And all the Fire cards did was Disrupt one Unit from an Ambush. I can deal with that.
Oh jeez….I hope that’s one of my HQ’s that’s not that big yet….
Ouch. That’s going to smart. That’ll make my West Sector turn…..sticky.
I’m able to get one of my Engineering bases to its largest ranges…which is kinda nuts. No reason why anything should be left on the beach over there. Everything else kinda stays in limbo because of the kinda logarithmic scale of those range tracks. Heck, it looks like the range goes out and hits the Navy!
But anyway, let’s do these Actions!
All of the Actions were outside the edges as I moved Units to get them where they needed to be. The combat will be once the HQ sphere overlaps as I said last turn. Won’t make it ’till next turn.
Didn’t do much here as two of my Actions that would have been free in HQ 116’s radius had to cost me this turn. Hrmph. E*F/5R moved after I took this shot…because apparently I have to forget to move one Unit per turn? Yeah, let’s go with that. Oh! I just noticed I can move 58AFA, too. Though there’s no way for it to get topside by the end of the game, but at least it’ll look a little better.
And we just made it to Turn 30.
The countdown to the end of the game.
What do you think, have I made the 40 VP for a success? At least over the 19 to not be a crushing defeat? Did I do better than that? Guess we’ll have to wait to find out!
No, this is not another beginning of a long-winded philosophical rant.
I told you I was going to talk specifically of the Victory Point requirements for the second half of the game, so here I am: talking about the Victory Point requirements for the second half of the game.
So it’s a tiered ranking system: Less than 19 points and you’ve lost. Boom.
20-29 and a defeat, but less of one. 30’s, kinda a loss. 40’s kinda a win (which is what happened in real life according to the game). 50’s a heck of a win and 60’s John Butterfield will bake you a cake.
So how do we receive these points, you ask?
(waits patiently for everyone reading to ask)
You get 1VP for every Reinforcement position controlled that’s on or adjacent to a major road OR a minor road that exits off the south edge of the map. These are the ones marked with the VP symbol. Apparently there are 42 of these. I’m not counting them, I’m trusting the rulebook on this.
4VPs for completely controlling a draw (all hexes and the engineers have cleared all obstacles).
1VP for every non-infantry, non-HQ unit on the high ground at the end of play…you know, all the chits that aren’t on the high ground as of this point in my current play.
1VP for each armor or regular infantry STEP that moves off the map from a LETTERED exit hex. And these stack with the above VP, so getting armor on the high ground AND getting it to exit counts as 2 VP (or more if it’s a multiple stepped armored unit). Of course, if you lose communication with that exit before end of game, you don’t score those VP because you’ve lost communication with that unit and…well….that stinks, so you have to keep track of them. Spooky.
1VP for each RANGER infantry step that moves off the map from exit F & G (the ones on the South edge of the map) even if not in communication…they’re a hardy bunch.
Finally, subtract 1 VP for each WN that you do not control and each Kampfgruppe Meyer unit that didn’t get used in the game (German Reinforcements).
And there you have it.
So as I start this 11 o’clock hour (oooo, it’s getting close to lunch!), I have to focus on getting my armor off the beach, getting my infantry off the map, and controlling those VP spaces.
EEeeeeaasssy, right?
I want me some of that Butterfield cake! (John, if somehow you end up reading this, I’m sorry if some Alpha gamer asks you for cake. But anyway, HI! Thanks for reading, and for all the great games you make!)
So I don’t have any Landing Checks to worry about….no plucky armors from hours ago still trying to land this time. I do have a bunch of units on the West Beach lining up, though, including a HQ unit, though. I load them up on the Eastern draw, hoping to help over there since the Western line is….kinda okay? Once that Red Bunker is taken out, that is. Maybe.
I actually end up putting a Ranger unit in the middle to go up the bluff there to act as a backup to either side depending on how things go this turn.
Event: Place German Reinforcements in Zones A, E and G. Yikes.
Zone A plops it in A2, right next to a Unit making that side of the board a mess. E is even worse, appearing behind General Cota and all the units trying to take out the WN at the end of Draw D-3. G has some units outside of town near the new HQ I’m setting up.
Hrmph. I mean, on the plus side, there can only be 11 Division reinforcements before they’re done.
On the downside….that’s a lot of people with guns who want to shoot me.
And one person with a gun who wants to shoot me is too many.
During the fire phase, we only have one one firing on the East Beach:
The downside is this dropped the unit a step and counted it as a Casualty for East Beach, brining the total to 7. And that’s the OTHER thing we’re fighting for, not hitting the loss limit. No, it’s not still 8. That’d be ridiculous. But it is 14 for each beach. We hit that, and it’s automatic game over. So…um….don’t do that.
West Beach is a mess. Blue fires down and destroys the units down in the Draw, while Yellow Resupplies and Reinforces, causing another unit to appear and also injure E*F/5R (though I forgot to draw a red bit on the chit there). Oof. Also Artillery fire from the 88 inch cannon fired. Needs just 1 observer, and the Red Bunker counts, so one of those brand spankin’ new Infantry hitting the shores takes a Step loss. *SIGH*
And now Second Event: German Reinforcements in Zones C and D. Are you freaking kidding me? I think I’ve drawn every freaking Reinforcement event in the damn game.
Annnyyyywaaaayyy.
So now we have our HQ and Engineer phase. I’m going to increase the size on Draw E-1 since that seems to be the most open on the East side, and D-3 because they need the most help. So they both now have a Range of 1, so everything gets a free move if they’re adjacent to them AND there’s no terrain penalties (except for cliffs and such, of course, let’s be reasonable here).
That also puts these nice little Garrison chits on any WN spots in Engineer range. That means those locations can’t be Re-occupied anymore because they’re now occupied by Americans who bring down the real estate value by too much. Or something.
I also flip the HQ in Vierville-sur-Mer, even though it’s dangerous over there. Got my fingers crossed that I can clear that spot out soon.
A lot of complicated movement here as I try to get the best units in the best places. Also trying to get some Armor close to the Engineers to get them to go down the Draws, too. That Eastern flank is a royal pain in the arse, but once L/3/16 and I/3/16 get freed up and are able to take the road behind that Red Reinforcement, they should be able to clear everything up and take Cabourg and all those VP locations.
Not as much movement, but a lot more action on the West Beach. Morse saves the day again, taking down another Depth marker. I had to use most Actions just getting units to the East side of Draw D-3 because poor E/2/116 is all alone over there, and I don’t want them charging up against the Red WN there all alone. Things will get better once I get that second HQ on shore.
But that will happen, next turn. Speaking of which:
We have now hit 20 turns. Noon. No shadows in the shell craters. I have a shakey beachhead. I can easily be pushed back into the ocean. Twelve turns to get a boatload of Victory points. I gotta get moving, but you see more movement is possible every turn, but so are more Germans.
Let’s go.
As all the units landing this turn are Infantry, I only have to check to see if I draw a mine result, and luckily I don’t (especially since a few of the beach spots I’m landing on haven’t been cleared yet), so all ashore who’s goin’ ashore.
I get 3 Infantry and 1 Ranger unit on the East Beach, and 1 Artillery unit for West to get ready to land. I set most of the Infantry to help with Draw E-3. It’s messy over there.
We’re turn 20, so we get the Naval Fire marker! That’s a Strength 9-U token we can use once on any attack. Booya. Were it turn 21, we’d be alright as HQ 16 is the poor sap that’s stuck near draw E-3 trying to find a place to call home.
The Reinforcement is put on the West side of E-3…because WHY NOT!?!
Ooo, we have our first German Advance! With a Yellow ‘A’ on a hex with an arrow pointing to an unoccupied Reinforcement position, you check to see if a few conditions are met. The condition of “Unrevealed German with a Depth Marker” was met, and then you check if a path could be made…it could, so this guy moves up.
Well. Ain’t that a humdinger?
Luckily, that’s all that happened, even with Red firing, I got lucky on the shape drawn. Phew.
Yellow also Advances on West Beach, which causes a one hex jump for one unit. But that’s all that happens on that side, too. Again, a bit of luck as everyone firing was out of range of my units. However, all the colors drawn also removed the two Disrupted tokens I had on the board. Hrmph.
And the second event:
HA! Remove all Disrupted tokens! Do I even have any left? Oh, I had one left. Well, still. Not as bad as it could have been.
Back to HQ phase.
My HQ on East Beach is pinned down in a heaping load of crap, but West Beach is able to increase its range for the first time. Sadly that still keeps it at ‘1’ for now. With my Engineers, I’m going to have the other two increase ranges that didn’t last turn, so that all 4 have a Range of ‘1’, mainly to put Garrisons on a bunch more WN positions to prevent Reoccupation. Don’t need that happening. As much as I would like a lot more armor moving up the Draws to help break us out of this German line, I would also hate for us to get pushed back into the ocean, too.
Now on to the actual Actions.
More scrambling for position. We were able to take down the Purple Reinforcement, and I know it looks like I’m attacking my own unit there on the right, but Smith’s unit took down that Brown Reinforcement and then two units used the road to march into that hex.
The Red Bunker is FINALLY no more! Morse is chiseling away at the far Western defenses as more infantry begin to make their way up that draw, and the…mess around the other draw is…still a mess, but I’m getting other units in there.
But now the turn is over.
*pantpantpant*
The deck is reshuffled. Kind of curious just how much thought was put into when the deck should be reshuffled. How often events show up? How often each color should fire? Who crunched those numbers? What distribution were they looking for? I for one would like to NOT have the “Reinforcements in Zone..” come up yet again, but now that I’m past turn 20, all the events are different, so I’m guessing it’s for the color/shape distribution, but I’m speculating here. Dunno, just thinking outload, that might be mentioned in the comments at the back of the rulebook. I’ll take a look at those later, but for now, 12:30.
Mines explode on the East Beach…which DOES affect one of the landing Infantry. Dangit. A/1/18 lands on shore with a step already taken off. I was thinking of putting them one hex over to support the mess near the old Purple Bunker, but nooooo, I thought that’d be gone by the time they landed, so get them closer to the road. *sigh*
On West Beach, an Artillery is landing, so I have to check the letter there. That, too, suffers one Step of damage. As it only had one Step, it blows up. *another sigh*
No new units approach, so on to the Event: GI Initiative, one extra action! FOUR Actions this turn!
German Fire:
Red fires and wounds in that tangle on the Eastern side, while Purple unDistrupts and a Brown Reinforcement appears in the South.
And Chrome crashed as I was typing that, so I had to restart everything. Awesome. (I feel like I typed that a few weeks or months ago on a similar action, hmmmm)
The only thing that happened on the West Beach was Morse’s unit had a random Patrol fall upon it and Disrupt the Unit. Annoying.
And our second Event: Remove all Disruption from German Units.
I’m going to have to take a count of just how often that thing comes up. I mean, this only starts on this particular card starting on turn 21. Lucky me, it’s Turn 21. Were it Turn 2-20, I’d get a Hero Marker and the Germans would get a Depth Marker, but Nooooooo…
Actually, there aren’t any Disruption Markers on the Map. They were already removed from the Fire Step. Waddya know?
HQ 116 now has a Command Range of 2 hexes. HQ 16 on East Beach is still waiting for rescue. Newly landed 115 will set up shop once a few more hexes inland.
And hey, neat, you can have Vassal turn on the HQ and Engineer ranges. I upped two of the Engineers and now take a look:
Looks nifty! Of course, it doesn’t work if it’s in a fire range of a German Unit, so some of those hexes aren’t truly in range, but it works great for my purposes.
Now my chance to use FOUR actions!
Continuing to make headway, and I’m finally getting around to taking on that Red Reinforcement.
Major progress on the East side here as I have a wave of Infantry and Armor now coming down the Draw, but the interior is a bit tough as the Red Reinforcement needs a flank attack, so I’ll need to do an Infiltration Action to do that….which I’ll explain when I get to do that.
I’m lining up a bunch of units on the West side there to lead a wave in Draw D-1 as well to eventually make it out of the Western Exit if H/1/115, A/1/115 and Morse’s unit can take out that Red Reinforcement there. Then I hope to keep a few units sitting on the E and G zones for the VPs and get the Armor out.
I mean, seems like a plan, right?
We start the next turn with no landing checks as there’s nothing landing. But a few units appear to be landing on East Beach for next turn. Yay! The last HQ will be landing. I set it to land near the Western Draw to help unload that area and get infantry down those central roads to control all those VP areas there. I also send two of the Infantry coming in to back it up, and send the other two Infantry to the other draw to help out with that mess.
The event is more German Reinforcements but….the reinforcement pool is empty! So, unless the Kra…Kamp..okay, here we go: Kampgruppe Meyer event is drawn adding 8 more Reinforcements to the pool, that should be all the Germans on the board for now, unless some WN get Reoccupied….which can happen, given there are a few with German communication right now due to some not exactly tight lines on my end. Oops.
So German Fire:
An ambush Disrupts F/2/116, and Red takes a Step out of I/3/16, raising the Casualty meter again. Still have a ways to go before I hit the magic number, but still, not great there.
One WN unDisrupts, but no biggie, it should be gone on my turn, but a Mortar attack from deep South destroys a unit that was on the way to help out General Cota. I could have done without that.
Second Event: Add one Depth Marker to a German Unit in each Sector.
Hrmph.
I mean, on the plus side, all the Units in East Sector already have Depth Markers, so HA, Eat it, Butterfield! But West will have the WN at the top of Draw D-3 gain a Depth. Because the little fighting force of K/3/116 totally needs that.
HQ/Engineer phase is a toughie. Don’t know exactly which Engineer base to increase on the East side. Draw E-3 needs the largest radius in order to let the Armor move down the roads (if the road is red, that means its mined and no armor units can go down it until Engineers can get to it) BUT with just one more range, E-1 will be “open” allowing Armor to go top side, which is worth some points and possible support. And actually, now that I’m looking at it, I have an HQ incoming there. If I can get a Command Post set up there, I can have that Dukw nearby and possibly be able to add 2 Strength to a large part of the board.
On the West I’m focusing on Draw D-3 for some reason. Seems like a bad idea, really, but that’s where all my armor is, so I gotta get them inland.
Hitting a bit of a stalemate as that Red Reinforcement and Green Reinforcement on the left fail to go anywhere, but the one on the right loses its Depth Marker. I’m set up now to get rid of the one in the middle, freeing up the Draw and allow all units to get off the beach…eventually. Spalding is stuck in building to building fighting up there, needing FR and AR to win, so he’ll have to wait for support before being able to take those VP locations.
Also a bit of a snag appearing here. I got a bit overzealous and didn’t wait for Morse before taking a peak at what the Germans had waiting for me. Was hoping for a “No effect,” but instead ended up Disrupting my own unit, which means I’ll have to wait another turn before I can do anything about them. Not going to do an Infiltration Move to Flank IR/352 there in the middle, instead going to use B/1/116 to get around coming up the road there. Wasn’t able to remove that new Depth Marker due to want of an MO. I hope once I take down the Red WN, I can just shift focus over and finally clear that out. I’ve got enough Units over there, consarnit.
I also have a huge stack of units waiting on the road to come up. There’s an HQ in there somewhere that I hope to be able to set up as a Command Post soon.
Okay, I don’t know if they grow wine that far north in France. I’m being a typical ignorant American.
Let’s just get back to the game, shall we?
So, what is different as we move to turn 17?
First, the scale pulls back a bit. Turns are no longer 15 minutes of “real time.” They are now a half hour. Because of that, a lot of things we were doing once before, we’ll be doing twice.
There will be two events per turn, one before the German fire phase, and one after.
Speaking of German fire, they can now hit two units per chit that’s firing. Fun.
BUT, it’s possible to wipe out a Depth marker AND a German unit in one turn as well.
WE GET THREE ACTIONS PER TURN. Yes, I’m aware that twice the time should mean twice the actions….but Butterfield likes it when we struggle, I guess.
There’s also a lot of new actions that open up all along the map, for both German and US troops.
The Germans will begin to do more actions on their fire phase (Remember those A’s, M’s and other letters on their fire cards? Those mean things now!).
All of our artillery units can now conduct Barrage actions, not just tanks.
Our HQ units can now actually become Command Posts to increase command ranges beyond one hex. (More free actions!)
We can also create Engineer bases, which is how we can direct traffic off the beach. (Even more free actions!)
But a lot of the same rules are also in play. But the German Fire Phase and Engineering phase are probably what change the most, so get ready for that. But first, let’s land our new troops.
After turn 14, Infantry doesn’t check for landing events, only for mines (Artillery still has a chart to reference, however). On this flip, my card for East Sector is showing mines. Lucky for me, only one hex ended up not having a Clear marker on it, and none of my landing Infantry is pointed at that hex, so no explosions for me.
Were that in West Beach, I would have had two Infantry lose a Step each as there are many more hexes that I was unable to clear over there.
So all that Infantry lands (on the High Tide line, right next to the Shingle) and we get our first Event of the second half.
“Remove all Disruption from German Units.”
I don’t know if they can hear my sigh all the way over there in France, but it got somewhere in the mid-Atlantic, I’m sure.
Okay! These cards mean more to us now that we’re in Turn 17. See that Yellow ‘R’? That’s probably the most complex of the new rules, so good thing we drew it first. It can mean 4 things, luckily all starting with ‘R’, so:
Occupied Yellow Reinforcement position with US in its Field of Fire “Re-Supply” (gain a Depth marker). An Occupied Yellow Reinforcement position with NO Us in its Field of Fire will Redeploy (move to a position where it can shoot at us). An Unoccupied Reinforcement Position will Reinforce (Um….it’ll show up) and finally an unoccupied WN position my Re-occupy (also show up).
Get all that?
So now we have to scan the East sector for Yellow Reinforcement positions for: Every Occupied WN and Reinforcement Position, Every unoccupied WN position with German Communication and every Reinforcement position within 2 hexes of a US unit and with German Communication. Remember, Communication means you can draw a line from it to an exit hex without it hitting US control, which is pretty easy at this point.
So here’s a poorly drawn bubble of US control blocking German communication. Meaning the Yellow WN can’t draw a line to an Exit, so no Re-occupy there, but C2 there is within 2 hexes and can draw a line to an exit no problem, so can Reinforce. BUT, it is NOT a VP position, nor does it have a US unit in an Intense or Steady fire position, therefore it doesn’t bother reinforcing.
So that was much ado about nothing, but you learned something.
The More You Knooooowwwww.
Now Green with an M: Mortar Fire. An Occupied Reinforcement Position without US in its field of fire would do this. Can’t teach this because there are no Green Reinforcement positions occupied. In fact, there are no Green positions occupied at all on East Beach. Moving on.
Finally the familiar Double Brown that would damage Armored units. No Double Brown positions. Hopping over to West Beach without incident.
Double Purple that can damage HQ/Hero/Generals. No double purples….I like this trend so far.
Okay, Double Green with an A. This is another “Means 3 things all starting with A”: Occupied Reinforcement may Advance. Unoccupied Reinforcement may Ambush. Occupied WN may conduct Artillery Fire.
Before I start taking pictures and everything, I know there are no Green Occupied WN bunkers, so no Artillery Fire (which just causes any unit with the symbol on the card to lose a step….anywhere on the map). There are also no Green Reinforcement positions occupied on West Beach, so no places to Advance. But what about Ambush?
Strangely, no. That would just be a Reinforcement Position that has a US unit within its Field of Fire. Basically a unit pops up out of existence and Disrupts a unit there without warning. Unless it’s in an Intense FoF, then you’d lose a Step. Which stinks. But hey! A whole turn and NO DAMAGE. And that’s with no Disrupted Germans!
So that brings us to the next change: Our second Event of the turn:
“Place a Hero Marker on any US Unit in 1st Division, and add a Depth Marker to one German Unit (9.2)”
1st Division is the East Beach. Things are…..difficult there. I have the two units up against the Purple Bunker and the Brown Reinforcement right behind it. Then I have a smattering of damaged units on the West side dealing with the Red Bunker. OR I could give it to one of the fresh units that just hit the beaches.
Hmmmm….
Okay, I’m going to give it to one of the units that USED to be a part of 29th Division, but that was given over to 1st Division due to the craziness that is war. It’s the one that’s been fighting the Red Bunker but was stymied by the NA requirement on the Depth marker. The Hero will negate that and I’ll be able to finally get rid of that damn thing.
But now I also have to add a Depth Marker. Priority goes to WN positions, then those with lower ID numbers, so WN position 60 wins over 71, so Purple Bunker on East Beach gets a Depth marker.
And now the Engineer phase. Again, completely new.
In this phase, I could flip over my HQ chits and establish Command Posts. Here they become immobile, BUT then they start moving up on this little track:
Each Engineer Phase a marker will move up on that track and the radius of the Command Post’s range will increase based on the number on the track. Anything within that radius will get all their actions for free, as well as RD for attacks and it makes it easier to do that coordination of tank and artillery support fire (remember you have to be commanding the infantry AND the artillery, which is much easier when you have a 4 hex range!).
You can’t form a Command Post if you’re in a field of fire of a German, and if you get shot, you immediately flip back over to a HQ chit, so you have to think about where you set up where you can do the most good.
Along with that, you also have your Engineers. You have 4 at your disposal, two for each Beach, one for each Draw. Each phase you place one, or increase the Range of one per Division. Which is a hell of a choice, I tell you what.
Engineers do the following: Any German positions in Engineer ranges can not be occupied. Awesome.
Shingle spaces can be moved over by tanks and stuff. Really, any hindering terrain can be moved over that ain’t a cliff.
Move actions are free.
So. All good things.
Engineers can’t be placed in active fields of fire, so Draw E-1 can’t be touched, so it’s easy to see where I can place the first one on East Beach. Same with West Beach as Draw D-1 is also blocked.
HQ decisions are…..tough to make. Where is the best place to put them? Where will they do the most good? Surely you want to establish Command Posts early so they can get the widest range and do the most good. But you also want good placement and not overlap with your Engineers too much and waste space.
I’m not going to establish any Command Posts yet. My goal is to get my East HQ closer to Colleville-sur-Mer and establish a post there and direct traffic inland. On the West Beach, I can easily (HA!) get into Vierville-sur-Mer and set up shop there, and get some of my gear out of Exit G.
For now they’ll help clear up some of these beach defenses.
The WN are blown up, but Purple pulled up a Tactical Reinforcement. Downside to this is that those chits are fresh out, which means I pull from Divisional Reinforcements, which come with their own Depth markers automatically. So that Red hex now has some Oomph to it. Also the attack on the Brown hex had the Flank requirement which caused it to gain a Depth marker as well, making that corner a dangerous place to be. I moved 62AFA closer to the Engineers so it can start moving inland. Once HQ is set up, it’ll be nice to have a 9 Strength, Unlimited range Artillery at my disposal.
West Beach is tying up some loose ends. You’ll notice some two hex movement. That’s a great benefit in these new turns. It doesn’t come up as often as you’d like, but it does exist for Infantry and Leaders. However, you can’t do it in bocage hexes (unless using a road) nor in Intense or Steady fire spots on an active German field of Fire. You’d be amazed at how much those restrictions come up. I am moving some Artillery over the Shingle onto my Engineer over on draw D-3 there. That should be fun if I can get that together. I don’t land my other HQ until turn 19, but I’m hoping to have a bit more of the end of that draw cleaned up by then and then I can start raining down hellfire.
But that ends the first turn of the extended game.
Exciting isn’t it?
Turn 18….Remember Turn 1? Simpler times, then.
Oh who am I kidding, I had 10 Bunkers filled with machine guns firing down at me.
ANYWAY, Turn 18.
No landing Phase as there’s nothing landing nor queuing up this turn. So we jump right to an event.
BUT WAIT!
I just noticed VASSAL automatically drew one Landing check card so I did a double take, and wouldn’t you know it….over there on West Beach is one bit of Artillery that was supposed to land on TURN 10, but got delay after delay after delay.
The lil’ scamp.
So I guess we have to check what happens….and yes, it could be delayed 3 turns again (it could also be delayed until June 7th….ie. removed from play). And a Diamond is result B which is…..Delayed until June 7th. Poor bugger goes home.
NOW we go to event. As if that wasn’t eventful.
Add a depth marker to one German unit. Hmmm….okay. Pretty standard here. There are a couple Germans with US within one hex, so it looks like it’ll go to the WN at the end of Draw D-3.
BUT, the WN Depth pool is depleted. When that happens, we don’t put Depth markers on WN positions anymore, we choose Reinforcement positions now. Looking at the Reinforcement position with the lowest number is D1, which is right in front of that WN position. Awesome.
Okay, let’s do this. First we have a double Purple with Patrol capabilities. We haven’t seen Patrol yet. It’s a weird one. Instead of firing as normal, occupied Reinforcement hexes only Disrupt units in intense and steady fields of fire. If there aren’t any in those fields of fire, it’ll Disrupt one unit within 3 hexes of that position. So it’s a weaker attack that can stretch pretty far as a kind of surprise. There are no Purple Positions (I just spit a little saying that), so we move on to Blue. Advance or Ambush.
The Blue Reinforcement position Ambushes G/2/16, but since it’s not a Triangle, it doesn’t lose a step. And then they fade into the distance. Phew.
And Green Resupply, Redeploy or Reinforcement….which is exactly what happens near Spalding. It’s 2 hexes away from a Unit and is a VP position, so a unit and Depth Marker appear there. Drat.
I hope you’re hearing a little “Ding” sound effect every time you see that word in my pictures. I know I am.
Purple has Mortar which is normal fire if in range, and Mortar fire if not, but there’s no Purple units, so I’m lucky there. Nor are there Blue or double Brown. The Brown WN does un-Disrupt, though.
Second event:
German Plugging Fire: Treat sporadic fire dots in beach hexes bordering protective hexsides as steady fire dots. Wow, that’s the first I’m seeing this. However, because it’s happening after the Germans already fired, it’s treated as no event.
So on to our Engineer/HQ phase. Again, I’m not going to do anything with my HQ’s….yet. As much as I’d like to increase ranges on my Engineers, I can place both my other units down, and having SOMETHING there is better than nothing at all, so all four with Range 0 is….something. So that does that. On to US Actions.
Getting our Artillery off the Beach and some further movement inland. Took Optional Attrition on the joint attack on that Brown Reinforcement. The Depth Marker required Artillery, so I had to take a hit. Hrmph.
HQ is in position in Vierville-sur-Mer. Morse took out the Yellow Reinforcement (don’t know why Red Pen was clicked there) and I’ve got quite the force ready to take on the brown WN in the back there.
Still looks like I’m cleaning up beginning of game objectives, but I’ll have to start concentrating on getting end of game goals. How to change gears to those will be the subject of the next post.
Hope you’re still following along. I’ve been noticing it takes about 30-45 minutes per turn to take the moves and write everything up, so you can imagine what kind of time investment 18 turns has been so far.
“Every new beginning comes from some other beginnings end.”
I am of an age where that was probably floated as a prom song. Sadly it was that freaking Aerosmith song from Armageddon. Class of ’99!
*sigh*
ANYWAY.
Turn 14. 9:30am. D-Day. Not Prom Night.
I do have to make some landing checks for the three Artillery Units that were a bit late coming to the party. One is delayed yet again, but the other two are able to make it to the pock marked shores of France.
And then the event has us remove all Disruption markers again. Dernit. Mind you, it’s only four markers this time, and I don’t have nearly as many units in fields of fire at this point, but still. Dernit.
Unfortunately that removal of the Disruption counter caused M/3/16 to get wiped out over there on the Eastern flank.
Dare I say Dernit?
West Beach only had these two bunkers firing, but it left a mark as Red had armor hits causing the Tank to explode and the Artillery underneath to be disrupted by Green’s fire.
Engineers are still waiting to finish their work.
Had to use both my actions to take out the top Red Bunker, but I think that was worth it.
And I’ve hit another wall over here. E/2/116 can’t finish off Brown Bunker due to missing BR. B/1/116 is also missing BG for Green Bunker. Morse is sitting on Blue Bunker in order to control that for endgame (if he stayed in the hex he was in, he’d be in the field of fire of that Yellow Reinforcement, so he wouldn’t count for controlling Purple). So I think I have to hope the Rangers can hop up and take care of the Yellow Reinforcements, or maybe give up on that corner and go for Green? I’m spread too thin over there, with all my units up with the General. That was poor strategy on my part. I should have sent more westward. I’m too bunched up.
Either way, the turn is done.
Turn 15.
So close. 6 losses on East Beach. 5 losses on West Beach. If either hit 8, it’s game over. I have 2 turns to do that. Then I have to hope I have 19 points to score the win. Then I get to do a little dance and keep playing.
Mind you, playing the full game you don’t need to count your score, but I’m doing it anyway, for educational purposes.
There’s no landing this turn, so we hop ahead to the event phase.
German Reinforcements in A, D and E. Oof. C’mon….there’s SOME that benefit us, ya know.
Huh.
German Fire Phase…and nothing shoots. I drew Yellow, Blue and Green. There’s only Purple, Brown, and Red firing positions on the East side. Huh.
West fires a bit…but it’s pretty useless and does no damage. Those Reinforcements are getting their say, however.
Now that the Brown Bunker is Disrupted during the Engineering phase, I can finally Clear another hex! It’s only one now that it’s Mid tide, but hey, it’s something!
Setting the stages for the end of the First Wave. Trying to position my units to control the most VP spaces as possible, while also knocking out the remaining German positions. Finally knocked on the door of the Purple bunker, knocking out its Depth marker. L/3/116 should be jumping down onto Red Bunker and taking it out next turn. I don’t think I have enough units to hold any of the Draws, however. They’re either too big, or there’s a German sitting there ruining things.
I decided to move those rangers up behind the Green Bunker to meet with HQ for Action Economy purposes. I’m also having some units attack Brown Bunker from the back to help E/2/116 take it out so the next Wave will have very little resistance on landing. A hiccup, though, when E*F/5R attacked the Reinforcements in the middle there, they didn’t accomplish anything AND it put a Depth Marker underneath. Oops. Luckily K/3/116 moved to flank them, so next turn I should be able to put a stop to that, but that was not the effect I was looking for.
It’s now Turn 16. The last one. You strapped in?
Again, nothing lands, but look what’s getting ready:
12 Units of Infantry. Looking forward to that.
One extra action this turn! What luck!
Everything’s coming up Milhouse!
But first…
Ineffective East Beach, though Purple un-disrupting might be a pain later.
I’m getting really good at freehand drawing “Ding” using a mouse, aren’t I?
Engineers can’t do anything on East Beach due to Purple waking up. Brown gives the same reasoning for West Beach. Looks like that’s what I’ll have to deal with for the rest of the game. Still, it could be worse.
Even with 3 actions, I wasn’t able to do much. L/3/16 took out the Reinforcement south of it rather than simply take out the bunker. There’s actually more in the fields of fire of those two Reinforcement hexes than the bunker right now, and neither of those units up there can control anything for VPs since they’re being fired upon.
Hmmm, actually there’s 3 units vs two. I counted wrong. It would have been smarter to take out the bunker. Oh shoot, and the one is in a Primary fire spot. Oh jeez, what was I thinking?
ANYWAY. L/3/116 revealed a 2 with a NA requirement (Naval Artillery), so there’s no removing of that marker any time soon. Will need to get higher numbers and then choose Optional Attrition.
Bit more excitement on this side. WN 66 is finally gone, Green Bunker got its Depth Marker revealed and Removed and the Yellow Reinforcement had the same result.
So that’s it.
That’s the First Wave.
So how did I do?
Let’s see what I control on East Beach:
7 measly points. I don’t get any points for Yellow bunker, even though it’s destroyed, because HQ and Generals don’t control anything (ironically) and L/3/16 can’t control anything because they’re too busy shooting at that Brown Reinforcement. And even though 62AFA controls the lower half of the bunker, you have to control both halves to get the points for it. I don’t control either of the draws because there are simply hexes I don’t. Draw E-3 on the left there is the closest I got, but at the top of the shot there are two hexes I never got to. If Spalding had another unit behind it, I could have moved it up and covered lost ground. But no dice.
It’s even worse over here. Only thing to note, hex G3 over there is in control because the chit under A*B/2R there has two steps on it, so it can control an adjacent hex. So only 4 VP here. Giving me 11 Total.
So if I were just playing the First Waves scenario, this would have been a loss. Of course, I would have played those last turns a bit differently. I couldn’t have charged ahead and tried to take out units further back, but concentrated on taking the Draws (each is worth 5VPs). Because if you’re playing the full extended scenario, turn 16 ends with a First Victory CHECK.
If you have between 11 and 24 points you can continue playing.
PHEW.
I’ll be honest, if I didn’t, I’d fudge some things and continue anyway (though I’m sure I missed some rules and have probably already fudged a bit….but who doesn’t like fudge?) for your sake, but there you go.
But now we must go BEYOND THE BEACH and continue with a few new rules and new objectives.
Now we want to control the crossroads and towns in France, and get our armor and infantry off the map so they can join up with other Allied forces from the other beaches. But we’ll need our Engineers to get our beaches levelled to allow our big machines able to roll up into the draws and up onto the high ground. And we still have German units rushing North to push us back.
The game is no where near over.
Play time to get to this point is about four hours. It took me about 3 months. The second half says 4 to 5 hours. I hope it doesn’t take me as long as I’ve got quite a little process going (I’m sending the file back and forth to various computers so I can keep the posts going no matter where I am). And since this is the fifth post, I’m scheduling everything to start dropping now, so I am now under the wire to get this game done.
Beachgoers aren’t staking claims with their blankets and umbrellas.
Tourists aren’t walking next to the waves, looking for shells, or looking inland for insight.
“Les Braves” memorial isn’t built yet.
But a few hundred men are still staring down the barrels of panicked German soldiers who never thought this day would happen.
But it has, and history is on the brink of disaster. If a beachhead isn’t made today, it may never be made and Fortress Europa will remain a Fortress. Fascism will reign supreme over millions of Europeans and the world will be a much darker place.
So we press on. Up the Shingle. Over the Bluffs. Into the Bunkers. Right up to those barrels, doing everything we can to quiet them. Maybe not for ourselves, we’ve lost too much blood for that, but for the men behind us. They can make things right.
I know I’m just playing a game here, but sometimes I like to recenter myself and remember: this ACTUALLY HAPPENED. Even though I’m just pushing chits around, when I’m told to “lose a step,” 4-6 people won’t be returning home today. To some, that’s a statistic. To those people’s family, it’s more than that. You should occasionally take a moment to reflect on that. The strangest thing the human mind can do is be surrounded by people getting older, by people getting sick, by people dying and thinking “this will never happen to me.”
But anyway, games.
(Did anyone even read this far?)
We’ve got more Artillery hitting the shore. We haven’t been able to get to use them much…or at all really. The main reason being they can only assist in an attack when they are under command of a General/HQ who is also commanding the unit that is doing the attack. That is very difficult to do in the chaos of a beach landing. However once HQ is able to set up and their command sphere is opened up to more than just their adjacent hexes, it becomes much more possible to rain hell down on the enemy.
But we need to have our ocean landings first to start the water cycle that ends in rain.
Wooo, that’s stretching the metaphor, ain’t it?
Oof, both Canadian units were destroyed completely in the waters. The others took hits as well. Not a good pull on my part.
And then the event:
To EACH sector? Ooof. Sector = Beach Side, so East and West. So that’s two Depth Markers, one on each side. Phooey.
On the East beach, there’s only one unit who has US units right next that is missing a Depth marker to it….that wily Yellow bunker. Dag nabbit. West beach is in a similar situation. Everything already has a Depth marker that has units right next to it…except the Yellow Bunker, so there we go. Luckily they’re still both Disrupted…but still, that’ll prevent me from Eliminating them another turn.
Dag nabbit.
As I feared, Blue and Red were able to inflict casualties, and the new Brown reinforcement opened fire. Luckily it didn’t draw the right symbol to take out G/2/16, but that’s a bit close for comfort.
Sadly that shot to H/2/116 bring our casualty count to ‘5’ of ‘8’. I need to take these bunkers out and fast. I got lucky that the other two draws were misses.
I’m able to get two more hexes cleared on the East Beach, but it’s amazing that Brown and Red cover the entire beach, save what I’ve already cleared over on West Beach. The Engineers are getting restless.
And ho-lee-crap y’all. I did a dumb. Does anyone remember I/3/16? No, of course not, because those poor bastards have been stuck against a sheer cliff all game.
I was flipping through the rules for something else, and noticed that Sheer Cliffside is not a “protective hexside” for a “self preservation move,” so I could move it over as a free action. Once it hit the hexes with the scalable cliffs, then it would stop, because I could have it climb up as an Action, buuuuuuut, it’s better than just sitting there.
Good thing High Tide doesn’t start ’till Turn 16, huh?
We continue to make our move up the middle, while the West Flank bravely tries to encircle the Red Bunker. I’m hoping the F/2/116 stack can flank the Blue bunker while our hero takes on the Purple reinforcements up there. I didn’t move the HQ yet so I can take out the Yellow bunker without an action, and then move HQ up so we can get those Rangers topside without Actions. I believe I’ll get a General in a turn or two which will make the West Flank a bit easier to handle. If I don’t draw a Red on the German firing card next turn, I’ll be a happy man.
More big moves over on the West Side. Using some of the free actions given by HQ and General to take some Barrage Actions. The Eastern tank is able to knock out the Brown Bunker, the other was not as lucky. I’ve got two full strength units up top now, charging over to the Yellow Bunker, while the lower Yellow bunker is hit and has its Depth Marker removed. The lower Brown Bunker is hit, but doesn’t have its Depth marker removed as I didn’t have the right weaponry (needed AR), but luckily it was only a 1, so I was still able to Disrupt it. Seems I don’t have anyone nearby that will be able to do it, so I’ll have to use Attrition to actually get rid of it, won’t I? Drat. Think I’ll do a flank attack and lose H/2/116 since that already counts as a casualty in my numbers.
And you get to see my first “Climb” action as A/1/116 is scaling the Bluffs there. Next turn as a free action, all it will be able to do is remove the Climb marker. Better than nothing, and here’s hoping they’ll be able to attack a bunker and do something. They’re VERY weak, but I’m hoping to park them in that blue zone to prevent any Reinforcements showing up there.
Things are heating up!
So as the clock ticks forward we land some more units, cluttering up the board more (funny to think all of these green pieces are on a row of beach that is no more than 3 hexes deep, huh?).
No damage this time from the surf, but quite a few units are delayed for 45 minutes so only 4 units total end up touching sand. I suppose that’s better than taking damage.
So the next wave to land is only one unit….and that unit is…
Okay, calling him a unit is just rude. It’s General Wyman, the General for East Beach. He, along with General Cota on the West Beach are the two Generals I have at my command to use throughout this game. I can place him in any of the landing boxes, so this is kind of important. He’ll give free actions to any units adjacent to him. I could put him right in the middle to give the units charging ahead the means to keep charging ahead. I could put him on the Eastern flank to let that side finish off the Yellow bunker and ultimately take the Purple bunker, making the capture of the draw that much easier, or going to the Western flank and helping the poor men trying to take the Red and Blue bunkers, which are really tough to get to, up high on those bluffs there.
I think the Eastern flank can do okay with the HQ there so I’ll put him on the Western flank, but injogged a little so his sphere of influence may touch anyone drifting over, giving maximum help to take the Blue Bunker, and that Purple reinforcement hex right behind it. Our Hero Spaulding is back there also, so I think between the two of them, that should clear that middle. I’ll have to use my Actions to work on the Red Bunker which, I’ll be honest, has been a pain in the arse every time I’ve played this game.
I just realized I used the term “injogged,” which I’ve only known from when I studied card magic back when I was a performer. I can’t find a picture, but it’s basically when you push a card in a fan or in a deck slightly toward you so it sticks out a little bit so it can easily be found with the thumb. In the reference above, I’m using it to say the General’s sphere of influence will be sticking out a little bit to be used by units near the center.
Again, I’m mixing my metaphors.
Aaaannnyyyway. I need to survive this turn first.
We have more smoke obscuring the beach! This time it’s WN 64 and 65.
*does happy dance*
Want to see which ones are 64 and 65?
That was lucky….very very lucky.
But will the luck hold out as we enter another German Fire Phase?
I haven’t shown what the cards look like in a while, so this is what I drew. And you see we have an Artillery draw, which now that I think about it, I haven’t drawn for a LONG time, if at all since Artillery has been active. Wow. Anyway, let’s do this.
The East Section isn’t worth a picture…..All that happens is Yellow “Ding’s”. Blue is Obscured by smoke, and Brown doesn’t have a Depth marker so doesn’t fire. And the Artillery will only fire if there are 5 total artillery chits in play….which is all of them. And guess what…the Green Bunker is one of them. Which I’ve eliminated. Therefore the Artillery doesn’t fire. Nice.
The West Sector is a different story, however.
On the plus side, only one step is removed from C*D/467, every other shot is a miss (and there aren’t any units in Blue’s field of fire).
And hey, this also means my Engineers are able to clear 2 hexes on each beach! High Tide looks less dangerous all of a sudden. Ain’t that nice!
So I continue to head up into the fields of Normandy, and the Yellow bunker is no more, however I hit a bit of a snag with the Red Bunker. While it only has a Strength of 1, it requires BG, which none of the units surrounding it has. That means I can only Disrupt it, never Eliminate it. The closest unit that does have a Bangalore Torpedo is two hexes to the West that I have planned to help on that Beach (and is under the command of the West) soooo….I’m not sure what to do now. Even the units on top of the Bluff who is trying to take down the Blue Bunker wont be able to hop down and save the day as those two units don’t have BG either! Hrmph. Okay, have to do some thinking here. But on to the West Beach.
So we have another successful tank Barrage (I didn’t draw the smoke!) and our hero is scaling the Bluffs to finish the Bunker off….maybe. I was able to take out the lower Yellow bunker, while up top the Depth marker was taken out by a joint attack by the Tank and Infantry. I used both Actions to do a joint attack on the lower Brown Bunker. Since the Depth marker was already revealed, I was able to do a “Disrupted with Optional Attrition” result, which meant I could remove a step from one attacker to remove the Depth Marker, even though I didn’t have the proper weapons on the chit. Since the unit was so devastated it was already considered a casualty, I removed H/2/116 like I said I’d do last turn. This will let me Eliminate it using only E/2/116 as long as a new Depth marker doesn’t appear in the interim.
As we hit 8:45, our Landing Checks aren’t eventful, because the ONLY unit hitting the beach is General Wyman, and he is not affected by the tides.
Which I’m sure he reminds people all the time. Egomaniac.
(And I just did that for laughs, you historians out there, please don’t start messaging me about how humble he was or anything like that.)
ANYWAY.
We won’t be seeing any new units until turn 13, either, so we’ve got to work with what we have right now. Which is a little frightening, to be honest. You kind of rely on the steady wave of units to keep backing up the other units, but when that wave is over? Can that pressure remain?
Oh.
Oh crap.
This is going to be a deadly turn. Yes, it’s turn 11. Were it turn 10, the Germans would merely gain a Depth marker. And while that’s annoying, it’s not nearly as bad as what might transpire here. Hoo boy.
I guess the Germans saw the break in the wave of Allies and see that this is their only hope to drive them back into the waters, and desperation strikes, so all the bunkers alight in a wave of death.
*sigh*
I apologize for the inconsistency where sometimes these pictures are taken before I change the status of the chits and sometimes it’s taken after.
So some of my artillery is damaged if they were in the kill zone, and luckily the Blue drawing didn’t have a star symbol on it, because if it did, our General would have been flipped to the Wounded side. Not a great way to enter combat. Biggest hit was K/3/16 there at the Southern most hex getting wiped out. Hrmph.
For the first time, I can say West Beach had better luck. Yellow only fired if it had two chits (double bunker or a depth marker) and it’s a single chit bunker at the moment, so no fire there, and the Blue Bunker fired, but there’s nothing in it’s field of fire, so nothing there. Only Red fired, blowing up some Artillery, which is sad, but hey, with everything else that could happen, I’ll take it.
For the Engineers, they could totally clean up East Beach if we can get Purple out of the picture. West Beach is still a mess. And no hexes can be cleared this turn.
With the arrival of the General I split into two groups, sending L/3/16 and the HQ to take out the Purple Bunker, while the General leads the rest to clean out the Western half. Spalding’s men successfully take out the Purple reinforcements, I’m lucky because they needed “FL” which is flanking, meaning they needed to be attacked from to different units that weren’t adjacent to each other, but the Hero counts as one weapon, and he counted as FL for this case. F/2/116 and F/2/16 attacked the Blue Bunker, 2-BZ was no problem, but the Depth marker required “NA,” which is Naval Artillery. Riiiiight. You only get that with an event card. So I can defeat that with “Optional Attrition” or with a Hero. I didn’t want to use Optional Attrition, so I’m going to have the F/2 duo head South while Spalding heads West to deal with that Bunker.
Since the Red Bunker is proving a pain, I had D/1/6 also head south so it wasn’t staring at that full dot and have them go up the bluff to help attack the Bunker up top. You can attack DOWN a bluff without penalty, so that could be fun, though it still doesn’t help against the lack of BG.
The Eastern side of West Beach is a flurry of Activity under Gen Cota, but I’m having trouble on the other side as the HQ only has unarmored Artillery nearby, and they can’t do anything if they are in the field of fire of undisrupted Germans. Morse is topside now, though, so here’s hoping he’s able to get Purple out of the way and allow those two units to move more freely and get them up that draw. You can also see on the left side of the picture the unit climbing the bluff ready to help East Beach with the BG problem. Though now that I’m looking at it, why did I have them climb? The BG is the lower bunker!
Um…..radio static must have gotten to them. Yeah, that’s it.
Anyway, the beginning of the 9:00 turn (Turn 12) is uneventful as there are no units hitting the beach. There are no units lining up for next turn either. Little scary.
We get a slightly different Event this time, though “Place a German Reinforcement in Zone E.” In Zone E, there’s one hex within 2 spaces of a US unit, so here we go:
Those 2 “E” spaces are equidistant from E-F/5R, but the Yellow hex is E1, a lower number, so it takes precedence. Luckily that doesn’t put that Ranger unit immediately in its field of fire, but does keep me from snagging that VP right away. Hrmph.
And…..
Guess what….
NO UNITS WERE HARMED DURING THE GERMAN FIRE PHASE!
Yellow Red and Green were drawn for East. Yellow is gone. Green is gone. Red fired on two Triangle Units, but needed Diamond to wound. West drew Yellow, Red and Brown. Yellow is gone. Red fired on Diamond and Circle but needed Triangle. Brown needed a Depth marker to fire, but is missing it.
Huzzah!
*rejoicing gif*
Still can’t do anything on my Engineering Phase, however, as these bunkers still have a field of fire over the beach, so the Engineers know better than to stick their heads out there. But still, I call that a good turn.
No attacks made on the East Beach except for a failed Barrage (though had I been going for the top Bunker without the Depth marker, I would have been able to disrupt it. Just a lot of movement to clean up the rest of the bunkers. You’ll notice I can’t move any of the Artillery/tanks over the Shingle. That’s because I don’t have any Engineer units on the beach yet to flatten the land enough to let them hop over, so they have to wait on the edge. You also see the Climb Cliff marker over there. It’s like the other Climb marker you saw, but since it’s a bigger border it’s crossing, next turn it’ll actually move into the hex it was moving into (as a free action) and flip the Climb Cliff marker to a basic Climb marker, and then the NEXT turn remove it for free. Then it’ll be able to do stuff. It’s slow going but it only costs one Action to get it started and I wanted it off the beach before High Tide came in.
Similar experience on West Beach as most units were setting themselves up for further attacks. Though Purple Bunker was taken out by Morse and his gang. I also chose to use an action to bring more Artillery off of the beach and get them closer to the action and away from possible High Tide problems in the future.
9:15 and all is?
Well?
Again nothing lands in this quarter hour, but at least I get to set up a few Artillery units to land next turn. These were the Units that were “Delayed 3 turns” back in turn 10.
Oof. Our Event has us placing German Reinforcements in Zone A, D and F. Looks like the call for help is getting heard and they are mobilizing. Inland Normandy just got a bit more interesting.
One of those new Reinforcements got to fire right away, but luckily had the wrong symbol. Unfortunately the Red Bunker fired and completely wiped out D/1/16 brining our casualty count to 5 on East Beach, tied with West Beach. Oh, and it looks like there’s a small error with the picture, the third firing line for Red Bunker should be pointed at L/3/116 because it has more steps than A/1/16. Doesn’t matter, though, since neither would be wounded by the shots as only Triangles would get damage.
Another good draw here as that’s the only bunker that fires, and it doesn’t wound anything.
Engineers are still unable to do anything as nothing much changed last turn, so we hop right to the US Action Phase.
Hoo boy, hit some snags here. First, the Purple Bunker had a Strength of 3, so L/3/16 running up the Bluff there bounced off since it was effectively going against a Strength 6 Bunker. It’ll need to either spend a turn going up the bluff behind it and attack it on even ground, or get help from M/3/16. Speaking of them, they poked the Red Reinforcements who need Bazookas to be taken out, but luckily were only Strength 1 so were Disrupted. I decided to use the Optional Attrition to have F/2/16 lose a Step and have the Depth Marker removed from the Blue Bunker because I needed SOMETHING destroyed because the Red Bunker required BG and BZ, which B/1/16 did not have together. Neither did L/3/116, so it will only be destroyed by a joint attack. Dangit. That Red Bunker is a pain in the arse.
West Beach was a bit more successful. Gen Cota has his units racing up the center, hoping to do a sweep around Draw D-3 to take out the WN on the southern tip of that objective. Morse blows up the Blue Bunker after it pulls up a Reinforcement token as its Depth Marker (you can see it there in the Yellow hex right above him). The only difficult spot was the 3 strength chit on the Red Bunker causing even the joint attack between A/1/116 and the tank 2/B/743 to fail pretty spectacularly, causing the Infantry to become Disrupted. That means next turn they’ll do nothing but remove their Disrupted token, which means they won’t be able to help in the attack against the Green Bunker. I was hoping 4 Strength would have been enough to at least look and see what Red was showing…but NOPE. What is it with Red Bunkers? JEEZ.
Thus ends Turn 13, we now enter the Penultimate turn of the first part of the game or “The First Wave.” You could play this as its own game. In fact I have, several times. I’ll keep going for the full experience, of course, but victory is hanging by a wire.
What is Victory? Why, Victory Points! What game is complete without Victory Points!
Well, lot’s of them, of course.
But this one has VP.
You earn VP by controlling WN positions, controlling German Reinforcement positions and a ton of points for Controlling Draws. Of course, to control a draw you need to Control every single hex in that draw.
Control is defined as being in a hex with a US unit or adjacent to one AND you can trace a line all the way back to the beach that doesn’t cross a German field of fire and/or a bluff/cliff. There are a few stipulations (Units down to one step and Artillery without armor don’t have control of adjacent spaces) but that’s the basics. So getting a Draw is a big freaking deal for VP.